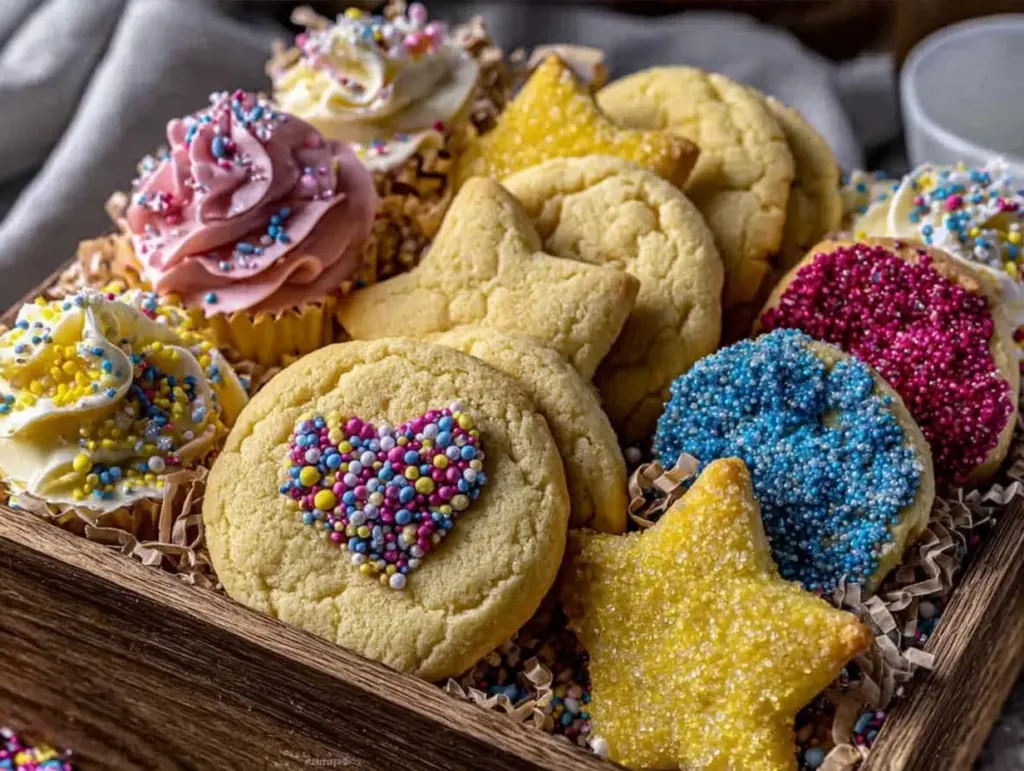
“Hey, do you have any ideas for a last-minute gift?” That text popped up from my neighbor just as I was cleaning up after a lazy Sunday baking session. Honestly, my kitchen was already a mess, but I had just wrapped up assembling what I now call my Perfect Cookie Decorating Kit in a Box Homemade Gift Set. I sent back a quick photo of the colorful box packed with cookie cutters, icing tubes, sprinkles, and edible glitter. A few days later, she told me it was the hit of her neighborhood cookie swap.
I never thought putting together a cookie decorating kit would turn into such a satisfying little project. It started from a moment of pure chaos when I realized I forgot to buy a gift for a friend’s birthday party. With just a few pantry staples and some leftover decorating supplies, I threw together a fun kit that felt thoughtful and creative without too much fuss. Honestly, it was the kind of gift that made everyone smile, not because it was perfect, but because it showed a bit of homemade love.
Since then, I’ve found myself making these kits regularly—tweaking the contents, adding seasonal touches, and wrapping them up for birthdays, holidays, or even as a fun surprise for my own kids on a rainy day. There’s something quietly joyful about handing over a little box that invites creativity and sweet memories. If you’re looking for a gift that’s easy to assemble, budget-friendly, and endlessly fun, this Perfect Cookie Decorating Kit in a Box Homemade Gift Set might just become your go-to.
What stuck with me the most? How a simple collection of cookie decorating essentials can spark a whole afternoon of laughter and connection. It’s not just a kit; it’s a tiny invitation to slow down, get a little messy, and enjoy the simple pleasure of decorating cookies together.
Why You’ll Love This Recipe
Coming from my many experiments in the kitchen—and yes, some kits that were less than stellar—this cookie decorating kit has been carefully curated to balance fun and functionality. It’s the kind of gift that’s been tested by kids, parents, and even a few skeptical adults who ended up getting totally hooked.
- Quick & Easy: You can gather everything and assemble the kit in under 30 minutes, perfect for those last-minute gift emergencies.
- Simple Ingredients & Supplies: No need for specialty stores. Most items come from your pantry or a local craft store.
- Perfect for Parties & Gatherings: Whether it’s a birthday, holiday, or just a cozy afternoon, this kit encourages shared moments and creativity.
- Crowd-Pleaser: Kids and adults alike love the hands-on fun of decorating cookies, making this a universally appreciated gift.
- Unbelievably Charming: The combination of vibrant icing colors, fun sprinkles, and cute cookie cutters makes the experience feel special without stress.
This isn’t just any cookie decorating kit. The thoughtful selection of tools—like fine-tipped icing tubes for precision, a variety of sprinkles from nonpareils to sanding sugar, and themed cookie cutters—makes it stand apart from the usual generic sets. Plus, including a simple recipe card with my favorite sugar cookie recipe adds a personal touch that turns the kit into an experience, not just a box of supplies.
Honestly, it’s the kind of gift you’ll want to keep for yourself after giving it away once. It’s cozy, crafty, and surprisingly comforting. If you’ve ever enjoyed the delicate sweetness of a well-decorated cookie or the satisfied grin after a decorating session, you know exactly why this kit works.
What Ingredients You Will Need
This cookie decorating kit is built around simple, pantry-friendly ingredients and a handful of decorating supplies that combine ease and charm. You don’t need a fancy baking aisle haul—just thoughtfully chosen basics that come together to create something sweet and fun.
- For the Sugar Cookies:
- All-purpose flour (about 3 cups / 375g) – choose a trusted brand like King Arthur for best results
- Unsalted butter, softened (1 cup / 227g) – adds richness and tenderness
- Granulated sugar (1 cup / 200g) – sweetness without overpowering
- Large eggs (2, room temperature) – for binding and moisture
- Pure vanilla extract (1 tsp / 5ml) – essential for flavor depth
- Baking powder (1 tsp / 5g) – for a light, tender crumb
- Salt (¼ tsp / 1.5g) – balances sweetness
- For the Icing & Decoration:
- Royal icing mix or homemade royal icing ingredients (powdered sugar, meringue powder, water)
- Food coloring gels in various vibrant colors (red, blue, yellow, green) – gels give bright colors without thinning the icing
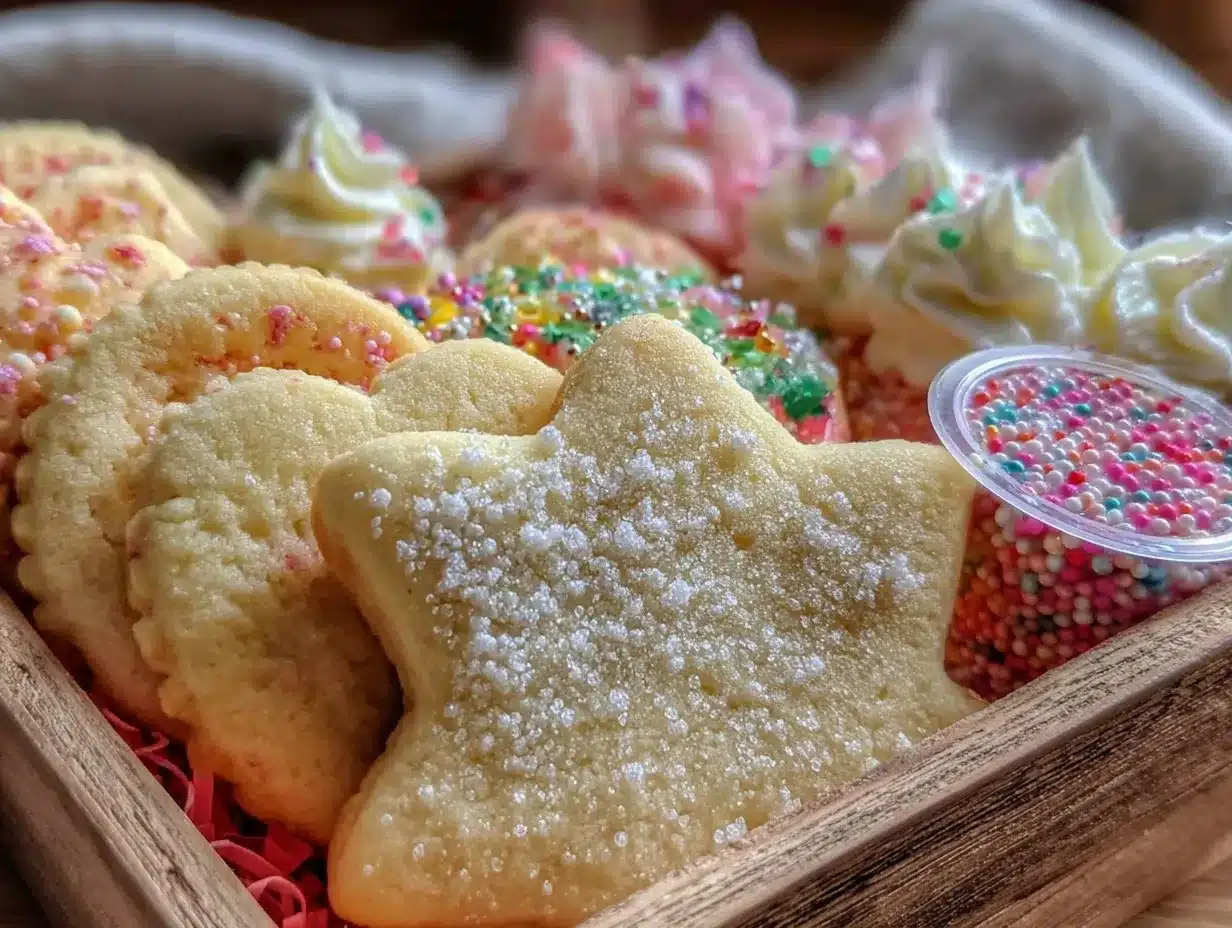
- Assorted sprinkles (nonpareils, sanding sugar, mini jimmies) – pick festive or seasonal mixes
- Edible glitter or shimmer dust – adds a magical touch
- Small piping bags or squeeze bottles – for easy icing application
- Plastic wrap or small airtight containers – for storing leftover icing
- For the Kit Assembly:
- Cookie cutters (variety of shapes, seasonal or classic) – metal or sturdy plastic
- Decorating tools like small offset spatulas or toothpicks – handy for fixing details
- Recipe card with baking and decorating instructions – adds personal flair
- Decorative box or reusable container – something sturdy and pretty to hold it all
- Ribbon, tags, or labels – for that finishing touch
Pro tip: I often swap out the royal icing for a simple buttercream glaze when I want a softer finish, and it’s great for kids to spread with a knife instead of piping. For gluten-free friends, almond flour or a gluten-free all-purpose blend works well in the sugar cookie base. And if you’re aiming for a vegan kit, swapping eggs for a flaxseed “egg” and using dairy-free butter keeps things inclusive.
Equipment Needed
- Mixing bowls – medium and large sizes for dough and icing
- Electric mixer or stand mixer – makes creaming butter and beating icing easier
- Measuring cups and spoons – accuracy counts, especially with baking powder and salt
- Rolling pin – a smooth, even roll sets the stage for perfectly shaped cookies
- Baking sheets lined with parchment paper or silicone mats – prevents sticking and makes cleanup easier
- Cooling racks – cookies need to cool completely before decorating
- Squeeze bottles or piping bags with small round tips – for precise icing work; I’ve found that disposable bags with couplers make cleanup less of a hassle
- Small spatulas or butter knives – handy for spreading icing or fixing mistakes
- Storage container or gift box – something with compartments or dividers works best to keep decorations separate
If you don’t have a stand mixer, a sturdy hand mixer works just fine—just be patient when creaming butter and sugar. And for rolling pins, a wine bottle can be a great substitute in a pinch (though it’s harder to get an even thickness). I keep a few extra piping bags on hand because sometimes the first bag springs a leak at the worst moment—lesson learned the hard way!
Preparation Method
- Make the Dough (15-20 minutes): In a large mixing bowl, cream together 1 cup (227g) softened unsalted butter and 1 cup (200g) granulated sugar until light and fluffy, about 3-4 minutes using an electric mixer. Add 2 large eggs, one at a time, beating well after each addition. Stir in 1 teaspoon (5ml) vanilla extract.
- Combine Dry Ingredients: In a separate bowl, whisk together 3 cups (375g) all-purpose flour, 1 teaspoon (5g) baking powder, and ¼ teaspoon (1.5g) salt. Gradually add the dry ingredients to the wet mixture, mixing on low speed until just combined. The dough will be slightly crumbly but should hold together when pressed.
- Chill the Dough (at least 1 hour): Divide the dough into two discs, wrap each in plastic wrap, and refrigerate. Chilling firms the dough, making it easier to roll and helping cookies keep their shape during baking.
- Preheat Oven & Prepare Baking Sheets: Set your oven to 350°F (175°C). Line baking sheets with parchment paper or silicone baking mats.
- Roll and Cut Cookies (10-15 minutes): On a lightly floured surface, roll out one disc of dough to about ¼ inch (6 mm) thickness. Use cookie cutters to cut shapes, placing them about 1 inch (2.5 cm) apart on the baking sheets.
- Bake (8-10 minutes): Bake cookies until the edges are just starting to turn golden—watch closely to avoid overbaking. Remove from oven and cool on the baking sheets for 5 minutes before transferring to cooling racks to cool completely.
- Prepare the Royal Icing: Mix royal icing according to package instructions or whip up a homemade batch with powdered sugar, meringue powder, and water until you get a smooth, pipeable consistency. Divide icing into small bowls and tint with food coloring gels. Transfer to piping bags or squeeze bottles.
- Decorate & Dry: Pipe outlines first, then flood the cookie centers with thinned icing. Use toothpicks or small spatulas to spread and fix details. Add sprinkles or edible glitter while icing is still wet. Let cookies dry for several hours or overnight for the best finish.
- Assemble the Kit: Place cookie cutters, icing tubes, sprinkles, decorating tools, and the recipe card into your decorative box. Wrap with ribbon and add a personalized tag.
Pro tip: If you’re packaging the kit as a gift, include a note about chilling the dough for the best rolling experience and a reminder to let the cookies dry fully before stacking or storing. I’ve found that a little guidance helps recipients feel confident and less intimidated.
Cooking Tips & Techniques
One thing I learned the hard way is that the thickness of your rolled dough really makes a difference in decorating success. Too thin, and cookies can brown too fast or break; too thick, and they won’t crisp nicely. I aim for about ¼ inch (6 mm)—it’s the sweet spot for sturdy, yet tender cookies.
When mixing royal icing, patience is key. Sometimes the consistency looks perfect but it’s actually too runny or thick. A quick test on parchment paper helps: pipe a line and watch if it holds shape without pooling. Adjust with tiny amounts of water or powdered sugar.
Multitasking helps—while cookies bake, I prepare icing and sort sprinkles. This keeps the momentum going, especially if you’re assembling multiple kits. Also, labeling piping bags with colors prevents mix-ups and speeds up decorating.
A common mistake is skipping the chilling step for the dough. I’ve tried baking unchilled dough in a pinch, but the cookies spread too much and lose their shape. So, don’t skip it if you want crisp edges and clean cutter lines.
For icing application, start with outlines and let them set for a few minutes before flooding the centers. This prevents colors from running together. And if you’re decorating with kids, keep some toothpicks handy—they’re great for fixing tiny errors or creating fun patterns.
Variations & Adaptations
This cookie decorating kit is a blank canvas that you can adapt easily depending on the occasion or dietary needs.
- Seasonal Themes: Swap cookie cutters based on holidays or seasons—hearts for Valentine’s Day, pumpkins for fall, or snowflakes for winter. Adding themed sprinkles and icing colors makes the kit feel extra special.
- Gluten-Free Option: Use a gluten-free all-purpose flour blend for the cookie base. The texture might be slightly different but still delicious and perfect for those with sensitivities.
- Vegan Adaptation: Replace butter with a plant-based alternative, swap eggs for flax eggs (1 tbsp ground flaxseed + 3 tbsp water per egg), and use dairy-free food coloring and sprinkles.
- Buttercream Icing: Instead of royal icing, include ingredients for a simple buttercream glaze—powdered sugar, dairy or non-dairy butter, and milk. It’s softer, easier for kids to spread, and has a melt-in-your-mouth feel.
- Personalized Decorating Tools: Add edible markers, stencils, or small brushes for painting with food coloring to encourage artistic fun beyond traditional piping.
One variation I tried was making a “cookie decorating date night” kit for friends, including mini bottles of wine and a playlist. It turned a simple gift into a memorable evening, combining my easy no-bake dessert with decorating fun.
Serving & Storage Suggestions
Cookies from this decorating kit are best served fresh but can keep well if stored properly. I recommend letting decorated cookies dry completely—ideally overnight—before stacking. Store them in an airtight container at room temperature for up to 5 days.
If you want to keep them longer, place layers separated by parchment paper in an airtight container, and freeze for up to 3 months. Thaw at room temperature before serving; the icing may soften slightly but the flavor stays intact.
Serving tip: Arrange decorated cookies on a festive platter with a cup of tea or coffee. For a brunch spread, pairing with items like spinach and feta croissant bake creates a balanced sweet and savory experience.
Flavors develop subtly over time; some find cookies even more flavorful after a day or two as the vanilla deepens and the sugar melds. Just keep an eye on delicate decorations if storing long term.
Nutritional Information & Benefits
A typical decorated sugar cookie (about 2.5 inches / 6 cm) contains roughly 150-180 calories, with 7-9 grams of fat, 20-25 grams of carbohydrates, and 1-2 grams of protein. Of course, these numbers vary depending on icing and decorations.
Using real butter and fresh eggs adds wholesome quality compared to processed alternatives. Vanilla extract contributes aroma without added sugar. Gluten-free or vegan adaptations allow this kit to fit various dietary needs.
While these cookies are a treat, the joy of decorating and sharing really contributes to wellness too—there’s something nourishing about creative play and connection. I often think of cookie decorating as a little edible mindfulness break.
Conclusion
This Perfect Cookie Decorating Kit in a Box Homemade Gift Set has become a little treasure in my gift-giving arsenal. It’s easy to pull together, personal, and invites moments of joyful creativity that are rare to find in store-bought gifts. Whether you’re crafting kits for kids, friends, or coworkers, it’s a sweet way to share a bit of homemade fun.
Feel free to customize the colors, cookie shapes, and decorating supplies to suit your style and the recipient’s taste. I love how this kit turns simple ingredients into shared memories—and yes, it’s totally okay to keep one for yourself!
If you try assembling your own kit, I’d love to hear how it goes or what personal touches you add. Sharing these small but meaningful projects makes the whole process even sweeter.
FAQs About the Perfect Cookie Decorating Kit
What are the best cookie cutters to include in the kit?
Choose a mix of classic shapes like stars, hearts, and circles, plus seasonal or themed cutters depending on the occasion. Metal cutters tend to give cleaner edges, but sturdy plastic ones are safer for kids.
Can I include pre-baked cookies in the kit?
Absolutely! Including a batch of pre-baked, cooled sugar cookies lets the recipient start decorating right away, which is especially great for kids or busy friends.
How do I keep the royal icing from drying out in the kit?
Package icing in airtight squeeze bottles or small containers with tight lids. Adding a damp paper towel inside the container can help maintain moisture during storage.
Is it okay to use store-bought icing tubes instead of homemade royal icing?
Yes, store-bought tubes work fine and save time. Just make sure they’re a good quality, and consider adding extra decorating supplies like sprinkles for variety.
What’s the best way to package the kit for gifting?
A sturdy box with compartments or a reusable tin works well. Wrap with clear cellophane and a ribbon for a polished look, and include a recipe card or decorating tips for a personal touch.
Pin This Recipe!
Perfect Cookie Decorating Kit Homemade Gift Set

A thoughtfully curated cookie decorating kit that includes a simple sugar cookie recipe, decorating supplies, and tools, perfect for gifting and creative fun for all ages.
- Prep Time: 20 minutes
- Cook Time: 10 minutes
- Total Time: 1 hour 30 minutes
- Yield: About 24 cookies 1x
- Category: Dessert
- Cuisine: American
Ingredients
- 3 cups (375g) all-purpose flour
- 1 cup (227g) unsalted butter, softened
- 1 cup (200g) granulated sugar
- 2 large eggs, room temperature
- 1 teaspoon (5ml) pure vanilla extract
- 1 teaspoon (5g) baking powder
- 1/4 teaspoon (1.5g) salt
- Royal icing mix or homemade royal icing ingredients (powdered sugar, meringue powder, water)
- Food coloring gels (red, blue, yellow, green)
- Assorted sprinkles (nonpareils, sanding sugar, mini jimmies)
- Edible glitter or shimmer dust
- Small piping bags or squeeze bottles
- Plastic wrap or small airtight containers
- Cookie cutters (variety of shapes, metal or sturdy plastic)
- Decorating tools (small offset spatulas or toothpicks)
- Recipe card with baking and decorating instructions
- Decorative box or reusable container
- Ribbon, tags, or labels
Instructions
- Make the Dough (15-20 minutes): Cream together 1 cup (227g) softened unsalted butter and 1 cup (200g) granulated sugar until light and fluffy, about 3-4 minutes using an electric mixer. Add 2 large eggs, one at a time, beating well after each addition. Stir in 1 teaspoon (5ml) vanilla extract.
- Combine Dry Ingredients: In a separate bowl, whisk together 3 cups (375g) all-purpose flour, 1 teaspoon (5g) baking powder, and 1/4 teaspoon (1.5g) salt. Gradually add the dry ingredients to the wet mixture, mixing on low speed until just combined. The dough will be slightly crumbly but should hold together when pressed.
- Chill the Dough (at least 1 hour): Divide the dough into two discs, wrap each in plastic wrap, and refrigerate.
- Preheat Oven & Prepare Baking Sheets: Set oven to 350°F (175°C). Line baking sheets with parchment paper or silicone baking mats.
- Roll and Cut Cookies (10-15 minutes): On a lightly floured surface, roll out one disc of dough to about 1/4 inch (6 mm) thickness. Use cookie cutters to cut shapes, placing them about 1 inch (2.5 cm) apart on the baking sheets.
- Bake (8-10 minutes): Bake cookies until edges just start to turn golden. Remove from oven and cool on baking sheets for 5 minutes before transferring to cooling racks to cool completely.
- Prepare the Royal Icing: Mix royal icing according to package instructions or make homemade royal icing with powdered sugar, meringue powder, and water until smooth and pipeable. Divide icing into small bowls and tint with food coloring gels. Transfer to piping bags or squeeze bottles.
- Decorate & Dry: Pipe outlines first, then flood cookie centers with thinned icing. Use toothpicks or small spatulas to spread and fix details. Add sprinkles or edible glitter while icing is still wet. Let cookies dry for several hours or overnight.
- Assemble the Kit: Place cookie cutters, icing tubes, sprinkles, decorating tools, and recipe card into decorative box. Wrap with ribbon and add a personalized tag.
Notes
Chill dough for at least 1 hour for best rolling and shape retention. Adjust royal icing consistency by adding small amounts of water or powdered sugar. Label piping bags with colors to avoid mix-ups. For gluten-free, use gluten-free flour blend; for vegan, substitute butter and eggs accordingly. Let decorated cookies dry overnight before storing. Store in airtight container up to 5 days or freeze up to 3 months.
Nutrition
- Serving Size: One decorated sugar
- Calories: 165
- Sugar: 12
- Sodium: 90
- Fat: 8
- Saturated Fat: 5
- Carbohydrates: 22
- Fiber: 0.5
- Protein: 2
Keywords: cookie decorating kit, sugar cookies, homemade gift, cookie decorating, royal icing, sprinkles, cookie cutters, easy baking, holiday gift, DIY gift


