“You know that feeling when you’re halfway through fixing a leaky faucet, and suddenly your neighbor’s dog starts barking like crazy? Yeah, that happened to me last Tuesday afternoon. I was elbow-deep in pipes when Mrs. Jenkins popped over with a plate of these irresistible white chocolate raspberry thumbprint cookies. Honestly, I wasn’t expecting much—just a quick hello and maybe a cookie to sweeten the day. But the moment I bit into one, I was hooked. The buttery cookie, the burst of tangy raspberry, and that creamy white chocolate center—it all came together in a way that made me forget about plumbing chaos for a while.
It’s funny how the simplest recipes can sneak up on you. I mean, thumbprint cookies aren’t new, but this version—oh, it’s something else. I remember making a mess trying to recreate them later that night in my tiny kitchen, flour everywhere, and the oven timer ringing just as my phone buzzed. Maybe you’ve been there, too, chasing a recipe that turns out better than you imagined despite the kitchen chaos. These cookies have stuck with me ever since, a perfect blend of sweet and tart that’s just the right kind of comforting. Let me tell you, once you try these, you’ll find yourself reaching for them again and again—the kind of treat that feels homemade, heartwarming, and a little bit fancy all at once.
Why You’ll Love This Recipe
From my countless baking trials and friendly taste tests, these white chocolate raspberry thumbprint cookies have earned a special spot in my recipe box. Here’s why you’ll want to make them ASAP:
- Quick & Easy: Comes together in under 30 minutes—perfect for last-minute cravings or a sweet weekend project.
- Simple Ingredients: No need for exotic items; you probably have most of these in your pantry already.
- Perfect for Gatherings: Whether it’s a cozy afternoon tea or a festive potluck, these cookies impress without fuss.
- Crowd-Pleaser: Kids adore the fruity surprise, and adults can’t get enough of the white chocolate melt.
- Unbelievably Delicious: The buttery cookie base pairs beautifully with the tart raspberry jam and luscious white chocolate—comfort food with a fresh twist.
What sets this recipe apart? The trick is in the dough’s texture—it’s soft yet sturdy enough to hold that classic thumbprint without cracking. Plus, blending in a touch of almond extract adds subtle depth. I also use a quality white chocolate that melts smoothly, creating that irresistible creamy center. Honestly, it’s the kind of recipe that makes you close your eyes after the first bite, savoring every morsel. It’s comfort food reimagined—simple, satisfying, and just a little bit special.
What Ingredients You Will Need
This recipe uses simple, wholesome ingredients to deliver bold flavor and satisfying texture without the fuss. Most are pantry staples, and if you ever need to swap something out, I’ve got you covered.
- Unsalted butter, softened (adds richness and tenderness)
- Granulated sugar (for sweetness and slight crispness)
- Large egg yolk, room temperature (helps bind and adds richness)
- Pure vanilla extract (for warm, familiar flavor)
- Almond extract, just a touch (optional but highly recommended for depth)
- All-purpose flour (I prefer King Arthur for consistent texture)
- Salt, a pinch (balances sweetness)
- Raspberry jam (seedless or your favorite brand; fresh or homemade works great too)
- Good quality white chocolate chips or chunks (Ghirardelli or Lindt melt beautifully)
Substitution notes: For a gluten-free version, swap all-purpose flour with a 1:1 gluten-free baking flour blend. If dairy is a concern, use plant-based butter alternatives and dairy-free white chocolate. In summer, fresh raspberries can be gently stewed to create a quick jam substitute. I once tried swapping almond extract for lemon zest—nice, but the almond’s subtle nuttiness really makes these cookies sing.
Equipment Needed
- Mixing bowls (one large for dough)
- Electric hand mixer or stand mixer with paddle attachment (makes creaming butter easier)
- Baking sheet lined with parchment paper or silicone mat (prevents sticking and ensures even baking)
- Measuring cups and spoons (precision matters)
- Small cookie scoop or tablespoon (for uniform cookie sizing)
- Teaspoon or your thumb (to create the indentations)
- Cooling rack (to let cookies cool evenly)
If you don’t have a mixer, no worries—hand mixing works fine, though it takes a little more elbow grease. For the indentations, I prefer using my thumb because you get a nice, natural shape, but a teaspoon works just as well (just be sure to dip it in flour or water to prevent sticking). Investing in a silicone baking mat is worth it; it makes cleanup a breeze and cookies bake more evenly. Cheap parchment paper works, too, but can sometimes wrinkle or shift.
Preparation Method

- Preheat your oven to 350°F (175°C). Line a baking sheet with parchment paper or a silicone baking mat. This step sets you up for success and cleanup ease. (5 minutes)
- Cream the butter and sugar: In a large bowl, beat 1 cup (227 g) softened unsalted butter with 2/3 cup (135 g) granulated sugar until light and fluffy—about 3-4 minutes with a mixer on medium speed. This aerates the dough for that melt-in-your-mouth texture. If mixing by hand, be patient and scrape the bowl often.
- Add the egg yolk and extracts: Mix in 1 large egg yolk, 1 tsp pure vanilla extract, and 1/4 tsp almond extract (optional) until fully combined. The almond extract is subtle but adds a lovely background note.
- Combine dry ingredients: In a separate bowl, whisk together 2 cups (250 g) all-purpose flour and 1/4 tsp salt.
- Mix dry into wet: Gradually add the flour mixture to the butter mixture, mixing until just combined. Avoid overmixing to keep cookies tender. The dough will be soft but not sticky—if too sticky, chill for 15 minutes.
- Shape the cookies: Use a cookie scoop or tablespoon to portion dough into 1-inch (2.5 cm) balls. Arrange them 2 inches (5 cm) apart on the prepared baking sheet. Now, gently press your thumb or a teaspoon into the center of each ball to create the classic thumbprint indent. Don’t press too hard or the dough might crack.
- Fill the centers: Spoon about 1/2 teaspoon of raspberry jam into each thumbprint. Don’t overfill, or the jam may spill over while baking.
- Bake: Place the baking sheet in the oven and bake for 12-14 minutes, until the edges are just golden and the dough looks set. The jam will bubble slightly but shouldn’t burn. If you notice the jam darkening too quickly, tent the cookies loosely with foil after 10 minutes.
- Add white chocolate: Immediately after removing cookies from the oven, press 3-4 white chocolate chips or chunks into the warm jam. The heat will gently melt the chocolate, creating that signature creamy center.
- Cool: Allow the cookies to cool on the baking sheet for 5 minutes, then transfer to a wire rack to cool completely. This helps the cookies set up and prevents sogginess.
Pro tip: If your kitchen’s warm, chilling the dough briefly before baking helps maintain shape. Also, keep a damp cloth nearby—you’ll thank me when you’re wiping jam off your fingers!
Cooking Tips & Techniques
Let me share a few tricks I’ve learned the hard way. First, don’t rush the creaming step. Taking the time to properly cream butter and sugar makes a noticeable difference in texture. I remember once skipping this step and ending up with dense cookies that felt more like biscuits—not the vibe you want here.
Second, when making the thumbprint indentations, avoid pressing too deep or too forcefully to prevent cracks. If your dough is too warm and soft, pop it in the fridge for 10-15 minutes. It firms up nicely and holds shape better.
Third, watch the baking time carefully. Ovens vary, and those last few minutes can tip cookies from perfectly golden to overdone. Stay close by, and if you see jam bubbling aggressively, tent with foil.
Lastly, the white chocolate addition right after baking is key. The residual heat melts it just enough for creamy goodness without melting the cookie itself. I’ve tried stirring chocolate chips into the dough before baking, but the effect isn’t the same—it loses that gooey charm.
Timing-wise, I often prep the dough in the morning and bake fresh cookies in the afternoon. This way, I can multitask—cleaning up or prepping other dishes—while the dough chills or cookies cool. Trust me, it makes the whole process less hectic.
Variations & Adaptations
- Seasonal twist: Swap raspberry jam for apricot or strawberry in spring and summer, or even fig preserves for a richer fall flavor.
- Dietary swaps: Use gluten-free flour blends to make these cookies gluten-free without losing texture. For dairy-free, replace butter with a high-quality vegan spread and choose dairy-free white chocolate.
- Flavor play: Add a teaspoon of lemon zest to the dough for a bright citrus note that complements the raspberry beautifully. Or sprinkle a tiny pinch of sea salt on top of each cookie before baking to balance sweetness.
- Cooking method: Tried making mini thumbprint cookies with the same dough—they bake faster, around 10 minutes, and make perfect bite-sized treats for parties.
- Personal favorite: One time, I mixed in finely chopped toasted almonds into the dough for extra crunch and nuttiness. It was a hit and gave the cookies an unexpected texture.
Serving & Storage Suggestions
These cookies are best served at room temperature when the white chocolate center is soft but set. For a cozy afternoon, pair them with a cup of hot tea or coffee—the tartness of raspberry balances beautifully with the creamy drink.
If you’re serving at a party, arrange them on a pretty platter with fresh raspberries and a dusting of powdered sugar for a lovely presentation. They also make thoughtful homemade gifts packed in a decorative tin.
To store, keep them in an airtight container at room temperature for up to 3 days. If you want to keep them longer, freeze the baked cookies in a single layer on a baking sheet, then transfer to a freezer-safe container for up to 2 months. Thaw at room temperature before serving.
Reheating? A quick 10-second zap in the microwave softens the white chocolate again, making them taste freshly baked. Just don’t overdo it, or the cookie gets too soft.
Flavors develop nicely overnight, with the jam soaking slightly into the cookie, making the next day’s batch even tastier. If you’re a fan of letting desserts rest, this one rewards patience.
Nutritional Information & Benefits
Each cookie contains approximately 150-170 calories, with around 8 grams of fat and 18 grams of carbohydrates. The raspberry jam adds natural fruit sugars and a touch of fiber, while the white chocolate contributes sweetness and a creamy texture.
Using real butter and quality chocolate means you’re getting some beneficial fats, and raspberries bring antioxidants and vitamin C to the table. Opting for seedless jam can help with texture if you prefer smooth centers.
For those watching carbs, you can reduce sugar by using a low-sugar jam or homemade fruit spread. Gluten-free flour blends help accommodate dietary restrictions without compromising flavor.
From a wellness perspective, these cookies are the kind of treat that balances indulgence with simple ingredients—perfect for when you want something homemade and satisfying without overcomplicating your day.
Conclusion
So, why should you make these white chocolate raspberry thumbprint cookies? Because they’re the kind of homemade treat that feels like a warm hug—simple, sweet, and just a little bit special. Whether you’re baking for yourself, family, or friends, these cookies are easy to customize and hard to resist.
I love this recipe because it brings back that joyful, slightly messy experience of baking with unexpected rewards—like the time I forgot to set my timer and only caught the cookies just in time. It’s proof that a little imperfection can make the process more fun and the results even sweeter.
Give these cookies a try, tweak them with your favorite flavors, and don’t forget to share how they turned out. Comments, stories, or even your own variations—I’d love to hear what you come up with. Happy baking, and may your kitchen be filled with sweet moments!
FAQs
Can I use frozen raspberries instead of jam?
Frozen raspberries can work if you make a quick compote by gently cooking them down with a bit of sugar until thickened. Let it cool before adding to the cookie indentations to avoid spreading.
How do I prevent the cookies from spreading too much?
Make sure your butter is softened but not melted, and chill the dough for 15-30 minutes before baking. Using parchment paper or a silicone mat also helps maintain shape.
Can I make these cookies ahead of time?
Yes! You can prepare the dough and refrigerate it for up to 24 hours before baking. Baked cookies keep well at room temperature for 3 days or can be frozen for longer storage.
What if I don’t have almond extract?
No problem—just leave it out or substitute with a small amount of lemon zest or vanilla extract. The cookies will still taste delicious.
Is it okay to use white chocolate chips instead of chunks?
Absolutely. Chips melt nicely and are easier to portion, but chunks create a more pronounced creamy center. Either works depending on your preference.
Pin This Recipe!

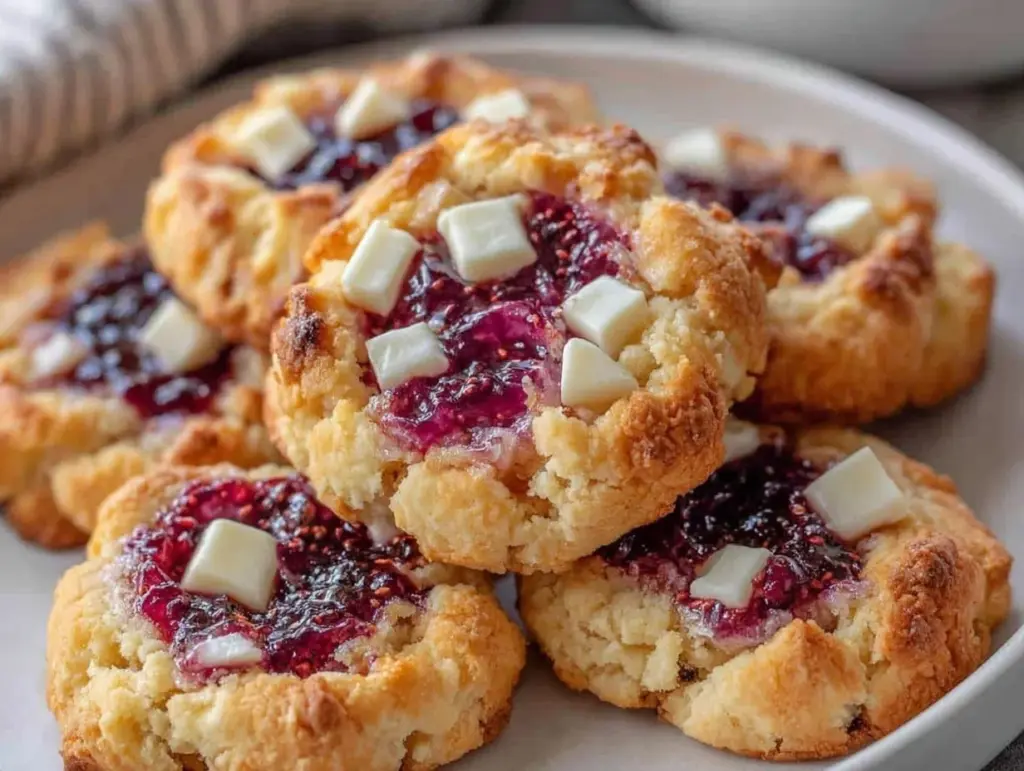
White Chocolate Raspberry Thumbprint Cookies

Buttery thumbprint cookies filled with tangy raspberry jam and topped with creamy white chocolate, perfect for a quick and easy homemade treat.
- Prep Time: 15 minutes
- Cook Time: 14 minutes
- Total Time: 29 minutes
- Yield: 24 cookies 1x
- Category: Dessert
- Cuisine: American
Ingredients
- 1 cup (227 g) unsalted butter, softened
- 2/3 cup (135 g) granulated sugar
- 1 large egg yolk, room temperature
- 1 tsp pure vanilla extract
- 1/4 tsp almond extract (optional)
- 2 cups (250 g) all-purpose flour
- 1/4 tsp salt
- Raspberry jam (seedless or your favorite brand)
- White chocolate chips or chunks (3-4 per cookie)
Instructions
- Preheat your oven to 350°F (175°C). Line a baking sheet with parchment paper or a silicone baking mat.
- In a large bowl, beat softened unsalted butter and granulated sugar until light and fluffy, about 3-4 minutes with a mixer on medium speed.
- Mix in the egg yolk, vanilla extract, and almond extract (if using) until fully combined.
- In a separate bowl, whisk together all-purpose flour and salt.
- Gradually add the flour mixture to the butter mixture, mixing until just combined. Chill dough for 15 minutes if too sticky.
- Use a cookie scoop or tablespoon to portion dough into 1-inch balls. Arrange 2 inches apart on the baking sheet.
- Press your thumb or a teaspoon into the center of each ball to create an indent.
- Spoon about 1/2 teaspoon of raspberry jam into each thumbprint, avoiding overfilling.
- Bake for 12-14 minutes until edges are golden and dough is set. Tent with foil if jam bubbles too much after 10 minutes.
- Immediately after baking, press 3-4 white chocolate chips or chunks into the warm jam to melt.
- Cool on the baking sheet for 5 minutes, then transfer to a wire rack to cool completely.
Notes
Chill dough if too sticky to maintain shape. Use thumb or floured teaspoon for indentations to prevent sticking. Tent cookies with foil if jam bubbles too aggressively. Add white chocolate chips immediately after baking for creamy centers. Dough can be refrigerated up to 24 hours before baking. Store cookies in airtight container at room temperature for up to 3 days or freeze for up to 2 months.
Nutrition
- Serving Size: 1 cookie
- Calories: 160
- Sugar: 12
- Sodium: 55
- Fat: 8
- Saturated Fat: 5
- Carbohydrates: 18
- Fiber: 1
- Protein: 2
Keywords: white chocolate, raspberry, thumbprint cookies, homemade cookies, easy dessert, baking, sweet treats


