“You know that moment when you’re standing in the kitchen, craving something bright and fresh, but all you have are random ingredients from the back of the fridge?” That was me last Thursday evening, wrestling with a half-used lemon and a bowl of berries I’d meant to eat earlier in the week. Honestly, I wasn’t planning to make a lemon curd tart that night — I was just trying to whip up a quick snack. But somehow, as I squeezed that lemon and whisked the curd, the kitchen filled with this zesty aroma that pulled me right in. The crust cracked a little when I blind-baked it (typical me, rushing!), but the final tart? Oh, it was worth every imperfect crumb.
This Perfect Lemon Curd Tart with Fresh Berries has quietly become my go-to dessert for any occasion. Maybe you’ve been there too — stuck between wanting something impressive but easy. This tart hits that sweet spot. I mean, the tang of the lemon curd paired with those juicy, fresh berries is like a little celebration for your taste buds. And no, it’s not just another lemon tart; I’ve played around with the balance until it sings just right.
That evening, I realized this recipe is more than just dessert. It’s a reminder that sometimes the best dishes come from a bit of improvisation and a lot of heart. Plus, the way the tart looks sitting on the table, all golden and bursting with color, makes any gathering feel special. So, let me share the story (and secrets) behind this simple yet stunning lemon curd tart that I keep coming back to — even after a few cracked crusts and berry-stained fingers.
Why You’ll Love This Recipe
From my many attempts and tweaks, here’s why this Perfect Lemon Curd Tart with Fresh Berries stands out:
- Quick & Easy: Comes together in under 1 hour, including chilling time — ideal for last-minute dessert plans or when you just want something sweet but fuss-free.
- Simple Ingredients: No exotic pantry raids needed. Just eggs, lemons, butter, sugar, and fresh berries — things you probably already have or can grab easily.
- Perfect for Any Occasion: Whether it’s a casual brunch, a potluck, or a fancy dinner, this tart fits right in with its fresh, vibrant flavors.
- Crowd-Pleaser: I’ve served this to both kids and adults — and it always disappears fast. The bright citrus cuts through the richness just right.
- Unbelievably Delicious: The custardy, silky lemon curd set in a buttery, flaky crust, topped with fresh berries? It’s a texture and flavor combo that feels like a hug from the inside.
What makes this recipe different? I blend my lemon curd until ultra-smooth before chilling, which gives it that luscious, melt-in-your-mouth consistency. I also use a touch less sugar than most recipes, so the tartness really shines without being overpowering. Plus, the fresh berries on top aren’t just decoration — they add a juicy burst that balances the richness perfectly.
Honestly, this tart isn’t just a dessert; it’s that recipe that makes you close your eyes after the first bite and savor every moment. It’s comfort food with a fresh twist, easy enough for busy cooks but fancy enough to impress guests without stress.
What Ingredients You Will Need
This recipe uses simple, wholesome ingredients to deliver bold flavor and satisfying texture without the fuss. Most are pantry staples, with fresh berries adding a seasonal touch or a splash of color anytime.
- For the Tart Crust:
- 1 ¼ cups (160 g) all-purpose flour
- ¼ cup (50 g) granulated sugar
- ½ teaspoon fine sea salt
- ½ cup (115 g) unsalted butter, cold and cubed (I prefer Kerrygold for its rich flavor)
- 1 large egg yolk, room temperature
- 2 tablespoons ice-cold water (add more if needed)
- For the Lemon Curd Filling:
- 3 large eggs
- 1 cup (200 g) granulated sugar
- ⅔ cup (160 ml) fresh lemon juice (about 3-4 lemons)
- Zest of 2 lemons (avoid the white pith for less bitterness)
- 6 tablespoons (85 g) unsalted butter, cut into pieces
- For the Fresh Berries Topping:
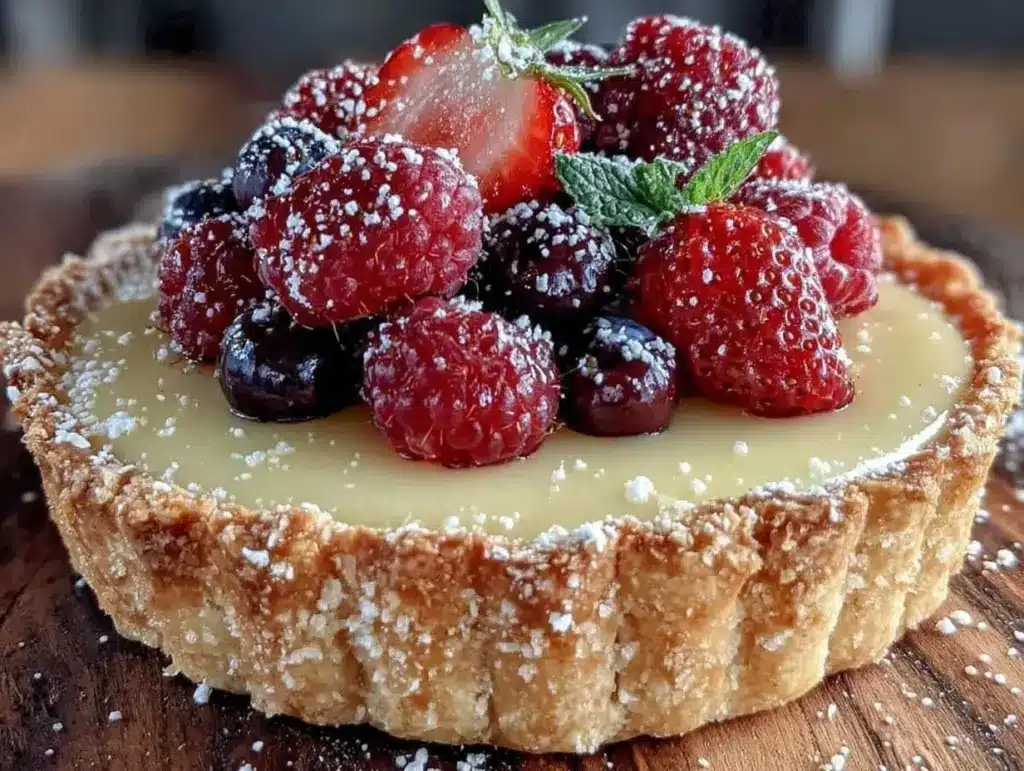
- 1 cup (150 g) fresh strawberries, hulled and halved
- ½ cup (75 g) fresh blueberries
- ½ cup (75 g) fresh raspberries
Pro tip: When selecting lemons, look for firm, bright yellow ones with a fragrant aroma — they pack the best flavor. For berries, I usually grab whatever looks freshest at the market; in summer, swapping in fresh blackberries also works beautifully.
Substitution tip: You can swap all-purpose flour with a gluten-free blend in the crust for a gluten-free option. For dairy-free butter, try coconut oil or vegan butter sticks, but expect a slight change in texture.
Equipment Needed
- 9-inch (23 cm) tart pan with removable bottom — makes releasing the tart so much easier. If you don’t have one, a regular pie dish works but be careful when removing.
- Mixing bowls — I prefer glass or stainless steel for easy cleaning.
- Whisk and rubber spatula — essential for smooth lemon curd and mixing dough.
- Rolling pin — for evenly rolling the tart dough. If you don’t have one, a clean wine bottle works in a pinch!
- Saucepan — to cook the lemon curd gently. A heavy-bottomed pan helps avoid scorching.
- Fine mesh sieve — optional but recommended to strain the lemon curd for a silky finish.
- Pastry brush — handy for docking the crust or brushing with egg wash if desired.
Personally, I find investing in a good tart pan with a removable bottom is worth it — it makes the presentation so much nicer, and cleanup easier. If you’re on a budget, thrift stores often have decent pans for cheap. Just keep your tools clean and dry to avoid rusting and prolong their life.
Preparation Method

- Make the Tart Dough: In a bowl, whisk together flour, sugar, and salt. Add cold, cubed butter. Using your fingertips or a pastry cutter, work the butter into the flour until the mixture resembles coarse crumbs with pea-sized bits. This texture is key for a flaky crust.
Add the egg yolk and 2 tablespoons of ice water. Gently mix until the dough just comes together. If too dry, add water, 1 teaspoon at a time. Don’t overwork it — that’s a rookie mistake I learned the hard way.
Wrap the dough in plastic wrap and chill in the fridge for at least 30 minutes. - Blind Bake the Crust: Preheat oven to 375°F (190°C). Roll out chilled dough on a lightly floured surface to about 12 inches (30 cm) diameter.
Transfer to your tart pan, pressing gently into edges. Trim excess dough. Prick the base with a fork to prevent puffing.
Line the crust with parchment paper and fill with pie weights or dried beans.
Bake for 15 minutes, then remove weights and parchment. Bake another 8-10 minutes until golden. Keep an eye to avoid burning edges! Let cool slightly. - Prepare the Lemon Curd: In a medium saucepan, whisk eggs and sugar until combined.
Add lemon juice, zest, and butter pieces.
Cook over medium-low heat, stirring constantly with a wooden spoon or heatproof spatula. This takes about 8-10 minutes.
The curd will thicken and coat the back of the spoon — look for a smooth, glossy texture.
Remove from heat and strain through a fine mesh sieve to remove zest and any cooked egg bits for that perfect silky finish.
Cover with plastic wrap pressed onto the surface to prevent a skin forming. Let cool to room temp. - Assemble the Tart: Pour the cooled lemon curd into the baked tart shell and smooth the top.
Refrigerate for at least 2 hours — this step is crucial for the filling to set beautifully.
Just before serving, arrange fresh berries on top in a casual, inviting pattern. I like to mix colors and sizes for visual appeal. - Serve and Enjoy: Remove tart from fridge about 10 minutes before slicing to soften slightly.
Use a sharp knife wiped between cuts for clean slices.
Serve on its own or with a dollop of whipped cream if you’re feeling indulgent.
Quick tip: Don’t rush the baking or cooling stages. I once tried slicing a warm lemon curd tart — sticky mess alert! Patience pays off for that perfect texture.
Cooking Tips & Techniques
Making the perfect lemon curd tart is about a few key details, trust me:
- Keep Butter Cold for Crust: Cold butter creates steam pockets during baking, resulting in that flaky, tender crust. If your kitchen’s warm, pop the dough back in the fridge before rolling.
- Watch the Lemon Curd Heat: Cooking curd over medium-low heat and stirring constantly prevents scrambling eggs. The moment it thickens and coats your spoon, take it off the heat — it will continue to thicken as it cools.
- Blind Baking is Essential: Without blind baking, the crust will get soggy under the lemon curd. Using parchment and weights stops the dough from puffing and keeps the base crisp.
- Don’t Skip Straining: Straining the curd removes zest bits and any cooked egg chunks, giving you that professional, silky texture. I learned this after a batch turned grainy — not fun to eat.
- Use Fresh Lemons: Bottled lemon juice just won’t cut it here. Freshly squeezed juice brings brightness and natural tartness that makes the flavor zing.
- Chill for Set Filling: The curd needs a good chill to firm up properly. I usually make this the day before a gathering and let it set overnight — no stress on the day!
One time, I forgot to prick the crust base before blind baking (classic!). The crust puffed up like a little balloon and cracked when I tried to fill it. Lesson learned: prick and weight the dough every time.
Variations & Adaptations
This lemon curd tart is a versatile canvas, so here are some ways to mix things up:
- Berry Swaps: Use raspberries only for a sharper contrast or add sliced kiwi and mango for a tropical twist. In winter, frozen berries work fine — just thaw and drain excess juice.
- Crust Alternatives: Try a graham cracker or almond flour crust for gluten-free options. Both add a nice nutty flavor that complements the lemon nicely.
- Dairy-Free Lemon Curd: Replace butter with coconut oil and use flax eggs instead of regular eggs to make a vegan-friendly curd. The texture shifts a bit, but it still tastes bright and fresh.
- Herb Infusion: Add a teaspoon of finely chopped fresh basil or thyme into the lemon curd for a subtle herbal note that pairs beautifully with the berries.
- Personal Experiment: I once stirred in a teaspoon of ginger juice into the curd — it gave an unexpected spicy kick that my family loved. Don’t be afraid to try your own twists!
Serving & Storage Suggestions
This tart is best served chilled or just slightly softened at room temperature. The lemon curd filling is refreshing, and the berries add a juicy pop that’s perfect for spring and summer days.
Pair it with a cup of Earl Grey tea or a glass of sparkling rosé for a simple yet elegant presentation. If you’re serving at a party, consider placing a few extra berries around the plate for color.
Store any leftovers covered tightly in the fridge for up to 3 days. The crust can soften slightly over time, but the flavors often deepen, making it even better the next day.
To reheat, bring slices to room temperature or gently warm them for 10-15 minutes in a low oven (275°F/135°C) wrapped loosely in foil. Avoid microwaving as it can make the crust soggy.
Nutritional Information & Benefits
Each slice of this lemon curd tart (about 1/8 of the tart) contains approximately:
| Calories | 280-320 kcal |
|---|---|
| Fat | 16 g (mostly from butter) |
| Carbohydrates | 32 g (includes natural sugars from berries and lemon) |
| Protein | 4 g |
Lemons are rich in vitamin C and antioxidants, supporting immune health and skin vitality. Fresh berries add fiber, vitamins, and a burst of natural sweetness with fewer calories than processed sweets.
This recipe uses real ingredients without preservatives or artificial flavors — a treat you can feel good about, especially when shared with family and friends.
Note: Contains eggs, dairy, and gluten. See variations above for allergen-friendly options.
Conclusion
The Perfect Lemon Curd Tart with Fresh Berries is one of those recipes that feels both special and approachable — the kind you’ll want to make again and again. It’s bright, creamy, and bursting with fresh flavor, yet simple enough to whip up on a whim.
Feel free to adjust the sweetness or berry mix to match your mood or the season. Trust me, this tart is forgiving and flexible, so don’t hesitate to make it your own. I love how it brings a little sunshine to any table and sparks smiles every time.
If you give this recipe a try, I’d love to hear how it turns out or what variations you’ve experimented with. Share your thoughts, photos, or questions below — let’s keep the conversation going!
Happy baking, and may your kitchen always smell like fresh lemons and sweet berries.
FAQs
Can I make the lemon curd tart ahead of time?
Absolutely! The tart can be fully assembled and refrigerated up to 24 hours before serving. Just add fresh berries right before serving to keep them vibrant.
What if I don’t have fresh lemons?
Fresh lemon juice is best, but in a pinch, bottled lemon juice can work. Use pure lemon juice without additives for the best flavor.
How do I prevent the crust from getting soggy?
Blind baking the crust with pie weights is key to keeping it crisp. Also, chilling the curd before filling helps reduce moisture absorption.
Can I freeze the tart?
It’s best to freeze the curd separately. You can freeze lemon curd in an airtight container for up to 3 months. The baked crust doesn’t freeze well once filled.
What other fruits go well with lemon curd tart?
Besides berries, sliced kiwi, mango, or even stone fruits like peaches and nectarines make delicious toppings.
Pin This Recipe!

Perfect Lemon Curd Tart Recipe Easy Homemade Dessert with Fresh Berries

A bright and fresh lemon curd tart with a buttery flaky crust topped with fresh berries, perfect for any occasion and easy to make in under an hour.
- Prep Time: 15 minutes
- Cook Time: 33 minutes
- Total Time: 1 hour 15 minutes
- Yield: 8 servings 1x
- Category: Dessert
- Cuisine: American
Ingredients
- 1 ¼ cups (160 g) all-purpose flour
- ¼ cup (50 g) granulated sugar
- ½ teaspoon fine sea salt
- ½ cup (115 g) unsalted butter, cold and cubed
- 1 large egg yolk, room temperature
- 2 tablespoons ice-cold water (add more if needed)
- 3 large eggs
- 1 cup (200 g) granulated sugar
- ⅔ cup (160 ml) fresh lemon juice (about 3–4 lemons)
- Zest of 2 lemons
- 6 tablespoons (85 g) unsalted butter, cut into pieces
- 1 cup (150 g) fresh strawberries, hulled and halved
- ½ cup (75 g) fresh blueberries
- ½ cup (75 g) fresh raspberries
Instructions
- Make the Tart Dough: In a bowl, whisk together flour, sugar, and salt. Add cold, cubed butter. Using your fingertips or a pastry cutter, work the butter into the flour until the mixture resembles coarse crumbs with pea-sized bits. Add the egg yolk and 2 tablespoons of ice water. Gently mix until the dough just comes together. If too dry, add water, 1 teaspoon at a time. Wrap the dough in plastic wrap and chill in the fridge for at least 30 minutes.
- Blind Bake the Crust: Preheat oven to 375°F (190°C). Roll out chilled dough on a lightly floured surface to about 12 inches (30 cm) diameter. Transfer to your tart pan, pressing gently into edges. Trim excess dough. Prick the base with a fork to prevent puffing. Line the crust with parchment paper and fill with pie weights or dried beans. Bake for 15 minutes, then remove weights and parchment. Bake another 8-10 minutes until golden. Let cool slightly.
- Prepare the Lemon Curd: In a medium saucepan, whisk eggs and sugar until combined. Add lemon juice, zest, and butter pieces. Cook over medium-low heat, stirring constantly with a wooden spoon or heatproof spatula for about 8-10 minutes until thickened and glossy. Remove from heat and strain through a fine mesh sieve. Cover with plastic wrap pressed onto the surface and let cool to room temperature.
- Assemble the Tart: Pour the cooled lemon curd into the baked tart shell and smooth the top. Refrigerate for at least 2 hours to set. Just before serving, arrange fresh berries on top in a casual pattern.
- Serve and Enjoy: Remove tart from fridge about 10 minutes before slicing to soften slightly. Use a sharp knife wiped between cuts for clean slices. Serve on its own or with whipped cream if desired.
Notes
Keep butter cold for flaky crust. Blind bake crust to prevent sogginess. Stir lemon curd constantly over medium-low heat to avoid scrambling eggs. Strain curd for silky texture. Chill tart for at least 2 hours to set filling. Use fresh lemons for best flavor. Variations include gluten-free crust, dairy-free curd, and different berry or fruit toppings.
Nutrition
- Serving Size: 1 slice (1/8 of tart
- Calories: 280320
- Fat: 16
- Carbohydrates: 32
- Protein: 4
Keywords: lemon curd tart, lemon tart, fresh berries dessert, easy lemon tart, homemade lemon curd, tart recipe, summer dessert, quick dessert


