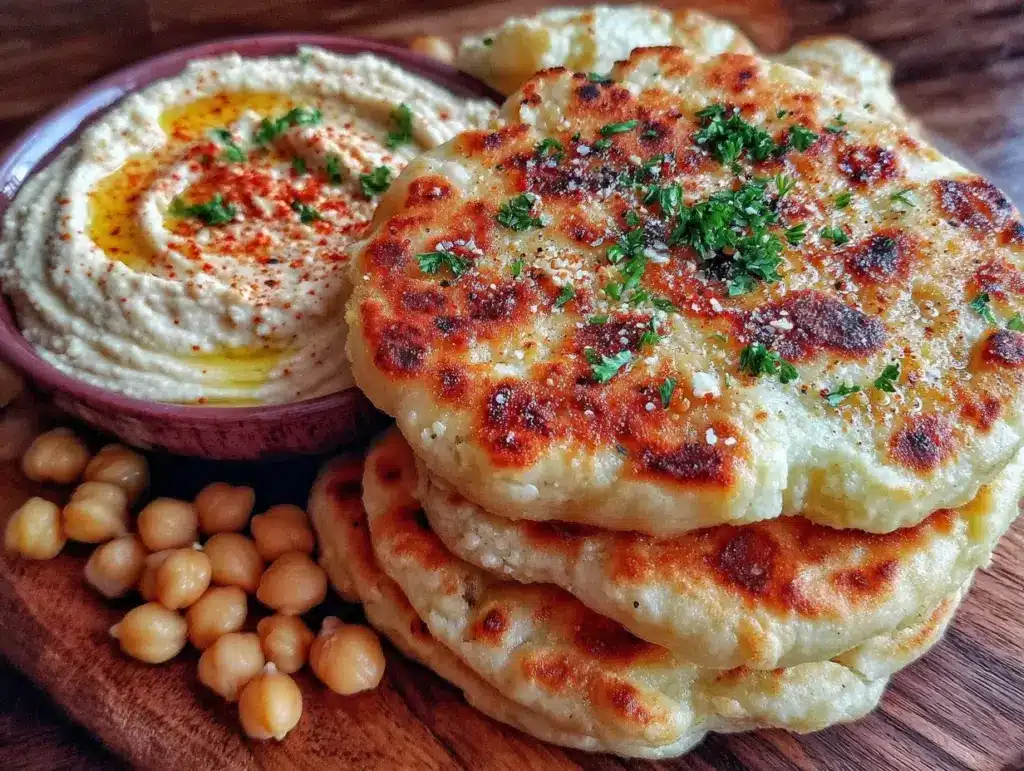
Let me tell you, the smell of freshly baked fluffy homemade pita bread drifting through my kitchen is downright irresistible. It’s one of those scents—warm, toasty, and ever-so-slightly nutty—that makes everyone in the house wander in, noses twitching, hoping for a taste. The first time I pulled a batch of these golden rounds from the oven, I was instantly hooked. There’s a little thrill in watching each pita puff up, creating that pocket just waiting to be filled.
You know what really sealed the deal for me? That moment when I paired these cloud-like pitas with the creamiest hummus dip I’d ever whipped up. The creamy, garlicky spread gliding across the soft bread—honestly, it’s the kind of moment where you pause, take a deep breath, and just smile because you know you’re onto something truly special. I first tried making this combo on a rainy Saturday, hoping to recreate the pita and hummus from my favorite Mediterranean spot. Turns out, homemade is even better (and, let’s face it, dangerously easy).
Years ago, when I was knee-high to a grasshopper, my grandma would bring home store-bought pita that never quite hit the mark. If only I’d known then how simple it is to make fluffy homemade pita bread from scratch! Now, whenever I make a batch, my kids can’t stop sneaking them off the cooling rack (honestly, I can’t blame them). My family’s reactions are proof enough—these pitas and hummus dip disappear faster than you can say “snack time.”
Whether you’re looking for the perfect addition to a potluck, a wholesome snack for your little ones, or just something to brighten up your Pinterest board, this recipe’s got you covered. I’ve tested these pitas and hummus more times than I care to admit (in the name of research, of course!), and it’s become a staple for family gatherings, gifting, and cozy nights at home. This fluffy homemade pita bread with creamy hummus dip feels like a warm hug—and you’re going to want to bookmark this one.
Why You’ll Love This Fluffy Homemade Pita Bread Recipe with Easy Creamy Hummus Dip
After baking up countless batches of pita and experimenting with hummus flavors, I’ve learned a thing or two about what makes this recipe stand out. Here’s why you’ll fall head over heels for these fluffy homemade pitas and easy creamy hummus dip:
- Quick & Easy: Comes together in just over an hour (including rising time), so you can whip up bakery-level pita and dip for last-minute cravings or spontaneous gatherings.
- Simple Ingredients: No fancy grocery trips required—you’ll find most ingredients right in your pantry. Flour, yeast, olive oil, chickpeas, tahini… all the classics.
- Perfect for Any Occasion: They’re a hit at brunch tables, potlucks, cozy dinners, and those holiday mornings when you want something comforting yet impressive.
- Crowd-Pleaser: Kids love the soft, pillowy bread, adults rave about the creamy hummus, and honestly, everyone sneaks a second helping.
- Unbelievably Delicious: The texture of the pita is next-level—fluffy inside, lightly crisp outside. Pair that with the silky, garlicky hummus, and you’ve got pure comfort food.
What makes this fluffy homemade pita bread recipe different? For starters, using a touch of yogurt in the dough gives it a softer crumb, while a well-heated oven guarantees that signature puff and pocket. The hummus is blended until ultra-smooth, with just the right amount of tahini and lemon juice to make it creamy without being heavy. It’s not just another pita recipe—it’s the one you’ll come back to, again and again.
This isn’t just good bread and dip. It’s the kind that makes you close your eyes after the first bite, savoring the warmth and flavor. It’s comfort food—healthier, faster, but with soul-soothing satisfaction. Whether you’re impressing guests or just turning Tuesday night into something special, these pitas and hummus make it effortless.
What Ingredients You Will Need
This fluffy homemade pita bread recipe with creamy hummus dip uses simple, wholesome ingredients that bring bold flavor and the softest texture to your table. Most of these are pantry staples—no need for a grocery store marathon.
For the Fluffy Homemade Pita Bread:
- All-purpose flour (plus extra for dusting)—about 3 cups (360g). I recommend King Arthur for consistent results.
- Active dry yeast—2 ¼ tsp (7g). Quick-rise yeast works too, just adjust rising time slightly.
- Sugar—1 tsp (4g). Helps activate the yeast and adds a subtle touch of sweetness.
- Salt—1 ½ tsp (9g). Don’t skip it; it brings out the flavor!
- Warm water—1 cup (240ml), about 105°F (40°C) for happy yeast.
- Plain yogurt—¼ cup (60g). Adds softness and a slight tang (skip for dairy-free, or use coconut yogurt).
- Olive oil—2 tbsp (30ml). I love California Olive Ranch for its light flavor.
For the Easy Creamy Hummus Dip:

- Canned chickpeas—1 can (15 oz/425g), drained and rinsed. Or cook your own for extra freshness.
- Tahini—¼ cup (60g). Creamy sesame paste; I like Soom for a silky texture.
- Lemon juice—3 tbsp (45ml), freshly squeezed if possible.
- Garlic cloves—2 medium, peeled (adjust to your garlicky preference!)
- Olive oil—2 tbsp (30ml), plus extra for drizzling.
- Salt—½ tsp (3g), or more to taste.
- Cold water—2–4 tbsp (30–60ml), as needed for creaminess.
- Ground cumin—½ tsp (optional, adds a warm depth).
- Paprika—for garnish (optional).
Substitution tips: Use whole wheat flour for a heartier pita, or gluten-free blend if needed (results may vary). For the hummus, swap chickpeas for white beans or roasted carrots for a twist. Lemon juice can be swapped with lime in a pinch. If tahini isn’t your thing, try sunflower seed butter—surprisingly delicious!
In summer, toss in some fresh herbs (parsley or dill) to the hummus for a burst of color. For a spicy kick, add a pinch of cayenne. Pantry-friendly, flexible, and ready for your creative touch!
Equipment Needed
You don’t need a fancy kitchen to whip up fluffy homemade pita bread and creamy hummus dip—just a few trusty tools:
- Mixing bowls: At least two; one for dough, one for hummus. Glass or stainless steel work best.
- Measuring cups and spoons: For precise results. I’ve used both plastic and metal; either will do.
- Wooden spoon or spatula: For stirring dough and scraping hummus.
- Stand mixer (optional): Makes kneading easier, but hand-kneading works just fine. If you use a mixer, be sure to check your dough texture mid-way.
- Rolling pin: For flattening the pitas. If you don’t have one, a clean wine bottle works in a pinch!
- Baking sheet or pizza stone: For baking the pitas. Pizza stones give a crispier bottom, but a sturdy baking sheet gets the job done.
- Clean kitchen towel: For covering dough during rising.
- Food processor or blender: For silky smooth hummus. I’ve used both—a good blender will work, but a food processor gets things extra fluffy.
If you’re low on gadgets, don’t stress. I’ve made pitas with just a bowl, spoon, and hands, and hummus with a stick blender. As for cleaning—soak your dough bowl early, and rinse the food processor right after blending for easy cleanup.
Preparation Method
How to Make Fluffy Homemade Pita Bread and Creamy Hummus Dip
-
Activate the Yeast:
In a large mixing bowl, combine 1 cup (240ml) warm water, 2 ¼ tsp (7g) active dry yeast, and 1 tsp (4g) sugar. Stir gently and let it sit for 5–10 minutes, until frothy. If nothing happens, your yeast might be old—start over with fresh yeast! -
Mix the Dough:
Add 3 cups (360g) all-purpose flour, 1 ½ tsp (9g) salt, ¼ cup (60g) plain yogurt, and 2 tbsp (30ml) olive oil to the yeast mixture. Stir until a shaggy dough forms. If it’s too sticky, sprinkle in a bit more flour (about 2 tbsp at a time). -
Knead the Dough:
Turn the dough out onto a floured surface. Knead for 8–10 minutes until smooth and elastic. If using a stand mixer, set to medium speed with the dough hook for 5–6 minutes. The dough should feel soft but not sticky—like a baby’s cheek! -
First Rise:
Place dough in a lightly oiled bowl, cover with a clean kitchen towel, and let rise in a warm spot for 45–60 minutes, until doubled in size. (Tip: I pop mine in the oven with the light on for gentle warmth.) -
Shape the Pitas:
Punch down the risen dough. Divide into 8 equal pieces (about 70g each). Roll each piece into a ball, then flatten with a rolling pin to about ¼ inch (6mm) thick rounds—don’t worry, they don’t have to be perfect circles! -
Second Rest:
Cover the shaped pitas with a towel and let rest for 15 minutes. This helps them puff more in the oven. -
Bake the Pitas:
Preheat your oven (and pizza stone, if using) to 475°F (245°C). Bake pitas for 3–5 minutes on the hot stone or baking sheet, until they puff and turn light golden. Watch closely—overbaking dries them out. If a pita doesn’t puff, don’t panic! It’ll still be delicious. -
Cool and Store:
Transfer baked pitas to a wire rack. Cover with a towel to keep them soft. Let cool completely before storing in an airtight container. -
Make the Creamy Hummus Dip:
In a food processor, combine 1 can (15 oz/425g) chickpeas, ¼ cup (60g) tahini, 3 tbsp (45ml) lemon juice, 2 garlic cloves, 2 tbsp (30ml) olive oil, ½ tsp (3g) salt, and ½ tsp cumin (if using). Process until thick and smooth, scraping down sides as needed. -
Adjust Creaminess:
With the processor running, drizzle in 2–4 tbsp (30–60ml) cold water until hummus is silky and creamy. Taste and add more salt or lemon juice if needed. For extra fluffiness, process for another minute. -
Serve:
Scoop hummus into a bowl, swirl the top, and drizzle with olive oil. Sprinkle paprika and fresh herbs if you like. Serve with warm pita bread—get ready for smiles!
Preparation Notes: If your dough feels tough, let it rest an extra 10 minutes. If the hummus seems grainy, add another splash of cold water and blend more. For pita that puffs perfectly, make sure your oven is fully preheated and the baking surface is hot.
Cooking Tips & Techniques
Here’s where the magic really happens—these little tips and tricks make all the difference for fluffy homemade pita bread and easy creamy hummus dip.
- Preheat Your Baking Surface: Whether you use a pizza stone or baking sheet, get it piping hot before baking. This shock of heat makes the pitas puff up and form that classic pocket. Cold pans = flat pitas (been there, sadly!).
- Don’t Overflour: Add flour sparingly when kneading. Too much and your pitas go dense instead of fluffy. I once dumped in an extra cup out of impatience—lesson learned!
- Rest the Dough: Letting the dough rest after shaping gives gluten time to relax, leading to softer bread. Even 10 minutes helps, but 15 is best.
- Oven Positioning: Bake pitas on the middle rack for even heat. If you crowd the tray, they steam instead of bake, so leave a little space between each round.
- For Creamy Hummus: Use cold water and process the hummus at high speed for fluffiness. Warm water leads to a runny dip. If you want ultra-smooth, peel the chickpeas (it’s a bit fiddly, but worth it if you’ve got time).
- Multitasking: While the dough rises, prep the hummus! It saves time and keeps you from staring at the bowl, willing the dough to grow.
Don’t worry if your first batch isn’t bakery-perfect. Pita bread is forgiving, and the hummus covers a multitude of sins. Each time you make them, you’ll get a little better—trust me, my first pitas were more “flatbread” than “fluffy,” but my family still gobbled them up.
Variations & Adaptations
One of the best things about fluffy homemade pita bread and creamy hummus dip? You can tweak them for every mood, season, and dietary need.
- Whole Wheat Pita: Swap half (or all) of the flour for whole wheat. You get a nuttier flavor and extra fiber. I do this in autumn for a heartier feel.
- Gluten-Free Pita: Use a gluten-free all-purpose blend—just be sure to add 1 tsp xanthan gum for structure. Results can vary, but some mixes are surprisingly fluffy!
- Herbed Hummus: Toss in a handful of fresh parsley, cilantro, or dill while blending. The color pops, and the flavor is fresh—great for spring.
- Spicy Variation: Add a pinch of cayenne or blend in roasted red peppers for a fiery kick. My sister loves a smoky paprika hummus for game night.
- Roasted Garlic Hummus: Instead of raw garlic, use a head of roasted garlic for mellow sweetness. I tried this for a holiday spread last year—huge hit!
- Dairy-Free Option: Skip the yogurt in the pita dough or use coconut yogurt for the same softness (it works, promise!).
If you’re cooking for allergies, substitute sunflower seed butter for tahini, and check the flour blend for hidden gluten. I’ve customized these pitas with za’atar seasoning sprinkled on top before baking—adds a savory twist that’s always popular at parties.
Serving & Storage Suggestions
For best flavor and texture, serve fluffy homemade pita bread warm, straight out of the oven or gently reheated. Stack the pitas in a clean kitchen towel to keep them soft and steamy.
- Presentation: Slice pitas into triangles and arrange around a bowl of creamy hummus. Drizzle the hummus with olive oil, a sprinkle of paprika, and fresh herbs for a Pinterest-worthy look.
- Pairings: Serve alongside grilled vegetables, falafel, tabbouleh, or a crisp cucumber salad. For brunch, add soft-boiled eggs and fresh fruit.
- Storage: Cool pitas completely, then store in an airtight container at room temperature for up to 2 days. For longer storage, freeze in a zip-top bag for up to 2 months. To thaw, leave at room temp or microwave for 20 seconds.
- Reheating: Warm pitas in a dry skillet over medium heat for 1–2 minutes, or wrap in foil and bake at 350°F (175°C) for 5 minutes. Hummus keeps in the fridge for up to 5 days—just stir and drizzle with fresh olive oil before serving.
- Flavor Development: The hummus gets even creamier after a day in the fridge, and the pita stays soft if stored covered. Honestly, leftovers are rare!
Nutritional Information & Benefits
Each fluffy homemade pita bread (about 70g) contains roughly 150 calories, 2g fat, 28g carbs, and 5g protein. The creamy hummus dip (2 tbsp) has about 70 calories, 5g fat, 6g carbs, and 2g protein.
These pitas are low in saturated fat, and homemade means no weird preservatives. Chickpeas in the hummus deliver plant-based protein, fiber, and iron, while tahini adds healthy fats and calcium. If you use whole wheat flour, you’ll boost fiber and micronutrients.
For gluten-free diets, just swap the flour blend. Vegan? Skip dairy yogurt or use coconut-based. Note: Contains wheat, sesame (tahini), and possible dairy. From a wellness perspective, I love that this recipe is filling, satisfying, and keeps blood sugar steady—plus, it’s a treat that feels good to eat.
Conclusion
There’s a special kind of joy in making fluffy homemade pita bread with creamy hummus dip—one bite and you’ll know why it’s worth every minute. The soft, warm pita paired with silky hummus is comfort food for every occasion, and you can tweak it to fit your tastes or dietary needs.
I love this recipe because it brings people together—kids, friends, and even picky eaters can’t resist. My kitchen feels warmer when there’s a stack of pitas and a bowl of hummus on the table. Try it once, and you’ll find yourself making it again and again (and maybe sneaking bites off the cooling rack, too).
Go ahead—give it a whirl, and let me know in the comments how you adapt it! Share your pitas and hummus creations, tag me on Pinterest, and spread the joy of homemade bread and dip. Here’s to making memories, one fluffy bite at a time!
Frequently Asked Questions
Can I make fluffy homemade pita bread without a stand mixer?
Absolutely! You can knead the dough by hand—it just takes a bit more muscle and about 8–10 minutes. The texture will be just as soft and fluffy.
What if my pita bread doesn’t puff up?
Don’t worry! Sometimes pitas don’t puff, but they’ll still taste fantastic. Make sure your oven is hot enough and the dough isn’t too thick. Even “flat” pitas are perfect for dipping.
How do I make my hummus extra creamy?
Use cold water when blending and process for a full minute. If you want ultra-smooth hummus, try peeling the chickpeas before blending—it makes a big difference!
Can I prepare the dough ahead of time?
Yes! You can let the dough rise in the fridge overnight. Just bring it to room temperature before shaping and baking the pitas.
What’s the best way to store leftover pita bread?
Cool the pitas fully, then keep them in an airtight container at room temperature for up to 2 days, or freeze for up to 2 months. Warm them in a skillet or oven before serving for that fresh-baked taste.
Pin This Recipe!

Fluffy Homemade Pita Bread Recipe with Easy Creamy Hummus Dip

This recipe features irresistibly fluffy homemade pita bread paired with a creamy, garlicky hummus dip. Perfect for gatherings, snacks, or cozy nights in, it’s easy to make and customizable for various dietary needs.
- Prep Time: 25 minutes
- Cook Time: 10 minutes
- Total Time: 1 hour 15 minutes
- Yield: 8 pitas and about 1 1/2 cups hummus (serves 4–6) 1x
- Category: Appetizer
- Cuisine: Mediterranean
Ingredients
- 3 cups all-purpose flour (plus extra for dusting)
- 2 1/4 tsp active dry yeast
- 1 tsp sugar
- 1 1/2 tsp salt
- 1 cup warm water (about 105°F)
- 1/4 cup plain yogurt (or coconut yogurt for dairy-free)
- 2 tbsp olive oil
- 1 can (15 oz) canned chickpeas, drained and rinsed
- 1/4 cup tahini
- 3 tbsp lemon juice
- 2 garlic cloves, peeled
- 2 tbsp olive oil (plus extra for drizzling)
- 1/2 tsp salt (or more to taste)
- 2–4 tbsp cold water (as needed for creaminess)
- 1/2 tsp ground cumin (optional)
- Paprika (for garnish, optional)
Instructions
- In a large mixing bowl, combine warm water, active dry yeast, and sugar. Stir gently and let sit for 5–10 minutes until frothy.
- Add flour, salt, yogurt, and olive oil to the yeast mixture. Stir until a shaggy dough forms. If too sticky, add more flour 2 tbsp at a time.
- Turn dough onto a floured surface and knead for 8–10 minutes until smooth and elastic. (Or use a stand mixer with dough hook for 5–6 minutes.)
- Place dough in a lightly oiled bowl, cover with a kitchen towel, and let rise in a warm spot for 45–60 minutes until doubled.
- Punch down the risen dough. Divide into 8 equal pieces, roll into balls, then flatten with a rolling pin to 1/4 inch thick rounds.
- Cover shaped pitas with a towel and let rest for 15 minutes.
- Preheat oven (and pizza stone, if using) to 475°F. Bake pitas for 3–5 minutes until puffed and light golden. Transfer to wire rack and cover with towel to keep soft.
- Let pitas cool completely before storing in an airtight container.
- For hummus, combine chickpeas, tahini, lemon juice, garlic, olive oil, salt, and cumin (if using) in a food processor. Process until thick and smooth.
- With processor running, drizzle in cold water until hummus is silky and creamy. Taste and adjust salt or lemon juice as needed.
- Scoop hummus into a bowl, swirl top, drizzle with olive oil, and sprinkle paprika and fresh herbs if desired. Serve with warm pita bread.
Notes
For fluffier pitas, ensure your oven and baking surface are fully preheated. Use cold water for extra creamy hummus. Dough can be made ahead and refrigerated overnight. For gluten-free, use a GF flour blend and add xanthan gum. For vegan, use coconut yogurt or omit yogurt. Hummus can be customized with herbs, spices, or roasted garlic.
Nutrition
- Serving Size: 1 pita bread (about
- Calories: 220
- Sugar: 2
- Sodium: 350
- Fat: 7
- Saturated Fat: 1
- Carbohydrates: 34
- Fiber: 4
- Protein: 7
Keywords: pita bread, hummus, homemade, Mediterranean, snack, vegan, vegetarian, easy, fluffy, bread, dip


