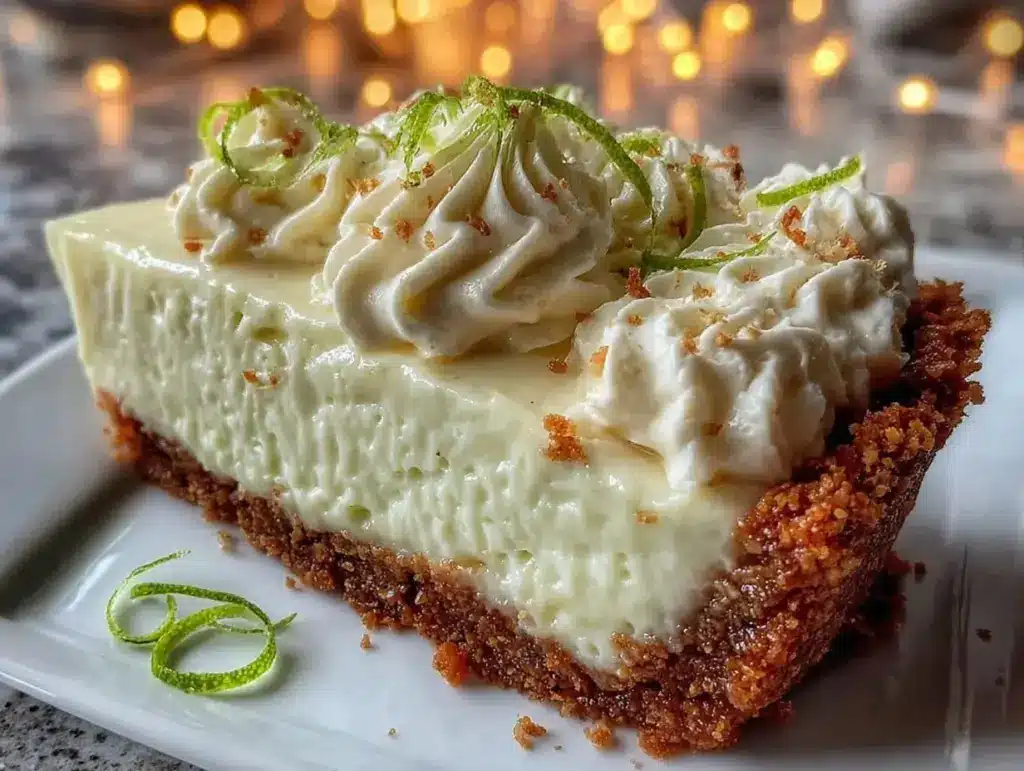
Let me tell you, the scent of zesty key limes mingling with sweet toasted meringue floating from my kitchen is enough to make anyone’s mouth water. The first time I baked this Creamy Key West Key Lime Pie with Fluffy Toasted Meringue, I was instantly hooked—the kind of moment where you pause, take a deep breath, and just smile because you know you’re onto something truly special. Years ago, when I was knee-high to a grasshopper, my grandma would bring home the most delightful citrus pies from local bakeries, but nothing ever quite matched the bright, tangy, and creamy vibe of a real Key Lime Pie straight from the Florida Keys. I stumbled upon this recipe on a rainy weekend, trying to recreate that nostalgic flavor, and honestly, I wish I’d found it years ago.
My family couldn’t stop sneaking slices off the cooling rack (and I can’t really blame them). The fluffy toasted meringue topping adds that perfect cloud-like texture, balancing the tart and creamy filling beautifully. This pie is dangerously easy and offers pure, nostalgic comfort. It’s perfect for summer barbecues, sweetening up your weekend dessert game, or brightening up your Pinterest cookie board with a slice that looks as good as it tastes. After testing this recipe multiple times in the name of research, of course, it’s now a staple for family gatherings and gifting. This pie feels like a warm hug from the tropics, and you’re going to want to bookmark this one for your next celebration.
Why You’ll Love This Recipe
This Creamy Key West Key Lime Pie with Fluffy Toasted Meringue comes with a heap of reasons to make it your go-to dessert:
- Quick & Easy: Comes together in under an hour, perfect for last-minute dessert cravings or casual get-togethers.
- Simple Ingredients: No fancy grocery trips needed; you likely already have everything in your kitchen, especially if you love baking.
- Perfect for Summer Parties: Bright, refreshing, and crowd-pleasing—ideal for barbecues, potlucks, or just cooling down on a hot day.
- Crowd-Pleaser: Kids and adults alike rave about this combo of creamy filling and fluffy toasted meringue.
- Unbelievably Delicious: That velvety smooth, tangy filling paired with sweet, toasted peaks is next-level comfort food.
What makes this recipe different? Well, it’s the meringue magic. Instead of the usual whipped cream topping, the toasted meringue adds a light, airy texture with a hint of caramelized sweetness that just sings against the tangy lime. Plus, the filling uses real Key lime juice—not just regular lime—which gives it that authentic Florida Keys punch. It’s comfort food with a tropical twist, healthy-ish thanks to fresh citrus, and fast enough to whip up on a whim. Whether you’re impressing guests or treating yourself, this pie closes your eyes after the first bite kind of delicious.
What Ingredients You Will Need
This recipe uses simple, wholesome ingredients to deliver bold flavor and satisfying texture without the fuss. Most are pantry staples, with the star being fresh or bottled Key lime juice. Here’s what you’ll need:
- For the crust:
- 1 ½ cups (150g) graham cracker crumbs (I prefer the finely crushed kind for best texture)
- 6 tablespoons (85g) unsalted butter, melted (adds richness and holds the crust together)
- ¼ cup (50g) granulated sugar
- For the filling:
- 4 large egg yolks, room temperature (adds creaminess and depth)
- 1 can (14 oz / 396g) sweetened condensed milk (I recommend Eagle Brand for consistent sweetness)
- ½ cup (120ml) fresh Key lime juice (bottled works, but fresh is best for that zing)
- 1 teaspoon finely grated lime zest (optional, for extra punch)
- For the toasted meringue topping:
- 4 large egg whites, room temperature (helps achieve that fluffy cloud texture)
- ½ cup (100g) granulated sugar
- ¼ teaspoon cream of tartar (stabilizes the meringue for perfect peaks)
- ½ teaspoon vanilla extract (adds subtle warmth)
Substitution tips: Use almond flour for a gluten-free crust option, or swap regular lime juice with bottled Key lime juice if fresh isn’t available. For a vegan twist, you could try aquafaba meringue, but I haven’t tested that personally yet. If you want to skip the meringue, whipped cream works as a quick alternative, though you’ll miss that toasty contrast.
Equipment Needed
- 9-inch (23cm) pie dish — glass or ceramic works best for even heat distribution
- Mixing bowls — at least two, one for crust and one for meringue
- Electric mixer or stand mixer — essential for whipping the meringue to stiff peaks
- Zester or fine grater — handy for fresh lime zest
- Spatula — for folding ingredients gently
- Baking sheet — to catch drips if you toast the meringue under the broiler
- Oven with broiler — for that perfectly toasted meringue finish
If you don’t have an electric mixer, a sturdy whisk and some elbow grease can do the job, but be prepared for a workout! For budget-friendly options, basic hand mixers from brands like Hamilton Beach do the trick perfectly. Keeping your mixing bowls grease-free is key for the meringue to whip properly — a quick wipe with lemon juice or vinegar helps.
Preparation Method
- Prepare the crust: Preheat your oven to 350°F (175°C). In a medium bowl, combine 1 ½ cups graham cracker crumbs, 6 tablespoons melted butter, and ¼ cup sugar. Mix until the crumbs are evenly coated and look like damp sand. Press the mixture firmly into the bottom and up the sides of your 9-inch pie dish. Use the back of a spoon or a flat-bottomed glass to compact it well. Bake for 8-10 minutes until golden and fragrant. Let cool completely while you prepare the filling.
- Make the filling: In a large bowl, whisk together 4 egg yolks until slightly thickened. Add the can of sweetened condensed milk and whisk until smooth. Stir in ½ cup fresh Key lime juice and 1 teaspoon lime zest. The mixture will thicken as the lime juice interacts with the milk. Pour the filling into the cooled crust and smooth the top with a spatula. Bake at 350°F (175°C) for 12-15 minutes — the center should still jiggle slightly but look set around the edges. Remove from oven and let cool to room temperature.
- Prepare the meringue: While the pie cools, combine 4 egg whites and ¼ teaspoon cream of tartar in a clean, dry bowl. Using an electric mixer, beat on medium speed until soft peaks form. Gradually add ½ cup sugar, a tablespoon at a time, while increasing speed to high. Continue beating until stiff, glossy peaks form — you can lift the beater straight up and the peaks should hold firm without drooping. Beat in ½ teaspoon vanilla extract.
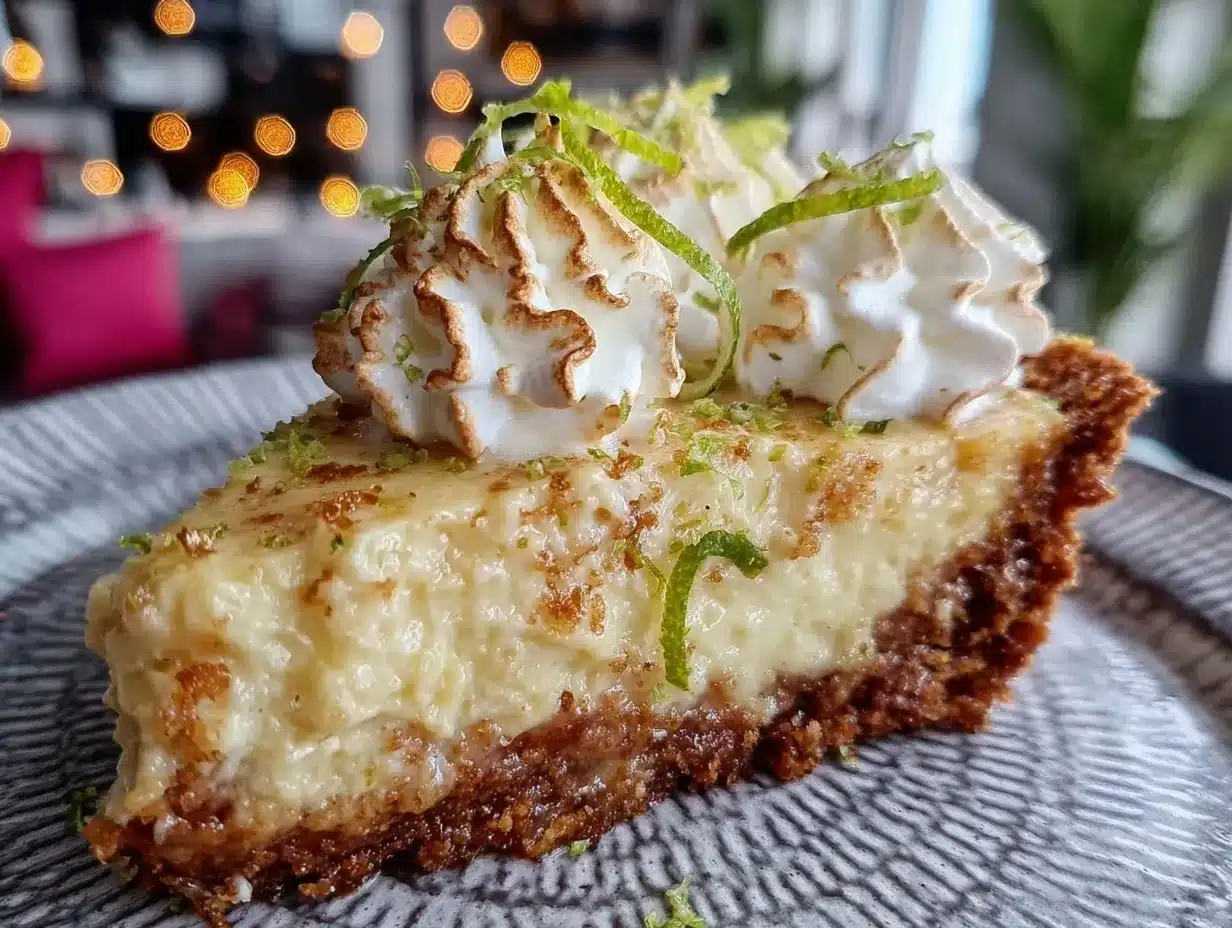
- Top and toast the meringue: Spoon or pipe the meringue over the pie filling, spreading it all the way to the edges to seal the filling. This helps prevent shrinking. Place the pie on a baking sheet and toast the meringue under the broiler for 1-2 minutes, watching closely until golden brown and slightly caramelized. Alternatively, use a kitchen torch for more control. Remove from oven and cool completely before slicing.
- Chill and serve: Refrigerate the pie for at least 2 hours before serving to set fully and let flavors meld. When ready, slice with a sharp knife dipped in hot water for clean cuts. Enjoy the creamy, tangy filling with the sweet, fluffy meringue topping.
Cooking Tips & Techniques
Whipping meringue can be intimidating, but here’s what I’ve learned after a few sticky kitchen mishaps. Always start with room temperature egg whites — they whip up faster and to higher volume. Make sure your mixing bowl and beaters are squeaky clean and dry; any fat or water will prevent stiff peaks. Adding sugar slowly allows the meringue to stabilize and become glossy instead of grainy.
When pressing the crust, don’t skimp on compacting it well — a loose crust crumbles apart. Toast the meringue with care! Broilers are powerful, so stay close and watch for that beautiful golden color; it can go from perfect to burnt in seconds. Using a kitchen torch gives more precise control if you have one.
Timing matters! The filling sets as it cools, so don’t overbake or it will crack. A slight jiggle is what you want when it comes out of the oven. This pie is best served well chilled but not frozen, so plan ahead to let it rest in the fridge. Trust me, the flavors deepen and the texture becomes even creamier the next day.
Variations & Adaptations
- Dietary Twist: Use gluten-free graham cracker crumbs or almond flour crust for gluten-free pies. Swap sweetened condensed milk for coconut condensed milk for a dairy-free version, though the texture changes a bit.
- Seasonal Flavors: Add fresh raspberries or blueberries on top of the filling before the meringue for a fruity burst. In winter, try mixing in a splash of orange zest for a warm citrus note.
- Flavor Swaps: Instead of the traditional meringue, try a coconut whipped cream topping for a tropical flair. Or add a pinch of cayenne pepper to the crust for a subtle kick that surprises your palate.
Once, I tried a version with lime and mint zest in the filling, which added a refreshing herbal twist that my guests loved. Feel free to experiment with your favorite citrus and herbs — this pie is forgiving and fun to personalize.
Serving & Storage Suggestions
Serve this pie chilled, straight from the fridge, for that creamy, tangy delight with the toasted meringue still light and fluffy. Garnish with thin lime slices or extra zest for a pretty finish. It pairs beautifully with a cup of strong coffee, iced tea, or even a light dessert wine like Moscato.
Store leftovers covered in the refrigerator for up to 3 days. The meringue may soften slightly but will still taste fantastic. Avoid freezing the pie as the texture of the meringue and filling changes when thawed. When reheating, skip the microwave — it’s best cold, but if you want to warm slices, a low-temperature oven for a few minutes works.
The flavors actually deepen over time, so if you can wait, making the pie a day ahead rewards you with even better taste and texture. Just keep it well covered to protect that delicate meringue.
Nutritional Information & Benefits
Each slice (1/8 of pie) roughly contains:
| Calories | 320 kcal |
|---|---|
| Fat | 15g |
| Carbohydrates | 40g |
| Protein | 5g |
Key limes are rich in vitamin C, which supports immune function and skin health. Using fresh juice means you’re getting natural antioxidants without artificial flavors. The pie is gluten-containing due to the graham cracker crust, but gluten-free alternatives work well. Note that this recipe contains eggs and dairy, so keep that in mind for allergen considerations.
From a wellness perspective, this pie offers a balanced treat — the tartness of the lime cuts through the sweetness, making it less heavy than many desserts. It’s perfect when you want a satisfying indulgence that doesn’t feel like overkill.
Conclusion
This Creamy Key West Key Lime Pie with Fluffy Toasted Meringue is truly worth making, whether you’re chasing that nostalgic citrus comfort or looking for a show-stopping dessert that’s as easy as it is delicious. Feel free to customize the crust, topping, or zest levels to suit your family’s taste buds; each variation brings something new to the table.
Personally, I love how this pie brings a little sunshine into my kitchen and onto my dessert plate. It’s a recipe I keep coming back to, and I hope it finds a place in your baking repertoire too. Don’t forget to share your thoughts, any fun twists you try, or questions in the comments below — I love hearing from fellow pie enthusiasts!
Happy baking, friends, and may your forks be ever ready for this creamy, tangy, and fluffy delight!
Frequently Asked Questions
Can I use regular lime juice instead of Key lime juice?
Yes, you can substitute regular lime juice, but Key lime juice gives a more authentic, slightly sweeter and tart flavor that defines this classic pie.
Is it safe to use raw egg whites in the meringue topping?
The meringue is baked or toasted under a broiler, which cooks the egg whites, making it safe to eat. Just make sure to toast it thoroughly.
How do I prevent the meringue from shrinking or weeping?
Spread the meringue right up to the crust edges to seal the filling, and avoid overbaking. Adding cream of tartar helps stabilize the meringue.
Can I make this pie ahead of time?
Absolutely! Make it a day ahead, keep it refrigerated, and the flavors will meld beautifully. Just toast the meringue close to serving if possible for the best texture.
What’s the best way to slice this pie cleanly?
Dip your knife in hot water and wipe it dry before slicing. This helps you get clean, neat slices without dragging the meringue or filling.
Pin This Recipe!

Creamy Key West Key Lime Pie Recipe with Fluffy Toasted Meringue

A bright, tangy, and creamy Key Lime Pie topped with fluffy toasted meringue, perfect for summer parties and nostalgic comfort.
- Prep Time: 20 minutes
- Cook Time: 25 minutes
- Total Time: 2 hours 45 minutes
- Yield: 8 servings 1x
- Category: Dessert
- Cuisine: American
Ingredients
- 1 ½ cups (150g) graham cracker crumbs
- 6 tablespoons (85g) unsalted butter, melted
- ¼ cup (50g) granulated sugar
- 4 large egg yolks, room temperature
- 1 can (14 oz / 396g) sweetened condensed milk
- ½ cup (120ml) fresh Key lime juice
- 1 teaspoon finely grated lime zest (optional)
- 4 large egg whites, room temperature
- ½ cup (100g) granulated sugar
- ¼ teaspoon cream of tartar
- ½ teaspoon vanilla extract
Instructions
- Preheat oven to 350°F (175°C). In a medium bowl, combine graham cracker crumbs, melted butter, and sugar. Mix until crumbs are evenly coated. Press mixture firmly into bottom and up sides of a 9-inch pie dish. Bake for 8-10 minutes until golden and fragrant. Let cool completely.
- In a large bowl, whisk egg yolks until slightly thickened. Add sweetened condensed milk and whisk until smooth. Stir in fresh Key lime juice and lime zest. Pour filling into cooled crust and smooth top. Bake at 350°F (175°C) for 12-15 minutes until center jiggles slightly but edges look set. Remove and cool to room temperature.
- Combine egg whites and cream of tartar in a clean, dry bowl. Beat with electric mixer on medium speed until soft peaks form. Gradually add sugar, increasing speed to high, until stiff, glossy peaks form. Beat in vanilla extract.
- Spread or pipe meringue over pie filling, sealing edges. Place pie on baking sheet and toast meringue under broiler for 1-2 minutes until golden brown and caramelized, watching closely. Alternatively, use a kitchen torch. Cool completely before slicing.
- Refrigerate pie for at least 2 hours before serving. Slice with a sharp knife dipped in hot water for clean cuts.
Notes
Use almond flour for gluten-free crust. For vegan meringue, try aquafaba (not tested). Whipped cream can substitute meringue but lacks toasted texture. Keep mixing bowls grease-free for best meringue results. Toast meringue carefully to avoid burning. Chill pie well before serving for best texture and flavor.
Nutrition
- Serving Size: 1 slice (1/8 of pie)
- Calories: 320
- Fat: 15
- Carbohydrates: 40
- Protein: 5
Keywords: Key lime pie, toasted meringue, creamy pie, summer dessert, citrus pie, Key West, easy pie recipe


