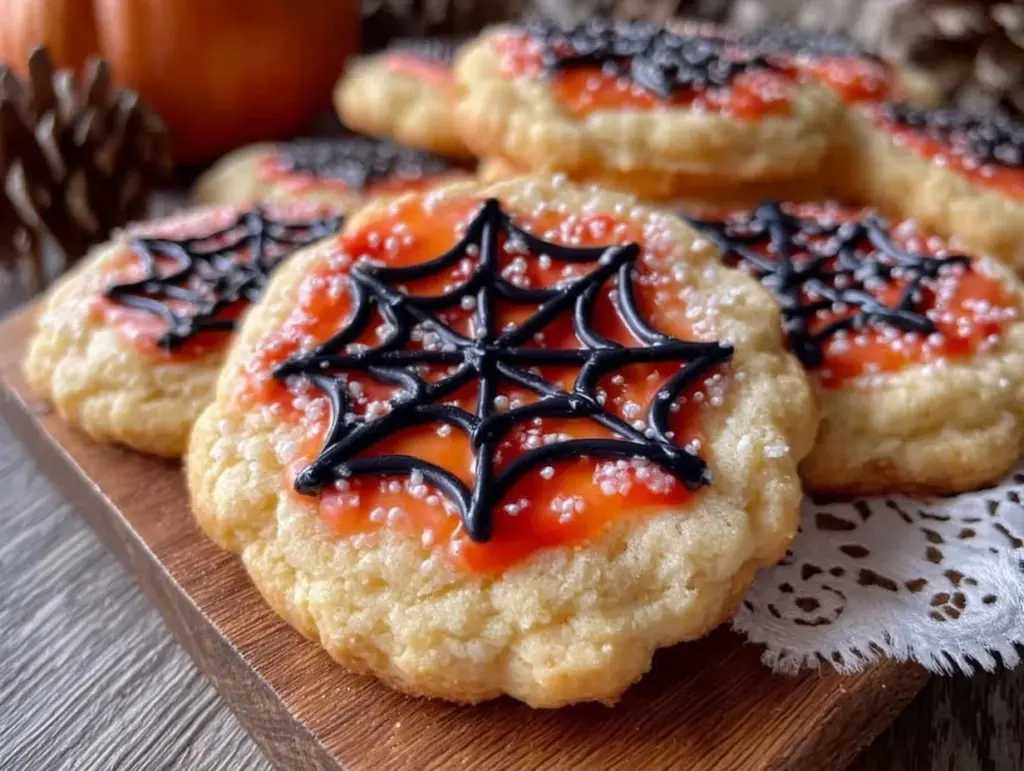
Glossy, slightly raised icing veins stretching out in a perfect spider web — and that’s the whole point. The way the sugary threads catch the kitchen light just right makes these Perfect Spider Web Halloween Sugar Cookies something you almost don’t want to eat. Almost. When I first made these cookies, I was obsessing over that delicate, intricate web pattern, the way it felt smooth and a little sticky under my fingertips before it hardened crisp. Honestly, I find myself staring at the finished batch longer than I should, tracing each sugary strand with my eyes, imagining the tiny spider that might have woven it if it was real.
There’s something quietly satisfying about a cookie that’s as much about texture and visual charm as it is about flavor. Baking these sugar cookies for Halloween became a tradition not because it was simple, but because the tactile experience—the way the icing dries just right, the subtle snap when you bite through—was something I craved every October. The spider web design isn’t just cute; it’s tactile art that transforms a humble sugar cookie into a festive, eerie delight you can’t help but pick up and admire.
That first batch stuck with me, not just for the look but because it reminded me of why I bake for the holidays: to create moments that feel a little magical. These cookies have the right balance of buttery crumb and crisp, glossy icing that feels almost alive. It’s the kind of recipe that makes you pause and really notice the textures beneath your fingertips before the flavors even register. This recipe is a little love letter to texture obsession, and honestly, that’s why it’s my go-to for Halloween treats now.
Why You’ll Love This Recipe
From my many trials tweaking sugar cookie recipes, this one nails a balance few others do, especially when you want that perfect spider web design. Here’s why this recipe stands out:
- Quick & Easy: The dough comes together in under 20 minutes, and you can chill it while prepping your icing, which means you’ll have festive treats ready before your party guests arrive.
- Simple Ingredients: You probably already have everything in your pantry—no weird extracts or specialty sugars needed.
- Perfect for Halloween Parties: These cookies bring a spooky elegance to any Halloween gathering, whether it’s a kids’ party or a grown-up get-together.
- Crowd-Pleaser: Kids love the fun spider web design, and adults appreciate the buttery, tender bite paired with that crisp icing finish.
- Unbelievably Delicious: The sugar cookie base is buttery and soft with a slight snap at the edges, while the icing dries smooth and glossy, creating a textural contrast that’s pure comfort food.
Unlike other Halloween sugar cookie recipes I’ve tried, this one uses a straightforward royal icing technique that dries with just the right sheen and texture—so your spider webs are sharp, clean, and not sticky the next day. Plus, the dough is sturdy enough to hold its shape but tender enough to melt in your mouth. Honestly, it’s the kind of recipe that makes you close your eyes after the first bite and think, “Yep, this is Halloween.”
It’s also flexible—you can tweak the colors or add little candy spiders if you want—making it great for impressing guests without any stress. If you’re into baking seasonal goodies like the Stars and Stripes Sugar Cookies, you’ll appreciate how this recipe balances classic sugar cookie nostalgia with a fun holiday twist.
What Ingredients You Will Need
This recipe uses simple, wholesome ingredients to deliver bold flavor and a satisfying texture without fuss. Most are pantry staples, easy to find, and you can swap a few if needed.
- For the Sugar Cookie Dough:
- 2 ¾ cups (345g) all-purpose flour (I prefer King Arthur for consistent texture)
- 1 teaspoon baking powder
- ½ teaspoon salt
- 1 cup (226g) unsalted butter, softened (room temp for easy creaming)
- 1 ½ cups (300g) granulated sugar
- 1 large egg, room temperature
- 2 teaspoons pure vanilla extract
- For the Royal Icing (Spider Web Design):
- 3 cups (360g) powdered sugar, sifted (to avoid lumps)
- 2 tablespoons meringue powder (for that perfect stiff but pipeable icing)
- 5-6 tablespoons warm water (adjust for consistency)
- Black gel food coloring (a few drops for striking spider web lines)
If you want a gluten-free version, swapping the flour for a 1-to-1 gluten-free blend works well, but the texture will change slightly. For a dairy-free option, use vegan butter and an egg replacer like flaxseed meal. The royal icing can be made with aquafaba instead of meringue powder, but I find meringue powder gives the best hold and shine.
For a pop of color or a different vibe, you can add a few drops of orange or purple gel food coloring to the icing base before piping the spider web. In terms of brands, I’ve had great luck with Wilton’s meringue powder and AmeriColor gel colors for vivid, reliable results.
Equipment Needed
To make these spider web sugar cookies, you’ll need a handful of standard baking tools:
- Mixing bowls (preferably glass or metal for the icing)
- Electric hand mixer or stand mixer (makes creaming butter and beating icing easier)
- Rolling pin (a smooth, medium-weight one works best for even dough thickness)
- Cookie cutters (round or any shape you like; I use a 3-inch circle for classic webs)
- Baking sheets lined with parchment paper or silicone mats (to prevent sticking)
- Piping bags and small round piping tips (#1 or #2) for drawing the spider web lines
- Toothpicks or a small clean brush (to help spread and shape the icing if needed)
If you don’t have piping bags, disposable ones or even a zip-top bag with a small corner snipped off will do just fine. For budget-friendly options, silicone baking mats are reusable and give great results compared to parchment paper.
Personally, I find a stand mixer with a paddle attachment saves my wrists during the butter creaming stage, but a hand mixer works well too. Keeping your dough chilled and rolling on a cool surface helps prevent sticking and keeps the cookie edges sharp.
Preparation Method
- Mix Dry Ingredients: In a medium bowl, whisk together 2 ¾ cups (345g) flour, 1 teaspoon baking powder, and ½ teaspoon salt. Set aside. (This keeps the leavening even throughout the dough.)
- Cream Butter and Sugar: Using a stand or hand mixer, beat 1 cup (226g) softened unsalted butter with 1 ½ cups (300g) granulated sugar until light and fluffy — about 3-4 minutes. This step is crucial for tender cookies with a slight lift.
- Add Egg and Vanilla: Beat in 1 large room temperature egg and 2 teaspoons vanilla extract until combined. The batter will look smooth and creamy.
- Incorporate Dry Ingredients: Gradually add the flour mixture in two additions, mixing on low speed until just combined. Avoid overmixing—stop when no flour streaks remain but dough is still soft.
- Chill Dough: Divide dough into two disks, wrap in plastic wrap, and chill for at least 1 hour (or overnight). This firms up the dough, making it easier to roll and cut sharp edges.
- Preheat Oven: Set oven to 350°F (175°C). Line baking sheets with parchment or silicone mats.
- Roll and Cut: On a lightly floured surface, roll dough to ¼ inch (6mm) thickness. Use a 3-inch round cutter to cut cookies and place them 2 inches apart on baking sheets.
- Bake: Bake for 8-10 minutes or until edges just begin to turn golden. Watch closely—overbaking dries cookies out. Remove and let cool on sheets for 5 minutes, then transfer to wire racks to cool completely.
- Prepare Royal Icing: In a clean bowl, combine 3 cups (360g) sifted powdered sugar, 2 tablespoons meringue powder, and 5 tablespoons warm water. Beat on medium-high speed until stiff peaks form (about 5-7 minutes). Add more water a teaspoon at a time if too thick.
- Color and Divide Icing: Reserve most icing white for the base. Tint a small portion black with gel food coloring for spider web lines.
- Flood Cookies: Thin white icing to flooding consistency by adding water a few drops at a time (it should spread smoothly but not run off the cookie). Fill a piping bag and flood each cookie’s surface. Let set for 10-15 minutes until slightly firm.
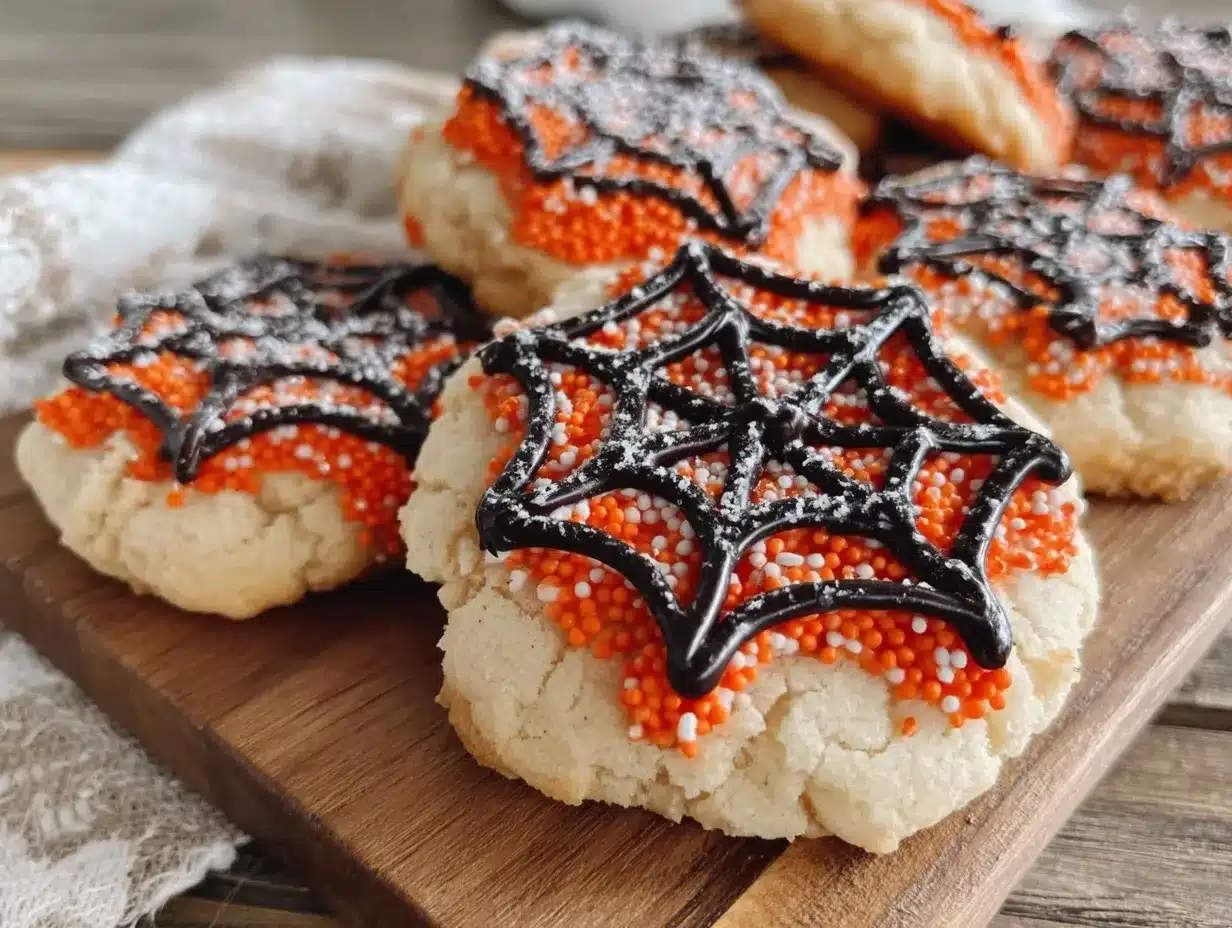
- Pipe Spider Webs: Using black icing and a small round tip, pipe concentric circles on the flooded cookie surface. Using a toothpick, drag lines from the center outward through each circle to create the web effect. Work quickly before icing crusts over.
- Dry Completely: Allow cookies to dry at room temperature for 4-6 hours or overnight for best results. The icing should be hard to the touch before stacking or storing.
Pro tip: If your black icing feels too stiff to pipe, add a tiny bit more water but be careful not to over-thin. Also, working in a cool, dry room helps the icing set nicely without tackiness. These steps take patience, but the result is worth it.
Cooking Tips & Techniques
Mastering spider web sugar cookies means paying attention to a few key techniques I learned the hard way:
- Don’t skip chilling the dough: It firms up the butter, which prevents cookies from spreading too much and losing their shape. I once skipped this step and ended up with sad, misshapen webs.
- Roll evenly: An uneven thickness means some cookies bake faster and can warp or burn. Using guide sticks or rolling pin rings can help keep the dough consistent.
- Consistency matters in royal icing: Too thick and it’s hard to pipe; too thin and the web lines bleed. Practice on parchment before piping on cookies if you’re new.
- Pipe quickly but carefully: The icing crusts fast, so you want to get your web lines done before the base dries completely but not so wet that the colors bleed.
- Use gel colors: They won’t thin your icing like liquid food colors, preserving the pipeability and shine.
- Multitask by icing in batches: While cookies dry, prep your piping bags or clean up the kitchen. This keeps the workflow smooth and stress-free.
One time, I left the icing too wet and the web looked more like a blurry mess than a crisp design—lesson learned! Also, don’t stack cookies until the icing is fully hardened or you’ll ruin the delicate surface.
Variations & Adaptations
Feel free to customize this recipe to suit your taste or occasion:
- Flavor twists: Add a teaspoon of almond or orange extract in the dough for an unexpected flavor note that pairs well with Halloween themes.
- Color variations: Swap the black icing for purple or green to create alien or witchy webs. You could even make multicolor webs for a playful twist.
- Dietary adaptations: Use gluten-free flour blends and vegan butter for allergy-friendly versions. Aquafaba-based royal icing works for egg-free needs.
- Alternative shapes: Cut cookies into bats, pumpkins, or ghosts and pipe spider webs over those shapes for extra festivity.
- Different decorating techniques: Instead of royal icing, try melted chocolate for the web design if you prefer a less sweet topping.
I once swapped the vanilla in the dough for a touch of pumpkin pie spice and it added a cozy autumn vibe without overpowering. If you like seasonal desserts, you might enjoy my Creamy Passion Fruit Mousse Cups for a refreshing contrast to these sweet treats.
Serving & Storage Suggestions
These sugar cookies are best served at room temperature, allowing the icing’s crisp texture to shine through. Arrange them on a festive platter with a few fake spiders or autumn leaves for a charming Halloween display.
Pair with a warm drink like spiced cider or a classic Earl Grey tea (which you can enjoy with my Earl Grey Tea Cake if you want a beautiful autumn spread). The buttery cookie and smooth icing balance the warmth and subtle bitterness of tea perfectly.
Store cookies in an airtight container lined with parchment paper to prevent sticking. They’ll keep well for up to 5 days at room temperature. For longer storage, freeze baked (but not iced) cookies wrapped tightly, thawing completely before decorating.
When reheating, avoid the microwave as it can soften the icing. Instead, bring cookies to room temperature naturally or briefly warm the container in a low oven (<200°F/90°C) to refresh the cookie texture without melting the icing.
Over time, the flavors meld beautifully, so making these a day ahead often improves the taste and texture experience.
Nutritional Information & Benefits
Each cookie (assuming 24 cookies per batch) contains approximately:
| Calories | 120 |
|---|---|
| Fat | 6g |
| Carbohydrates | 16g |
| Protein | 1g |
The key ingredients like butter and eggs provide some protein and fats, while the powdered sugar adds sweetness without heaviness. Using real vanilla extract adds flavor without artificial additives.
While these are definitely treats rather than health foods, you can make them gluten-free or vegan with substitutions. Just note that royal icing contains egg white powder unless you use an aquafaba alternative. For those with allergies, be mindful of dairy and egg content.
From a wellness perspective, I like to think of these cookies as special occasion bites—perfect for celebrating without guilt when enjoyed mindfully with family and friends.
Conclusion
The Perfect Spider Web Halloween Sugar Cookies aren’t just about a pretty face—they bring a satisfying texture and festive fun that sticks with you. Whether you’re decorating with kids or impressing guests, these cookies offer a delicate balance of buttery softness and crisp, glossy icing that makes Halloween a little sweeter.
Feel free to tweak the colors or flavors to fit your style and occasion. Personally, these cookies remind me of cozy autumn afternoons spent in the kitchen, fingers dusted with powdered sugar, making memories I want to revisit every year.
If you try them out, I’d love to hear how your webs turn out or what personal touches you add. Baking should always be a little playful, right? Here’s to a spooky, sweet Halloween!
Frequently Asked Questions
- Can I make the dough ahead of time? Yes! The dough keeps well chilled for up to 3 days or frozen for up to 3 months. Just thaw before rolling.
- How do I fix royal icing that’s too runny? Add more powdered sugar a little at a time until you reach piping consistency. If it’s too thick, add water sparingly.
- Can I use regular food coloring instead of gel? Regular liquid colors can thin the icing too much. Gel colors are best for maintaining texture and vibrant color.
- What’s the best way to store decorated cookies? Store in a single layer in an airtight container at room temperature. Use parchment between layers if stacking.
- How long do these cookies last? They’re best within 5 days. The icing hardens and seals the cookie to help preserve freshness.
Pin This Recipe!

Spider Web Halloween Sugar Cookies

Glossy, slightly raised icing veins stretch out in a perfect spider web design on buttery, tender sugar cookies. These festive treats combine a crisp icing finish with a soft, buttery crumb, perfect for Halloween parties.
- Prep Time: 20 minutes
- Cook Time: 10 minutes
- Total Time: 1 hour 30 minutes
- Yield: 24 cookies 1x
- Category: Dessert
- Cuisine: American
Ingredients
- 2 ¾ cups (345g) all-purpose flour
- 1 teaspoon baking powder
- ½ teaspoon salt
- 1 cup (226g) unsalted butter, softened
- 1 ½ cups (300g) granulated sugar
- 1 large egg, room temperature
- 2 teaspoons pure vanilla extract
- 3 cups (360g) powdered sugar, sifted
- 2 tablespoons meringue powder
- 5–6 tablespoons warm water
- Black gel food coloring
Instructions
- In a medium bowl, whisk together flour, baking powder, and salt. Set aside.
- Using a mixer, beat softened butter with granulated sugar until light and fluffy, about 3-4 minutes.
- Beat in egg and vanilla extract until combined.
- Gradually add flour mixture in two additions, mixing on low speed until just combined. Avoid overmixing.
- Divide dough into two disks, wrap in plastic wrap, and chill for at least 1 hour or overnight.
- Preheat oven to 350°F (175°C). Line baking sheets with parchment paper or silicone mats.
- Roll dough on a lightly floured surface to ¼ inch (6mm) thickness. Cut cookies with a 3-inch round cutter and place 2 inches apart on baking sheets.
- Bake for 8-10 minutes until edges begin to turn golden. Cool on sheets for 5 minutes, then transfer to wire racks to cool completely.
- Prepare royal icing by combining powdered sugar, meringue powder, and warm water. Beat until stiff peaks form, about 5-7 minutes. Adjust water for consistency.
- Reserve most icing white for flooding. Tint a small portion black with gel food coloring for spider web lines.
- Thin white icing to flooding consistency and flood each cookie surface. Let set for 10-15 minutes until slightly firm.
- Pipe concentric circles with black icing on flooded cookies. Use a toothpick to drag lines from center outward to create spider web effect.
- Allow cookies to dry at room temperature for 4-6 hours or overnight until icing is hard to the touch.
Notes
Chill dough to prevent spreading and maintain shape. Use gel food coloring for best icing texture and color. Work quickly when piping spider webs before icing crusts. Let icing dry completely before stacking cookies. For gluten-free or dairy-free versions, substitute flour and butter accordingly. Store cookies in airtight container with parchment paper between layers for up to 5 days.
Nutrition
- Serving Size: 1 cookie
- Calories: 120
- Fat: 6
- Carbohydrates: 16
- Protein: 1
Keywords: Halloween cookies, sugar cookies, spider web cookies, royal icing, festive treats, Halloween dessert