Let me set the scene: the kitchen is filled with the sweet, nutty aroma of peanut butter mingling with the deep, cocoa scent of crushed Oreos. I’m not exaggerating—the moment you open the cookie package and blend it with creamy peanut butter, it’s a symphony of decadent smells. The first time I made these Creamy Peanut Butter Oreo Truffles, I remember standing at the counter, spoon in hand, just marveling at how something so simple could taste so utterly luxurious. It was one of those pause-and-smile moments, the kind that makes you realize you’ve stumbled onto a treat that’s equal parts nostalgia and pure indulgence.
Years ago, when I was knee-high to a grasshopper, my grandma would whip up holiday fudge and peanut butter balls. These truffles are like the best of both worlds—pure, nostalgic comfort, but with a modern twist. I first tried making them on a rainy weekend, inspired by a bake sale flyer and a leftover sleeve of Oreos. Let’s face it, I wish I’d known about these years ago! My kids couldn’t stop sneaking them off the cooling rack (though, to be honest, neither could I). They’re dangerously easy, and the combination of rich peanut butter and crunchy Oreo crumbs is just downright irresistible.
This recipe has quickly become a staple in our house, especially for family gatherings or last-minute gifting. Whether you need a festive treat for a potluck, something special for your holiday dessert platter, or just want to brighten up your Pinterest board with a show-stopping sweet, these truffles deliver every time. I’ve tested them more times than I’d like to admit (in the name of research, of course), and each batch feels like a warm hug in bite-sized form. Trust me—you’re going to want to bookmark this one.
Why You’ll Love These Creamy Peanut Butter Oreo Truffles
After countless kitchen trials and more than a few taste tests (with lots of happy volunteers), I can confidently say these truffles are a game-changer. Here’s why you’ll fall head-over-heels for this recipe:
- Quick & Easy: You can whip up a batch in under 30 minutes—no baking required! Perfect for busy weeknights or unexpected guests.
- Simple Ingredients: No fancy grocery trips or confusing specialty items. Odds are, you’ve already got everything you need.
- Perfect for Festive Occasions: These truffles shine on any dessert table—think holiday parties, birthdays, or even as a sweet surprise for Valentine’s Day.
- Crowd-Pleaser: Seriously, kids and adults alike rave about these. They’re the first to disappear at bake sales and family gatherings.
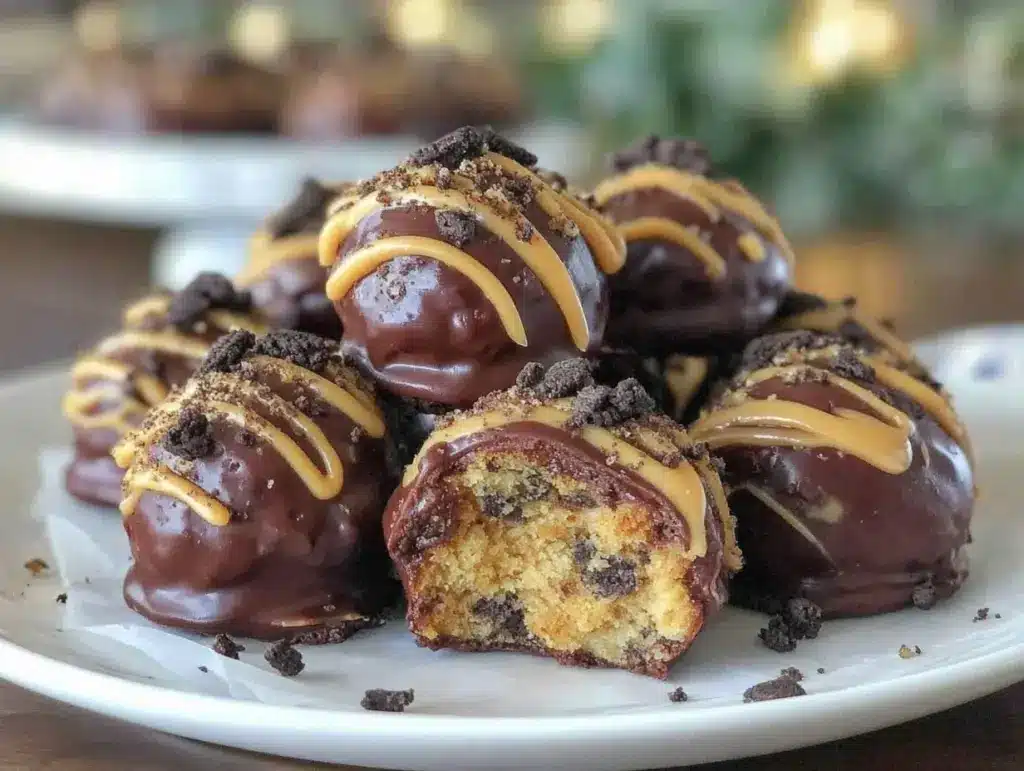
- Unbelievably Delicious: The creamy peanut butter and crunchy Oreo combo is pure comfort food, with a chocolate shell that cracks just right.
What really sets these Creamy Peanut Butter Oreo Truffles apart is the texture. By blending the peanut butter into the crushed Oreos, you get a filling that’s ultra-smooth and satisfyingly rich—never dry or crumbly. I use a little cream cheese for extra silkiness, which makes them stand out from the typical truffle crowd. You know what? After the first bite, you’ll probably close your eyes and savor it—because it’s that good.
This recipe isn’t just sweet; it’s a way to make dessert feel special without any stress. Whether you’re impressing guests or just treating yourself, these truffles are the shortcut to memorable homemade treats. Comfort food with a festive twist—what’s not to love?
What Ingredients You Will Need
These truffles come together with just a handful of everyday ingredients, but each one plays a key role in making them so addictive. Here’s what you’ll need:
- For the Filling:
- Oreo cookies (36 cookies, about 400g) – regular or double-stuffed both work, but I prefer classic for the best texture.
- Creamy peanut butter (1/2 cup / 120g) – go for a smooth, no-stir variety. I love using Jif or Skippy for the creamiest results.
- Cream cheese (4 oz / 115g, softened) – this adds a luxurious, tangy richness. Philadelphia is my go-to brand.
- For the Coating:
- Semi-sweet chocolate chips (8 oz / 225g) – melts beautifully and gives a classic shell. You can use milk or dark chocolate if you prefer.
- Coconut oil or vegetable shortening (1 tbsp / 14g) – just a touch helps the chocolate set with a glossy finish.
- Optional Toppings:
- Crushed peanuts or extra Oreo crumbs – for a festive sprinkle.
- Colored sprinkles – perfect for holidays!
- Sea salt flakes – adds a pop of flavor and balances the sweetness.
If you need to swap ingredients, it’s easy. Use gluten-free chocolate sandwich cookies for a celiac-friendly version, or almond butter if you want a peanut-free twist. I’ve even tried dairy-free cream cheese (Tofutti works well) with great results. In summer, you can add a touch of raspberry jam to the filling for a fruity kick—so good!
These are all pantry staples, which means you’re never more than a few steps away from creamy, homemade truffles. And if you’re ever out of coconut oil, don’t sweat it—just skip it or use a bit of butter.
Equipment Needed
One of the best things about Creamy Peanut Butter Oreo Truffles is that you don’t need a fancy kitchen setup. Here’s what I use (and some alternatives):
- Food processor or blender – for crushing the Oreos. If you don’t have one, just place the cookies in a zip-top bag and crush them with a rolling pin (works in a pinch, and it’s oddly satisfying).
- Mixing bowls – at least two: one for the filling, one for the melted chocolate.
- Hand mixer or sturdy spoon – for blending in the cream cheese and peanut butter. I’ve done it both ways, but the mixer saves your arm.
- Baking sheet lined with parchment paper – so the truffles don’t stick as they chill.
- Forks or dipping tools – for dunking the truffles in chocolate. A regular fork works perfectly.
- Microwave-safe bowl – for melting the chocolate chips. If you prefer, use a double boiler for extra control.
Honestly, you don’t need anything fancy. I’ve made these with thrift store mixing bowls and a hand-me-down food processor. If you do use a food processor, keep the blades sharp—those Oreos can be tough! And parchment paper really does make cleanup easier (trust me, I’ve tried skipping it, and regretted it every time).
Preparation Method

- Crush the Oreos: Place all 36 Oreo cookies into a food processor and pulse until you get fine crumbs. If using a zip-top bag, crush with a rolling pin until you have no big chunks. This should take about 3 minutes. The crumbs should look like damp coffee grounds.
- Make the Filling: Add 1/2 cup (120g) creamy peanut butter and 4 oz (115g) softened cream cheese to the Oreo crumbs. Pulse until fully combined, scraping down the sides as needed. If mixing by hand, use a sturdy spoon and elbow grease. The mixture will be thick, sticky, and smell heavenly.
- Shape the Truffles: Scoop out heaping tablespoons of the mixture and roll into balls (about 1 inch / 2.5 cm diameter). You should get around 24 truffles. Place them on a parchment-lined baking sheet. If the mix feels too soft, chill it in the fridge for 15 minutes—it’ll firm up nicely.
- Chill the Truffles: Refrigerate the truffle balls for at least 30 minutes. This helps them hold their shape when dipping in chocolate. If you’re in a rush, pop them in the freezer for 10 minutes.
- Melt the Chocolate: In a microwave-safe bowl, combine 8 oz (225g) semi-sweet chocolate chips and 1 tbsp (14g) coconut oil. Microwave in 20-second bursts, stirring after each, until smooth and glossy. Alternatively, use a double boiler over simmering water. Watch carefully—chocolate burns fast!
- Dip the Truffles: Using a fork, dip each chilled truffle into the melted chocolate, letting the excess drip off. Place back on the parchment paper. If the chocolate starts to thicken, microwave for another 10 seconds to loosen it up.
- Add Toppings: Before the chocolate sets, sprinkle with crushed peanuts, Oreo crumbs, colored sprinkles, or sea salt. Get creative! The toppings stick best while the chocolate is still wet.
- Final Chill: Refrigerate the dipped truffles for 30 minutes, or until the chocolate is fully set. Once firm, they’re ready to serve.
- Troubleshooting: If your filling is too sticky, add more Oreo crumbs. If too dry, add a touch more peanut butter. If chocolate clumps, add a half-teaspoon more coconut oil.
- Personal Tip: For super-smooth truffles, wash your hands in cold water before rolling—it keeps the mixture from sticking and gives you a neater finish.
Each step is simple, but pay attention to the sensory cues—the filling should smell peanut buttery and look dark and glossy, and the chocolate should be smooth and shiny. Chilling time is key for easy dipping, so don’t rush it!
Cooking Tips & Techniques
Here’s the thing—making truffles might sound fancy, but it’s honestly just about a few smart tricks. Over the years, I’ve learned (sometimes the hard way) what works best.
- Use Room-Temperature Cream Cheese: Cold cream cheese can make the filling lumpy. Let it sit out for 30 minutes before mixing.
- Crush Oreos Finely: Big chunks will mess with the texture. Process until completely fine, like damp sand.
- Don’t Overmix: Once everything’s combined, stop! Overmixing can make the filling tough.
- Chill Thoroughly: If you skip this, the truffles will fall apart in the chocolate. I’ve rushed this step before, and ended up with a sad, sticky mess.
- Use a Fork for Dipping: A fork lets excess chocolate drip off, so your shell isn’t too thick.
- Work in Batches: Only take a few truffles out of the fridge at a time when dipping; the filling gets soft fast at room temp.
- Multitask Smartly: While the truffles chill, prep your toppings—set out bowls of sprinkles, peanuts, or cookie crumbs so you’re ready to decorate.
- Chocolate Melting Tips: Microwaves can be unpredictable. Use short bursts and stir well each time. If it gets grainy, add a bit more oil.
Consistency is the name of the game. If your truffles crack after chilling, the chocolate was too hot or too thick. If they’re soft, the filling needed more chilling. Practice makes perfect—and honestly, every “mistake” still tastes great!
Variations & Adaptations
This recipe is super flexible, which makes it perfect for customizing. Here are a few of my favorite twists:
- Gluten-Free Version: Swap regular Oreos for gluten-free chocolate sandwich cookies. The taste is just as rich!
- Peanut-Free Adaptation: Use almond butter or sunflower seed butter instead of peanut butter. Great for allergy-friendly parties.
- Seasonal Flavors: For winter, add a pinch of cinnamon to the filling. In summer, mix in 2 tbsp raspberry jam for a fruity burst.
- White Chocolate Coating: Dip the truffles in melted white chocolate instead of semi-sweet for a sweeter, more festive look.
- Vegan Option: Use dairy-free cream cheese and vegan chocolate chips. Tofutti and Enjoy Life brands work well.
I’ve personally tried adding a splash of espresso powder to the chocolate coating—oh wow, it takes these truffles to another level. For birthday parties, colored sprinkles make them extra cheerful. Don’t be afraid to experiment; these are forgiving and fun!
Serving & Storage Suggestions
These Creamy Peanut Butter Oreo Truffles are best served chilled—straight from the fridge, the shell gives a satisfying crack. Arrange them on a festive platter, and they’ll steal the show. For parties, pop each truffle into a mini cupcake liner for easy grabbing and a pretty presentation.
Pair them with coffee, hot chocolate, or a cold glass of milk (classic, right?). They also go great alongside fruit trays or salty snacks—think pretzels or popcorn for a sweet-and-salty spread.
Storage is simple: keep truffles in an airtight container in the refrigerator for up to 7 days. If you want to freeze them for future snacking, layer between sheets of parchment paper and freeze for up to 2 months. To serve, thaw in the fridge overnight—don’t microwave, or the chocolate will melt! Honestly, the flavor gets even richer after a day or two, as everything melds together.
Nutritional Information & Benefits
Here’s a quick look at the estimated nutrition per truffle (assuming 24 truffles):
- Calories: ~130
- Fat: ~8g
- Carbohydrates: ~14g
- Protein: ~2g
- Sugar: ~10g
Peanut butter adds healthy fats and a touch of protein, while the dark chocolate (if used) brings antioxidants. If you use gluten-free cookies or dairy-free swaps, these can fit a variety of dietary needs. Allergens to watch for: peanuts, dairy, wheat (unless you use gluten-free cookies). As a fan of balanced indulgence, I love that these truffles satisfy sweet cravings in small, portion-controlled bites. Perfect for a treat without going overboard!
Conclusion
If you’re looking for a homemade treat that’s easy, impressive, and downright delicious, these Creamy Peanut Butter Oreo Truffles are it. They’re endlessly adaptable—swap ingredients, change toppings, or make them fit your dietary needs. I love this recipe because it brings people together, sparks smiles, and tastes like pure joy.
Give these a try, and don’t be afraid to put your own spin on them. I’d love to hear about your creations—drop a comment, share your photos, or tag me with your festive truffle masterpieces. This recipe is proof that homemade sweets really don’t have to be complicated. Here’s to lots of happy snacking and sweet memories!
FAQs
Can I make Creamy Peanut Butter Oreo Truffles ahead of time?
Absolutely! You can make them up to a week in advance. Just store in an airtight container in the fridge—they’ll stay fresh and delicious.
Do I need to use a food processor for the Oreos?
Nope, a zip-top bag and rolling pin work just fine. The crumbs might be a little chunkier, but it’s still tasty.
Can I freeze these truffles?
Yes, they freeze beautifully. Layer between parchment paper in a sealed container, and freeze for up to 2 months. Thaw in the fridge before serving.
What’s the best chocolate for dipping?
Semi-sweet chocolate chips are my favorite for a balanced flavor, but you can use milk, dark, or even white chocolate. Just add a touch of coconut oil for smooth dipping.
How do I make these nut-free?
Swap the peanut butter for sunflower seed butter or almond butter. Always check labels to be sure it’s safe for allergies.
Pin This Recipe!

Creamy Peanut Butter Oreo Truffles

These easy, no-bake truffles combine creamy peanut butter, crushed Oreos, and a touch of cream cheese, all coated in a glossy chocolate shell. Perfect for festive occasions, gifting, or a quick homemade treat that everyone will love.
- Prep Time: 15 minutes
- Cook Time: 0 minutes
- Total Time: 45 minutes
- Yield: 24 truffles 1x
- Category: Dessert
- Cuisine: American
Ingredients
- 36 Oreo cookies (about 14 oz / 400g)
- 1/2 cup creamy peanut butter (120g)
- 4 oz cream cheese, softened (115g)
- 8 oz semi-sweet chocolate chips (225g)
- 1 tbsp coconut oil or vegetable shortening (14g)
- Optional: crushed peanuts, extra Oreo crumbs, colored sprinkles, sea salt flakes for topping
Instructions
- Place all Oreo cookies into a food processor and pulse until fine crumbs form. Alternatively, crush cookies in a zip-top bag with a rolling pin.
- Add peanut butter and softened cream cheese to the Oreo crumbs. Pulse or mix until fully combined and smooth.
- Scoop heaping tablespoons of mixture and roll into 1-inch balls (about 24 truffles). Place on a parchment-lined baking sheet.
- Chill truffle balls in the refrigerator for at least 30 minutes (or freezer for 10 minutes) until firm.
- In a microwave-safe bowl, combine chocolate chips and coconut oil. Microwave in 20-second bursts, stirring after each, until melted and smooth. Alternatively, melt using a double boiler.
- Using a fork, dip each chilled truffle into melted chocolate, letting excess drip off. Place back on parchment paper.
- Immediately sprinkle with desired toppings while chocolate is still wet.
- Refrigerate dipped truffles for 30 minutes, or until chocolate is set.
- If filling is too sticky, add more Oreo crumbs. If too dry, add more peanut butter. If chocolate thickens, microwave briefly or add more oil.
- For smoother truffles, wash hands in cold water before rolling.
Notes
Use room-temperature cream cheese for a smooth filling. Crush Oreos finely for best texture. Chill truffles thoroughly before dipping in chocolate. Work in batches to keep filling firm. For gluten-free or vegan adaptations, use suitable cookies and cream cheese. Truffles can be made ahead and stored in the fridge for up to 7 days or frozen for 2 months.
Nutrition
- Serving Size: 1 truffle
- Calories: 130
- Sugar: 10
- Fat: 8
- Carbohydrates: 14
- Protein: 2
Keywords: Oreo truffles, peanut butter truffles, no-bake dessert, holiday treats, easy truffles, chocolate truffles, festive sweets, homemade candy


