“You’ve gotta try roasting the strawberries before you freeze them—it’s a game changer.” — and that was it. That casual text from my sister set me on a path of making this creamy no-churn roasted strawberry balsamic ice cream that I honestly can’t stop thinking about. I was skeptical at first; roasting fruit before turning it into ice cream sounded fancy, but also kind of a hassle. But once I gave it a whirl, well, let’s just say my freezer has never been the same.
It wasn’t just the roasting, either. Adding a splash of balsamic? That little twist made the flavors pop in a way I hadn’t expected. The strawberries caramelize, getting all jammy and sweet, but the balsamic adds this tangy depth that feels surprisingly fresh and sophisticated. It’s like a grown-up strawberry ice cream with a secret ingredient that wakes up your taste buds.
Making this ice cream doesn’t even require an ice cream maker, which I know can be a deal-breaker for some people. You just roast, mix, fold, and freeze. The creamy texture comes out smooth and luscious, even without churning. It’s perfect for when you want something homemade but don’t want to fuss with complicated equipment or long processes.
What really sticks with me is how this recipe changed my view of what ice cream can be. It’s not just a cold, sweet treat—it’s a little adventure in a bowl, and honestly, it’s one of those recipes I trust to impress without stress. If you’ve got a spare half hour and a craving for something that tastes homemade but looks like you spent hours on it, this is the one.
Plus, it’s the kind of ice cream that makes you pause after the first bite and think, “Okay, I might just have to make this again next weekend.”
Why You’ll Love This Recipe
This creamy no-churn roasted strawberry balsamic ice cream has been tested in my kitchen more times than I can count, and it never disappoints. Honestly, it’s one of those recipes that feels fancy but is incredibly approachable.
- Quick & Easy: Comes together in about 30 minutes plus freezing time – no ice cream maker required, making it perfect for last-minute dessert cravings.
- Simple Ingredients: Uses pantry staples and fresh strawberries – no exotic or hard-to-find items here.
- Perfect for Any Occasion: Whether you’re hosting a casual summer BBQ or a cozy night with friends, this ice cream fits right in.
- Crowd-Pleaser: Kids and adults alike rave about the balance of sweet roasted berries and tangy balsamic.
- Unbelievably Delicious: The roasting process intensifies the strawberry flavor, while the balsamic vinegar adds a subtle complexity that keeps each scoop interesting.
What sets this recipe apart is really the roasting technique combined with the balsamic twist. It’s not just a standard strawberry ice cream. Roasting the strawberries brings out a caramelized sweetness and soft texture that blends seamlessly into the creamy base. And the balsamic vinegar? It’s that little secret weapon that makes the flavors sing, without overpowering the natural fruitiness.
If you want a dessert that feels like it took effort but actually didn’t, this is your go-to. Plus, it’s dairy-forward but could easily be adapted for alternative milks or creams if you want a twist. Honestly, this recipe has been a lifesaver when I needed something quick but memorable.
What Ingredients You Will Need
This recipe uses simple, wholesome ingredients to deliver bold flavor and satisfying texture without the fuss. Most are probably already hanging out in your kitchen or local market.
- Fresh Strawberries: About 2 pounds (900g), washed and hulled. I prefer medium-sized berries for roasting because they get beautifully jammy without drying out.
- Balsamic Vinegar: 2 tablespoons. Use a good-quality aged balsamic for the best flavor (I like Colavita brand).
- Granulated Sugar: ½ cup (100g), for roasting and sweetening the base.
- Heavy Cream: 2 cups (480ml), cold. This is what gives the ice cream its creamy, dreamy texture.
- Sweetened Condensed Milk: 1 can (14 oz / 396g). This sweetens and thickens the ice cream base without needing an ice cream maker.
- Vanilla Extract: 1 teaspoon, for warmth and depth.
- Pinch of Salt: To balance all the sweetness and enhance flavors.
If you’re looking to make this dairy-free, swap heavy cream for canned coconut milk (full fat), and use a dairy-free condensed milk alternative or homemade cashew cream sweetened with maple syrup. For a gluten-free treat, all ingredients here are naturally gluten-free.
Equipment Needed
- Baking Sheet: For roasting the strawberries evenly. A rimmed sheet works best to catch any juices.
- Mixing Bowls: At least two – one for whipping cream and one for combining ingredients.
- Hand Mixer or Stand Mixer: For whipping the cream to soft peaks. You can do it by hand, but trust me, a mixer saves time and effort.
- Spatula: A flexible silicone spatula is perfect for folding the whipped cream into the condensed milk gently.
- Freezer-Safe Container: To hold your ice cream while it freezes. I like using a loaf pan or any airtight container.
No fancy ice cream machine needed here, which is one reason I adore this recipe. If you don’t have a hand mixer, a whisk and some patience will do, but the texture might not be quite as fluffy. Also, keeping your mixing bowls and beaters chilled helps the cream whip up faster and better.
Preparation Method
- Preheat your oven to 400°F (200°C). Line a baking sheet with parchment paper for easy cleanup.
- Prepare the strawberries: Place the hulled strawberries in a single layer on the baking sheet. Sprinkle with ¼ cup (50g) granulated sugar and drizzle the 2 tablespoons of balsamic vinegar evenly over them. Toss lightly to coat.
- Roast the strawberries: Pop them in the oven for 20–25 minutes. You want them soft, slightly caramelized, and juicy but not mushy. They’ll smell heavenly. Once done, let them cool completely in the pan. (Pro tip: reserve the roasting juices — those are pure gold for flavor!)
- Blend the roasted strawberries: Transfer the cooled berries and their juices to a blender or food processor. Pulse a few times to roughly puree but still leave some chunks for texture. Set aside.
- Whip the cream: In a chilled bowl, beat the cold heavy cream with a hand or stand mixer until soft peaks form. This usually takes about 3–5 minutes.
- Mix the base: In a separate large bowl, combine the sweetened condensed milk, vanilla extract, pinch of salt, and the roasted strawberry puree. Stir gently until combined.
- Fold whipped cream into the strawberry mixture: Using a spatula, gently fold in the whipped cream in three additions. This keeps the mixture light and airy, which is key for creamy no-churn ice cream.
- Transfer to container and freeze: Pour the mixture into your freezer-safe container, smoothing the top with a spatula. Cover tightly with a lid or plastic wrap.
- Freeze for at least 6 hours or overnight. The ice cream will firm up beautifully without any churning.
- Serve: Let the ice cream sit at room temperature for 5 minutes before scooping to get that perfect creamy softness.
If your ice cream becomes too hard, just let it thaw a little longer before scooping, and avoid leaving it out too long to prevent melting. Also, if you want to add texture, folding in chopped roasted nuts or a swirl of balsamic glaze right before freezing can be a fun twist.
Cooking Tips & Techniques
Roasting the strawberries is the secret sauce here. It concentrates sugars and softens the fruit in a way fresh strawberries simply can’t match. Don’t skip this step, or you’ll miss out on that rich caramelized flavor.
When whipping the cream, cold ingredients and bowls make all the difference. I’ve learned this the hard way after several lackluster batches where the cream just wouldn’t peak. Chill everything for at least 30 minutes if you can.
Folding the whipped cream into the condensed milk and strawberry mixture gently is crucial. Stirring too aggressively knocks out the air and leaves you with a denser ice cream. Take your time and fold in thirds for the best texture.
Using sweetened condensed milk is a lifesaver for no-churn ice cream. It adds sweetness and creaminess without the need for eggs or complicated custards. Plus, it helps prevent ice crystals from forming, keeping the texture smooth.
One common mistake is trying to skip the freezing time or rushing the chilling process. Patience here pays off — the ice cream firms up better and tastes way more luscious after a full freeze.
Also, I’ve found that letting the ice cream soften a bit at room temperature before scooping really helps with that creamy mouthfeel. Nobody wants rock-hard scoops that hurt your teeth!
Variations & Adaptations
- Dairy-Free Version: Use full-fat canned coconut milk instead of heavy cream and swap condensed milk for a dairy-free sweetened condensed milk alternative or homemade cashew cream with maple syrup.
- Flavor Twists: Add a tablespoon of fresh mint finely chopped for a refreshing lift, or swirl in a ribbon of honey or balsamic reduction before freezing for extra depth.
- Berry Mix: Swap strawberries for a combination of roasted raspberries and blackberries if you want a darker berry profile. Just roast gently as these berries are softer.
- Nutty Crunch: Fold in toasted pistachios or almonds for texture. I once added crushed amaretti cookies, inspired by a white chocolate raspberry cheesecake bar, and it was a delightful surprise.
Feel free to customize the balsamic amount to your taste. Some like it more tangy, others prefer just a hint. I personally stick to 2 tablespoons but have gone up to 3 when I want a bolder kick.
Serving & Storage Suggestions
This ice cream tastes best served slightly softened, about 5 minutes out of the freezer. Scoop it into bowls or pretty glasses, then garnish with fresh mint leaves or a few whole roasted strawberries if you have extras.
It’s fantastic alongside light desserts like a crisp Earl Grey tea cake or as a refreshing finish to a summer brunch spread featuring a spinach and feta croissant bake.
Store leftovers in an airtight container in the freezer for up to 2 weeks. The flavor holds up well, but try to avoid ice crystals by pressing a piece of parchment paper directly on the surface before sealing.
Reheat gently by letting sit at room temp for a few minutes and stirring lightly if needed to restore creaminess. The flavors actually deepen after a day or two in the freezer, making it an even better treat.
Nutritional Information & Benefits
A typical serving (about ½ cup or 120g) of this creamy no-churn roasted strawberry balsamic ice cream contains roughly 250 calories, 15g fat, 25g carbohydrates, and 3g protein. It’s a treat, but the fresh fruit and lack of artificial additives make it a cleaner indulgence than store-bought options.
Strawberries bring antioxidants and vitamin C to the table, while balsamic vinegar may aid digestion and blood sugar regulation. Using real cream and condensed milk provides calcium and vitamin D, important for bone health.
For those watching sugars, you can slightly reduce the sugar quantity or experiment with natural sweeteners like monk fruit or stevia, but that might affect texture slightly.
Conclusion
This creamy no-churn roasted strawberry balsamic ice cream is one of those recipes that feels both indulgent and effortlessly elegant. It’s a reminder that sometimes simple techniques—like roasting fruit and adding a splash of balsamic—can completely change how we think about a classic dessert.
Make it your own by tweaking the berries, adding mix-ins, or trying a dairy-free version if you like. I love this recipe because it delivers an impressive homemade treat without the usual ice cream fuss.
If you’ve ever enjoyed the vibrant flavors of a frozen strawberry dessert or the creamy richness of a passion fruit mousse cup, you’ll find this ice cream hits that same sweet spot but with a fun twist you won’t forget.
Go ahead and give it a try — I’d love to hear how your batch turns out or what creative twists you come up with. There’s something so satisfying about making your own ice cream at home, and this recipe makes it actually doable.
FAQs
Can I use frozen strawberries instead of fresh?
Fresh strawberries are best for roasting because they caramelize nicely. Frozen berries tend to release more water and might make the ice cream icier, but if that’s all you have, thaw and drain them well before roasting.
How long does the ice cream need to freeze before serving?
Freeze for at least 6 hours or overnight for the best texture. The longer it freezes, the firmer it gets.
Can I make this recipe without balsamic vinegar?
You can omit the balsamic, but it adds a unique tang and depth to the flavor. If you skip it, consider adding a pinch of lemon zest or a splash of vanilla for brightness.
Is this recipe suitable for vegans?
Not as written, but you can make it vegan by using coconut cream and a dairy-free condensed milk alternative. The texture will be slightly different but still delicious.
How do I prevent ice crystals from forming?
Using sweetened condensed milk helps reduce ice crystals. Also, cover the ice cream surface with parchment paper before sealing the container to minimize air exposure, which causes crystals.
Pin This Recipe!

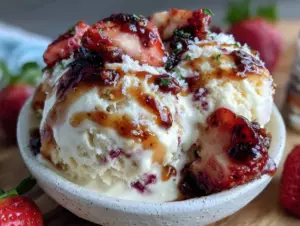
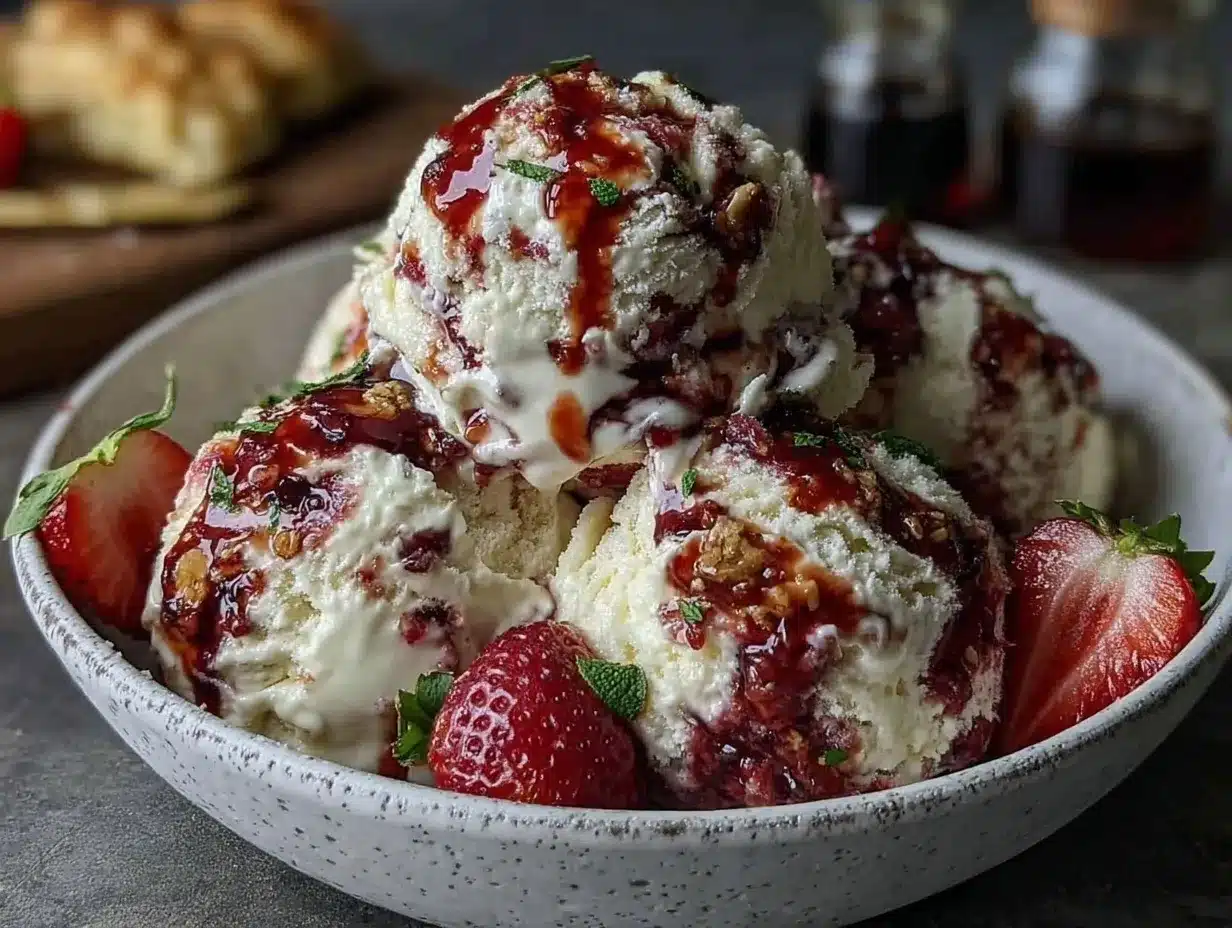
Creamy No-Churn Roasted Strawberry Balsamic Ice Cream

A creamy no-churn ice cream featuring roasted strawberries and a splash of balsamic vinegar for a sophisticated, jammy flavor. Easy to make without an ice cream maker and perfect for any occasion.
- Prep Time: 15 minutes
- Cook Time: 25 minutes
- Total Time: 6 hours 40 minutes
- Yield: 8 servings 1x
- Category: Dessert
- Cuisine: American
Ingredients
- 2 pounds (900g) fresh strawberries, washed and hulled
- 2 tablespoons balsamic vinegar
- ½ cup (100g) granulated sugar
- 2 cups (480ml) cold heavy cream
- 1 can (14 oz / 396g) sweetened condensed milk
- 1 teaspoon vanilla extract
- Pinch of salt
Instructions
- Preheat your oven to 400°F (200°C). Line a baking sheet with parchment paper.
- Place hulled strawberries in a single layer on the baking sheet. Sprinkle with ¼ cup (50g) granulated sugar and drizzle 2 tablespoons balsamic vinegar evenly over them. Toss lightly to coat.
- Roast the strawberries for 20–25 minutes until soft, slightly caramelized, and juicy. Let cool completely in the pan, reserving the roasting juices.
- Transfer cooled strawberries and juices to a blender or food processor. Pulse a few times to roughly puree, leaving some chunks for texture. Set aside.
- In a chilled bowl, whip the cold heavy cream with a hand or stand mixer until soft peaks form (about 3–5 minutes).
- In a separate large bowl, combine sweetened condensed milk, vanilla extract, pinch of salt, and roasted strawberry puree. Stir gently until combined.
- Gently fold whipped cream into the strawberry mixture in three additions to keep it light and airy.
- Pour the mixture into a freezer-safe container, smoothing the top. Cover tightly with a lid or plastic wrap.
- Freeze for at least 6 hours or overnight until firm.
- Before serving, let the ice cream sit at room temperature for 5 minutes to soften for easier scooping.
Notes
Roasting strawberries intensifies their sweetness and texture. Use cold bowls and cream for better whipping. Fold whipped cream gently to keep the mixture airy. Freeze at least 6 hours for best texture. Let ice cream soften 5 minutes before scooping. For dairy-free, substitute heavy cream with full-fat canned coconut milk and use dairy-free condensed milk alternative.
Nutrition
- Serving Size: ½ cup (120g)
- Calories: 250
- Sugar: 22
- Sodium: 50
- Fat: 15
- Saturated Fat: 9
- Carbohydrates: 25
- Fiber: 2
- Protein: 3
Keywords: no-churn ice cream, roasted strawberry ice cream, balsamic ice cream, easy homemade dessert, no ice cream maker, creamy strawberry ice cream