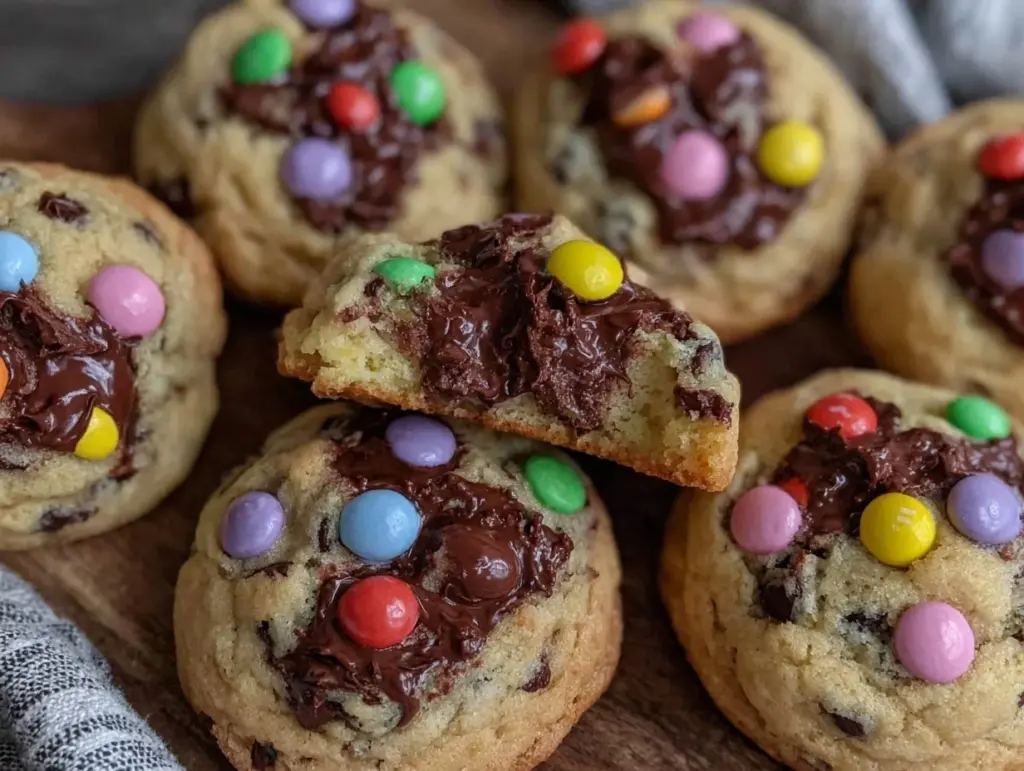
Let me tell you, the scent of freshly baked soft chewy Easter M&M cookies wafting through the kitchen is enough to make anyone’s mouth water. That warm, buttery aroma mixed with bursts of sweet chocolate and colorful candy shells brings an instant smile. The first time I baked these cookies, I was instantly hooked — the kind of moment where you pause, take a deep breath, and just smile because you know you’re onto something truly special. It was a rainy Saturday afternoon years ago, when I was knee-high to a grasshopper, helping my grandma bake treats for Easter. She handed me a bowl filled with colorful M&Ms and said, “These will make the cookies pop!” Ever since then, these soft chewy Easter M&M cookies have been a family favorite.
You know what’s honestly the best part? My family couldn’t stop sneaking them off the cooling rack (and I can’t really blame them). These cookies have that perfect chewy texture that feels like a warm hug wrapped in a cookie. They’re dangerously easy to make, too — perfect for potlucks, sweet treats for your kids, or just brightening up your Pinterest cookie board. I’ve tested this recipe more times than I can count (in the name of research, of course), and it’s become a staple for family gatherings and gifting. Trust me, you’re going to want to bookmark this one.
Why You’ll Love This Recipe
Honestly, this recipe ticks all the boxes for a cozy, crowd-pleasing treat. Coming from countless kitchen trials and a few happy accidents, I can say these soft chewy Easter M&M cookies are a winner because:
- Quick & Easy: Comes together in under 30 minutes, perfect for busy weeknights or last-minute cravings.
- Simple Ingredients: No fancy grocery trips needed; you likely already have everything in your kitchen.
- Perfect for Easter & Spring Celebrations: The colorful M&Ms bring an instant festive vibe to any gathering.
- Crowd-Pleaser: Always gets rave reviews from kids and adults alike — the chewy texture is a universal favorite.
- Unbelievably Delicious: The buttery, soft cookie with a slight chew and bursts of chocolate is next-level comfort food.
What makes this recipe stand out is the way the dough stays soft and chewy even days after baking — no rock-hard edges here! The trick is using a mix of brown sugar and just the right amount of flour, plus chilling the dough briefly before baking. Also, folding in those Easter M&Ms at the end ensures they don’t melt too much, so you get those popping colors and little crunchy surprises in each bite. This isn’t just another cookie recipe — it’s the best version you’ll find for a cozy, nostalgic treat with a modern twist. If you’re looking to impress guests without the stress or want a simple recipe that feels like a warm hug, these cookies are calling your name.
What Ingredients You Will Need
This recipe uses simple, wholesome ingredients to deliver bold flavor and satisfying texture without the fuss. Most of these are pantry staples, with the Easter M&Ms adding that seasonal pop of color and sweetness.
- All-purpose flour (2 ¼ cups / 280g) – the base for soft, chewy texture
- Baking soda (1 teaspoon) – helps the cookies rise just right
- Salt (½ teaspoon) – balances the sweetness
- Unsalted butter, softened (1 cup / 226g) – adds richness and moisture (I recommend using a European-style butter like Plugrá for best texture)
- Brown sugar (¾ cup / 150g), packed – key to that chewy softness with a hint of caramel flavor
- Granulated sugar (½ cup / 100g) – for balanced sweetness and slight crisp edges
- Large eggs (2), room temperature – helps bind ingredients and add moisture
- Pure vanilla extract (2 teaspoons) – for warm, cozy flavor
- Easter M&Ms (1 ½ cups / 270g) – the star of the show! Use your favorite brand, or swap for regular M&Ms if you prefer
Substitution notes: If you want a gluten-free option, almond flour can be used but expect a slightly different texture. For dairy-free, swap butter with a plant-based margarine and use dairy-free eggs or flax eggs.
Equipment Needed
- Mixing bowls – I prefer glass or stainless steel for easy cleanup.
- Electric hand mixer or stand mixer – makes creaming butter and sugar a breeze.
- Measuring cups and spoons – precise measurements are key for cookie success.
- Spatula – for folding in M&Ms gently without breaking them.
- Baking sheets – rimmed ones help prevent spills.
- Parchment paper or silicone baking mats – to keep cookies from sticking.
- Cooling rack – allows cookies to cool evenly without sogginess.
If you don’t have a stand mixer, an electric hand mixer works just fine. For budget-friendly baking sheets, I recommend non-stick aluminum pans. And remember, a good spatula is worth its weight in gold when mixing delicate cookie dough.
Preparation Method
- Preheat your oven to 350°F (175°C). Line two baking sheets with parchment paper or silicone mats. This prevents sticking and helps with even baking. (5 minutes prep)
- Mix dry ingredients: In a medium bowl, whisk together 2 ¼ cups (280g) all-purpose flour, 1 teaspoon baking soda, and ½ teaspoon salt. Set aside. This ensures even distribution of leavening and salt. (2 minutes)
- Cream butter and sugars: In a large bowl, use an electric mixer to beat 1 cup (226g) softened unsalted butter with ¾ cup (150g) packed brown sugar and ½ cup (100g) granulated sugar. Beat on medium speed until light and fluffy, about 3-4 minutes. This step traps air, making cookies soft and chewy. (5 minutes)
- Add eggs and vanilla: Beat in 2 large room-temperature eggs, one at a time, followed by 2 teaspoons pure vanilla extract. Mix until combined but don’t overdo it — that can make cookies tough. (2 minutes)
- Incorporate dry ingredients: Gradually add the flour mixture to the wet ingredients on low speed. Mix just until combined — overmixing develops gluten and can make cookies less tender. The dough should be soft but not sticky. (3 minutes)
- Fold in Easter M&Ms: Gently fold in 1 ½ cups (270g) Easter M&Ms using a spatula. Be careful not to break the candies, so you get those pretty colorful bursts. (2 minutes)
- Chill the dough: Cover the dough and refrigerate for 30 minutes. This step helps prevent spreading and improves chewiness. (30 minutes wait)
- Shape cookies: Scoop dough using a cookie scoop or tablespoon-sized spoon onto the prepared baking sheets, spacing about 2 inches apart. (5 minutes)
- Bake: Bake in preheated oven for 10-12 minutes until edges are set but centers look slightly underbaked — that’s the sweet spot for softness. (10-12 minutes)
- Cool: Let cookies cool on baking sheets for 5 minutes before transferring to a wire rack to cool completely. This helps them set without losing softness. (10-15 minutes)
Pro tip: If cookies look too flat after baking, chill the dough longer next time. Also, don’t worry if they look slightly underdone — they’ll firm up beautifully as they cool.
Cooking Tips & Techniques
Let’s be honest — baking cookies sounds simple until you end up with rock-hard or flat results. I’ve been there, trust me. Here are some tips I picked up through trial and error:
- Butter temperature matters: Using softened, not melted butter gives you the best texture. If your butter is too warm, cookies spread too much.
- Don’t skip chilling: Refrigerating the dough before baking helps control spreading and keeps the cookies chewy.
- Measuring flour right: I learned the hard way that scooping flour straight from the bag packs too much in. Fluff it first and spoon into measuring cups for accuracy.
- Mix just until combined: Overmixing develops gluten, making cookies tough. Stop once you see no dry flour.
- Watch baking time: Pull cookies out when edges are set but centers still look soft. They’ll firm up — no overbaking!
- Multitasking: While dough chills, clean your workspace or prep a cup of tea. It makes the process smoother and more enjoyable.
Honestly, once you get these down, your oven will be your best friend for cozy cookie days.
Variations & Adaptations
Want to mix things up or cater to special diets? Here are some fun and tasty ideas:
- Gluten-Free Version: Swap all-purpose flour for a gluten-free baking blend. I’ve tried Bob’s Red Mill 1-to-1 blend with great results — just keep an eye on dough texture and add a splash of milk if too dry.
- Peanut Butter Twist: Replace ½ cup of butter with smooth peanut butter for a nutty flavor. Your family will love the extra richness.
- Seasonal Fruit M&Ms: Swap Easter M&Ms for regular or even mini peanut M&Ms year-round. During summer, try folding in fresh raspberries or chopped strawberries for a fruity surprise.
- Dairy-Free Option: Use dairy-free margarine and flax eggs (1 tablespoon flaxseed meal + 3 tablespoons water per egg). Texture changes slightly but still delicious.
I once tried adding a sprinkle of sea salt on top before baking — pure magic! It balances the sweetness beautifully.
Serving & Storage Suggestions
These soft chewy Easter M&M cookies are best served at room temperature, fresh out of the oven, or slightly warmed. They pair perfectly with a cold glass of milk or a cozy cup of hot cocoa. For Easter brunch, serve alongside fruit salad or yogurt parfaits for a fun treat.
To store, place cooled cookies in an airtight container at room temperature for up to 5 days. If you want to keep them longer, freeze the dough balls or baked cookies in a single layer on a baking sheet, then transfer to freezer bags — they keep for up to 3 months. When ready, thaw at room temperature or warm in a 300°F (150°C) oven for 5 minutes to bring back that fresh-baked softness.
Fun fact: these cookies actually taste better the next day as the flavors meld and the texture becomes even more tender. So, if you can wait, you’re in for a treat!
Nutritional Information & Benefits
Estimated per cookie (based on 24 cookies): 180 calories, 9g fat, 23g carbs, 2g protein.
The key ingredients like butter and eggs provide healthy fats and protein, while the brown sugar adds just the right amount of sweetness without going overboard. Using real butter offers more flavor and moisture than substitutes, and the M&Ms add a fun boost of chocolate and color.
If you’re mindful of allergens, note that this recipe contains eggs, dairy, and gluten. Adjustments like gluten-free flours and dairy-free alternatives can make these cookies accessible to many diets. For those watching sugar intake, you might reduce the granulated sugar slightly or swap for coconut sugar, though texture will shift a bit.
Conclusion
So, why should you make these soft chewy Easter M&M cookies? Because they’re the kind of recipe that brings joy with every bite — colorful, sweet, chewy, and cozy all at once. You can easily customize them to suit your tastes or dietary needs, and they’re perfect for sharing with family and friends.
I love this recipe because it reminds me of those cozy afternoons baking with grandma, filling the house with warmth and laughter. It’s simple, satisfying, and downright comforting. Go ahead, try it out, and don’t forget to let me know how your batch turns out! Share your thoughts, tips, or fun twists in the comments — I love hearing from you.
Happy baking, and remember: a good cookie is always worth the wait!
FAQs About Soft Chewy Easter M&M Cookies
Can I use regular M&Ms instead of Easter-themed ones?
Absolutely! Regular M&Ms work just as well and taste delicious. The Easter ones just add a festive pop of color if you’re baking for springtime.
How do I keep my cookies soft for longer?
Store them in an airtight container at room temperature with a slice of bread inside — the bread helps keep cookies moist. Avoid refrigerating as it can dry them out.
Can I freeze the cookie dough?
Yes! Freeze dough balls on a baking sheet, then transfer to a freezer bag. When ready, bake directly from frozen, adding a couple extra minutes to the baking time.
What if I don’t have an electric mixer?
You can mix by hand with a sturdy spoon or whisk, but it may take a bit longer to cream the butter and sugar well. Just be patient and keep mixing until fluffy.
Can I make these cookies vegan?
With some tweaks, yes! Use dairy-free margarine, a flax egg substitute, and vegan-friendly candy-coated chocolates. Texture and flavor will vary but still tasty!
Pin This Recipe!

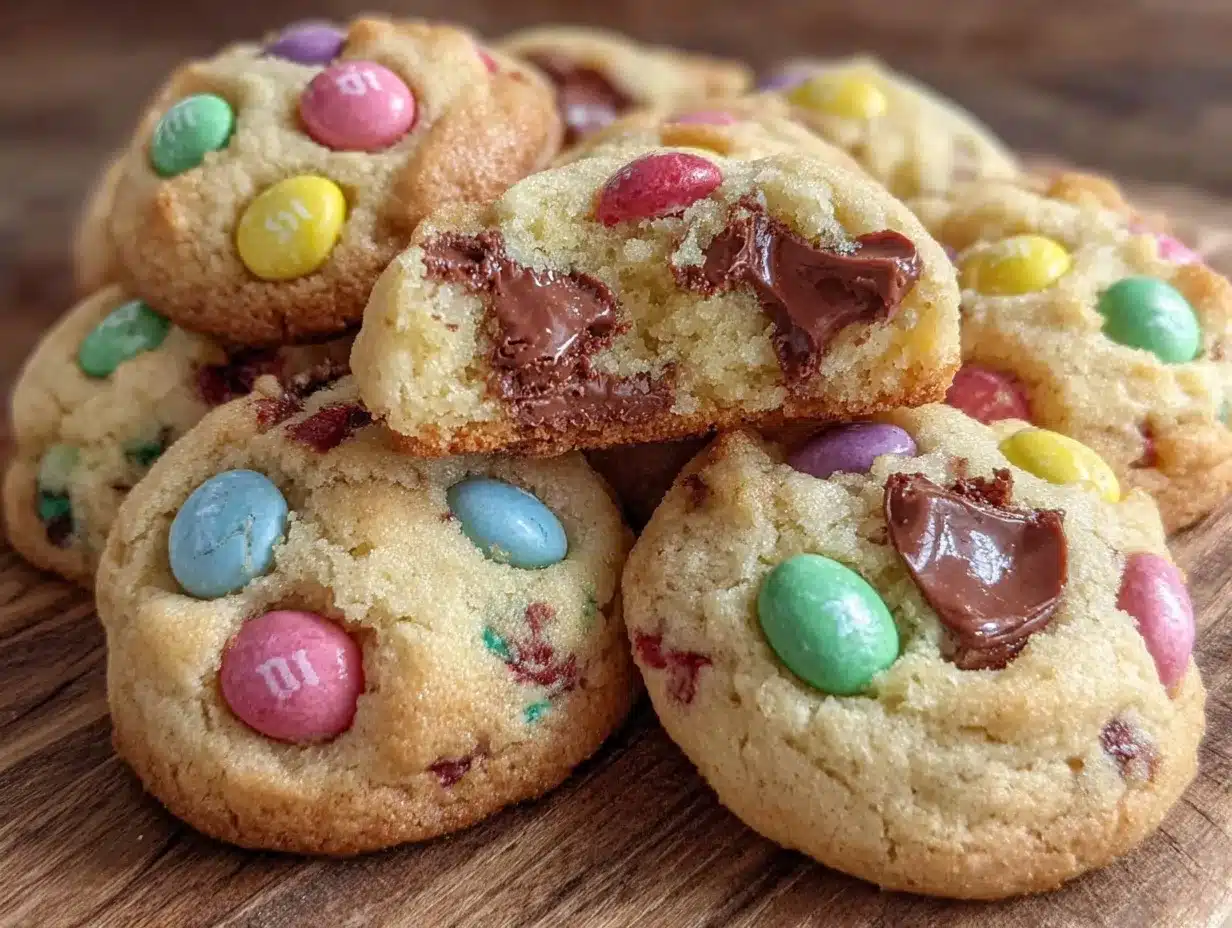
Soft Chewy Easter M&M Cookies

These soft chewy Easter M&M cookies are a cozy, crowd-pleasing treat with a perfect chewy texture and bursts of colorful candy. Easy to make and perfect for Easter celebrations or any sweet craving.
- Prep Time: 20 minutes
- Cook Time: 12 minutes
- Total Time: 1 hour 2 minutes
- Yield: 24 cookies 1x
- Category: Dessert
- Cuisine: American
Ingredients
- 2 ¼ cups (280g) all-purpose flour
- 1 teaspoon baking soda
- ½ teaspoon salt
- 1 cup (226g) unsalted butter, softened
- ¾ cup (150g) packed brown sugar
- ½ cup (100g) granulated sugar
- 2 large eggs, room temperature
- 2 teaspoons pure vanilla extract
- 1 ½ cups (270g) Easter M&Ms
Instructions
- Preheat your oven to 350°F (175°C). Line two baking sheets with parchment paper or silicone mats.
- In a medium bowl, whisk together the flour, baking soda, and salt. Set aside.
- In a large bowl, beat the softened butter with brown sugar and granulated sugar on medium speed until light and fluffy, about 3-4 minutes.
- Beat in the eggs one at a time, then add the vanilla extract and mix until combined.
- Gradually add the dry ingredients to the wet ingredients on low speed, mixing just until combined.
- Gently fold in the Easter M&Ms using a spatula, being careful not to break the candies.
- Cover the dough and refrigerate for 30 minutes.
- Scoop dough using a cookie scoop or tablespoon-sized spoon onto the prepared baking sheets, spacing about 2 inches apart.
- Bake for 10-12 minutes until edges are set but centers look slightly underbaked.
- Let cookies cool on baking sheets for 5 minutes, then transfer to a wire rack to cool completely.
Notes
Use softened butter, not melted, for best texture. Chill dough before baking to prevent spreading and improve chewiness. Pull cookies out when edges are set but centers look slightly underbaked for softness. Store cookies in an airtight container with a slice of bread to keep moist. Dough can be frozen for up to 3 months.
Nutrition
- Serving Size: 1 cookie
- Calories: 180
- Fat: 9
- Carbohydrates: 23
- Protein: 2
Keywords: Easter cookies, M&M cookies, soft chewy cookies, easy cookie recipe, holiday treats, colorful cookies


