
“You seriously made cheesecake in a jar? No oven?” my friend Ellie asked, raising an eyebrow as she eyed the little dessert jars I’d brought over for our last-minute backyard barbecue. That afternoon had been a whirlwind—kids running wild, the grill acting up, and me realizing I forgot to prep dessert. Honestly, I was this close to conceding defeat when the idea of these Easy No-Bake Strawberry Cheesecake Jars with Golden Oreo Crust popped into my head.
There’s something about the smell of crushed Golden Oreos mixed with fresh strawberries that instantly shifts the mood. I remember smashing those cookies with a rolling pin (because who has time to get out the food processor?), layering the creamy, tangy cheesecake filling, and topping it all with juicy strawberries. The best part? No oven, no stress. By the time everyone was done grilling, dessert was ready to go—cool, sweet, and perfectly portioned.
These jars quickly became a hit, not just because they look cute (hello, summer vibes!) but because they’re just easy enough to whip up between the chaos of a busy day. I’ve made them a handful of times since, especially when I want something light but still satisfying after a meal. Plus, they’re fun to personalize, which makes them a crowd-pleaser whether you’re hosting a big group or just craving a simple treat.
What stuck with me was how a spur-of-the-moment dessert could turn a hectic day around. It’s the kind of recipe that feels thoughtful without demanding hours in the kitchen—just the way I like it. And yeah, it’s a little celebration in a jar. You might find yourself making these Easy No-Bake Strawberry Cheesecake Jars with Golden Oreo Crust as often as I do, especially when summer rolls in.
Why You’ll Love This Easy No-Bake Strawberry Cheesecake Jars with Golden Oreo Crust Recipe
After trying a bunch of no-bake cheesecake recipes over the years, this one quickly became a favorite for more reasons than I expected. It’s honestly a lifesaver when you want dessert fast but don’t want to sacrifice flavor or presentation.
- Quick & Easy: You can have these cheesecake jars ready in about 20 minutes, perfect for those last-minute get-togethers or when the craving hits unexpectedly.
- Simple Ingredients: No fancy or hard-to-find stuff here. Golden Oreos, cream cheese, fresh strawberries, and a few pantry staples—nothing that requires a special trip to a specialty store.
- Perfect for Summer: These jars scream warm-weather vibes, whether it’s a picnic, barbecue, or just a casual dinner outside.
- Crowd-Pleaser: Kids love them (the cookie crust is a hit), and adults appreciate the balance of creamy and fruity. Everyone’s getting seconds.
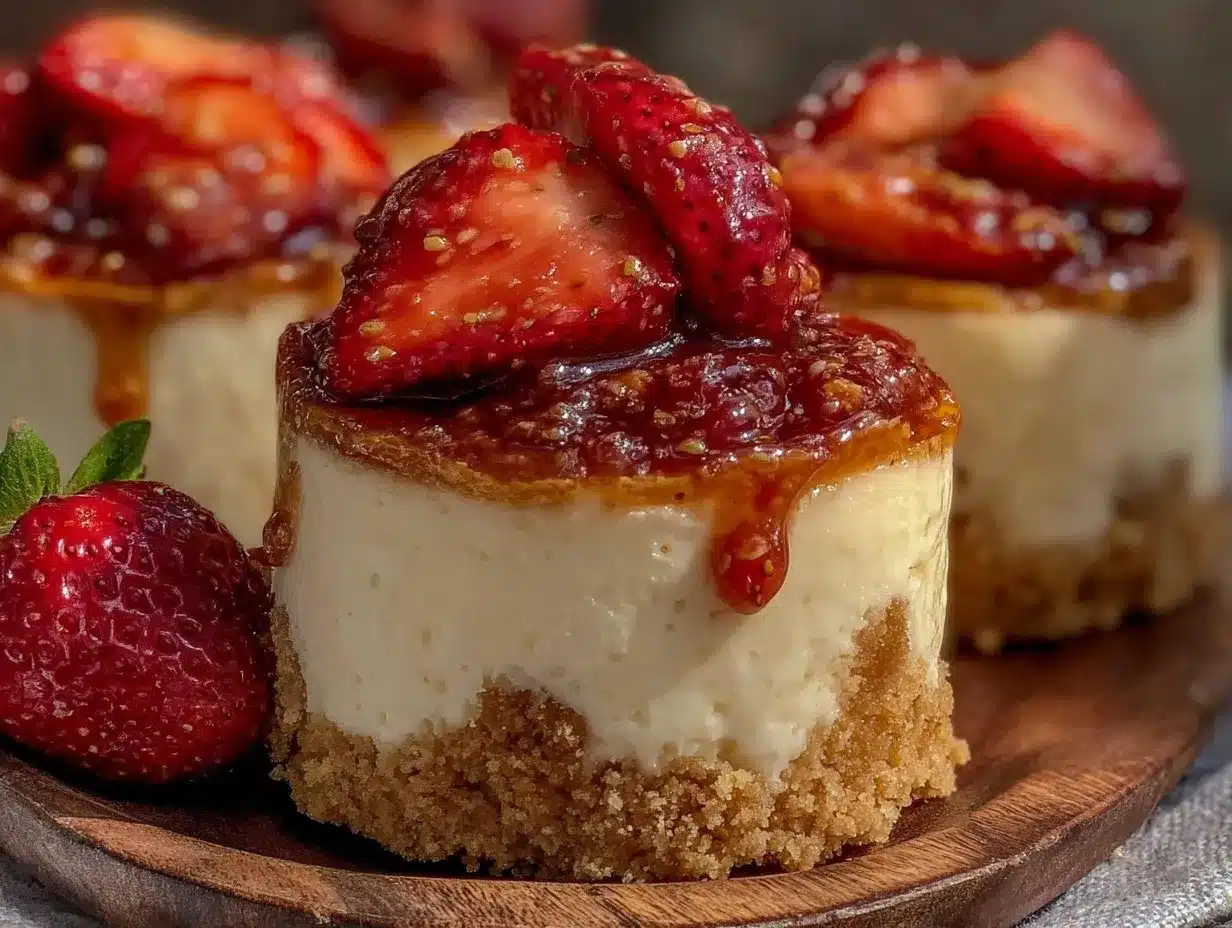
- Unbelievably Delicious: The Golden Oreo crust adds a buttery crunch that’s a nice switch from the usual graham cracker base, and the strawberry topping keeps things fresh and bright.
What sets this recipe apart is the texture combo—smooth cheesecake filling that’s light yet rich, paired with the crisp, slightly sweet Oreo crust. I also like how it’s presented in individual jars, making portion control easier and cleanup a breeze. Plus, these jars travel well, so they’re great for potlucks or picnic baskets.
This recipe isn’t just another no-bake cheesecake; it’s the version I keep coming back to because it feels a little special, but you don’t have to be a pro baker to get it right. Honestly, it’s the kind of dessert that invites you to relax and enjoy a moment, whether it’s a quiet night in or a lively summer gathering.
What Ingredients You Will Need for Easy No-Bake Strawberry Cheesecake Jars with Golden Oreo Crust
This recipe uses simple, wholesome ingredients to deliver bold flavor and a satisfying texture without the fuss. Most of these are pantry staples, and the fresh strawberries add that seasonal pop of color and taste.
- Golden Oreo Cookies (about 24 cookies for crust) – I prefer Nabisco for the perfect balance of sweetness and crunch.
- Unsalted Butter (6 tablespoons, melted) – binds the crust and adds richness.
- Cream Cheese (16 ounces or 450g, softened) – the star of the cheesecake filling; use full-fat for the creamiest texture.
- Granulated Sugar (3/4 cup or 150g) – sweetens the filling just right.
- Heavy Whipping Cream (1 cup or 240ml, chilled) – whipped to add lightness and fluffiness to the filling.
- Vanilla Extract (1 teaspoon) – enhances the cheesecake’s flavor.
- Fresh Strawberries (2 cups, hulled and sliced) – ripe and juicy, for topping and layering. In winter, frozen berries work fine too.
- Lemon Juice (1 tablespoon, freshly squeezed) – brightens the strawberry topping and balances sweetness.
- Powdered Sugar (1/4 cup or 30g) – optional, for dusting or extra sweetness in the filling if you prefer.
If you want to mix it up, almond flour can replace the cookie crust for a gluten-free option. Also, swapping out heavy cream for coconut cream works well if you need a dairy-free version. For the cheesecake base, I’ve tried Greek yogurt once to make it lighter, but it changes the texture quite a bit—still tasty, just less creamy.
Equipment Needed
- Mixing Bowls: A large bowl for the crust and another for the filling is ideal.
- Hand Mixer or Stand Mixer: To whip the cream and beat the cream cheese until smooth. A whisk works but is more of a workout!
- Food Processor or Rolling Pin: To crush the Golden Oreos. I often just use a zip-top bag and a rolling pin for easy cleanup.
- Measuring Cups and Spoons: For accuracy – I find it helps keep the filling just right.
- Spoons or Small Spatulas: To spread and layer the cheesecake filling.
- Jars or Small Glasses: Mason jars or any small glass containers work great for individual servings.
Personally, I’ve found that a handheld electric mixer speeds things along, especially when whipping the cream to soft peaks. If you don’t have one, a good old-fashioned whisk can do the trick, just expect a bit of an arm workout!
For budget-friendly options, using rolling pins and ziplock bags to crush cookies works surprisingly well and means fewer dishes.
Preparation Method
- Prepare the Crust: Place the Golden Oreos in a food processor and pulse until finely crushed. No food processor? No problem—put the cookies in a zip-top bag and crush them with a rolling pin until you get fine crumbs (about 2 minutes).
Transfer the crumbs to a bowl, then stir in the melted butter until the mixture feels like wet sand. - Layer the Crust: Spoon about 2 tablespoons (30g) of the crust mixture into each jar. Press down gently using the back of a spoon to create an even, compact base. This will give you that satisfying crunch under the creamy filling.
Set jars aside while you make the filling. - Make the Cheesecake Filling: In a large bowl, beat the softened cream cheese with granulated sugar and vanilla extract until smooth and creamy (about 2-3 minutes). It should be lump-free and slightly fluffy.
In a separate chilled bowl, whip the heavy cream until soft peaks form. Gently fold the whipped cream into the cream cheese mixture until well combined but still light and airy. - Fill the Jars: Using a spoon or piping bag, layer the cheesecake filling over the crust in each jar, filling about 3/4 full. Smooth the tops with the back of a spoon for a neat finish.
- Prepare the Strawberry Topping: In a small bowl, toss sliced strawberries with lemon juice and a teaspoon of sugar if desired. Let sit for 5 minutes to macerate and release their natural juices.
- Top the Cheesecakes: Spoon the strawberries atop each jar, distributing evenly. The strawberry juices will mingle slightly with the filling, adding a fresh zing.
- Chill: Cover the jars with lids or plastic wrap and refrigerate for at least 2 hours before serving. This helps the cheesecake set and flavors to meld.
Pro tip: If you’re short on time, flash chill in the freezer for 30-45 minutes, but keep an eye so it doesn’t freeze solid. Also, when pressing the crust, don’t over-compact; you want a little texture left.
Cooking Tips & Techniques for the Best No-Bake Cheesecake Jars
Working with no-bake cheesecakes can be a little tricky if you don’t know a few insider tips. Here’s what I’ve learned after a handful of batches:
- Softened Cream Cheese Is Key: Take the cream cheese out of the fridge about 30 minutes ahead. If it’s too cold, lumps will form, and the mixture won’t be silky.
- Whip the Cream Just Right: Stop whipping as soon as soft peaks form. Overwhipping makes it grainy and hard to fold in.
- Folding Technique Matters: Gently fold the whipped cream into the cream cheese mixture with a spatula, using a light hand. This keeps the filling airy and fluffy.
- Crust Texture: Avoid crushing the Oreos too finely into powder—small crumbs add a pleasant crunch and hold together better.
- Strawberry Prep: Let the strawberries sit with a bit of lemon juice and sugar to bring out their juices. Freshness here is everything.
- Chilling Time: Don’t rush the chill. The longer the jars rest, the more the flavors meld, and the filling firms up.
Once, I tried swapping the Golden Oreo crust for regular chocolate ones, and while tasty, the color and flavor shifted the vibe to more of a classic cheesecake. Honestly, I prefer the bright, buttery notes of the golden cookies here—they pair so well with strawberries.
Variations & Adaptations for Every Taste and Occasion
This recipe is surprisingly flexible, so feel free to get creative depending on what you have or prefer.
- Dairy-Free Version: Use dairy-free cream cheese and coconut cream whipped instead of heavy cream. For the crust, almond flour mixed with melted coconut oil makes a great substitute.
- Flavor Twists: Add a teaspoon of lemon zest or a splash of almond extract to the cheesecake filling for extra depth. You might also fold in some finely chopped fresh mint or basil for a garden-fresh note.
- Seasonal Fruit: Swap strawberries for blueberries, raspberries, or even peach slices for a summer twist. Frozen berries work fine, just thaw and drain excess liquid.
- Crunch Upgrade: Mix chopped toasted pecans or sliced almonds into the crust for a nutty crunch.
- Extra Toppings: Drizzle with a homemade berry coulis or a spoonful of lemon curd for a tangy finish.
Once, I tried adding a layer of white chocolate-raspberry cheesecake bars crumbs between the crust and filling for a decadent surprise—total crowd-pleaser.
Serving & Storage Suggestions
These strawberry cheesecake jars are best served chilled straight from the fridge. The cool temperature keeps the filling firm and refreshing, especially on warm days.
For presentation, add a fresh strawberry slice or a sprig of mint on top for a little color pop. They look fantastic on a dessert table or picnic blanket.
If you’re serving a crowd, these jars are perfect for prepping ahead of time. Store them covered in the refrigerator for up to 3 days. Avoid freezing, as the texture can get grainy and watery when thawed.
When reheating, just bring to room temperature for about 15 minutes before serving; that way, the flavors open up without melting the filling.
Over time, the crust might soften slightly as it absorbs moisture, but honestly, that just makes every bite more cohesive and dessert-like. If you want to keep the crust crunchy, add it just before serving.
Nutritional Information & Benefits
Each jar serves about 1 person, with an estimated 350-400 calories depending on portion size and ingredient brands.
Key ingredients like cream cheese provide protein and calcium, while fresh strawberries bring antioxidants and vitamin C.
This recipe can easily be made gluten-free by swapping the Golden Oreo crust for gluten-free cookies or almond flour. It’s a moderate treat that balances indulgence with fresh fruit, making it a great option for mindful eaters who want dessert without guilt.
Plus, these jars are portion-controlled, so you can enjoy a sweet ending without overdoing it—a little indulgence that feels just right.
Conclusion
Easy No-Bake Strawberry Cheesecake Jars with Golden Oreo Crust have become my go-to summer dessert for good reason. They’re simple, quick, and deliver that perfect mix of creamy, crunchy, and fruity in every bite. Whether you’re hosting friends or just treating yourself after a long day, these jars bring a little joy without the hassle.
Feel free to tweak the toppings or crust to suit your mood or what’s in your pantry. Honestly, the charm is in the simplicity and ease of making something that looks and tastes like you spent hours in the kitchen.
Next time you want a fuss-free, delicious treat, these jars won’t disappoint. And if you enjoy playing with layered desserts, you might appreciate the lightness of the creamy passion fruit mousse cups or the cozy sweetness of creamy peach Bellini panna cotta as well.
Happy no-bake baking!
Frequently Asked Questions About Easy No-Bake Strawberry Cheesecake Jars
Can I make these cheesecake jars ahead of time?
Yes! They actually taste better after sitting in the fridge for a couple of hours or overnight as the flavors meld and the filling firms up nicely.
What can I use instead of Golden Oreos?
You can swap Golden Oreos for graham crackers, digestive biscuits, or even crushed pretzels for a salty-sweet twist.
How do I store leftover cheesecake jars?
Keep them covered in the refrigerator for up to 3 days. Avoid freezing, as the texture might change.
Can I use frozen strawberries?
Absolutely! Just thaw and drain any excess liquid before using so your jars don’t get watery.
Is there a way to make this recipe dairy-free?
Yes, use dairy-free cream cheese and substitute heavy cream with whipped coconut cream. For the crust, almond flour mixed with coconut oil is a good alternative.
Pin This Recipe!
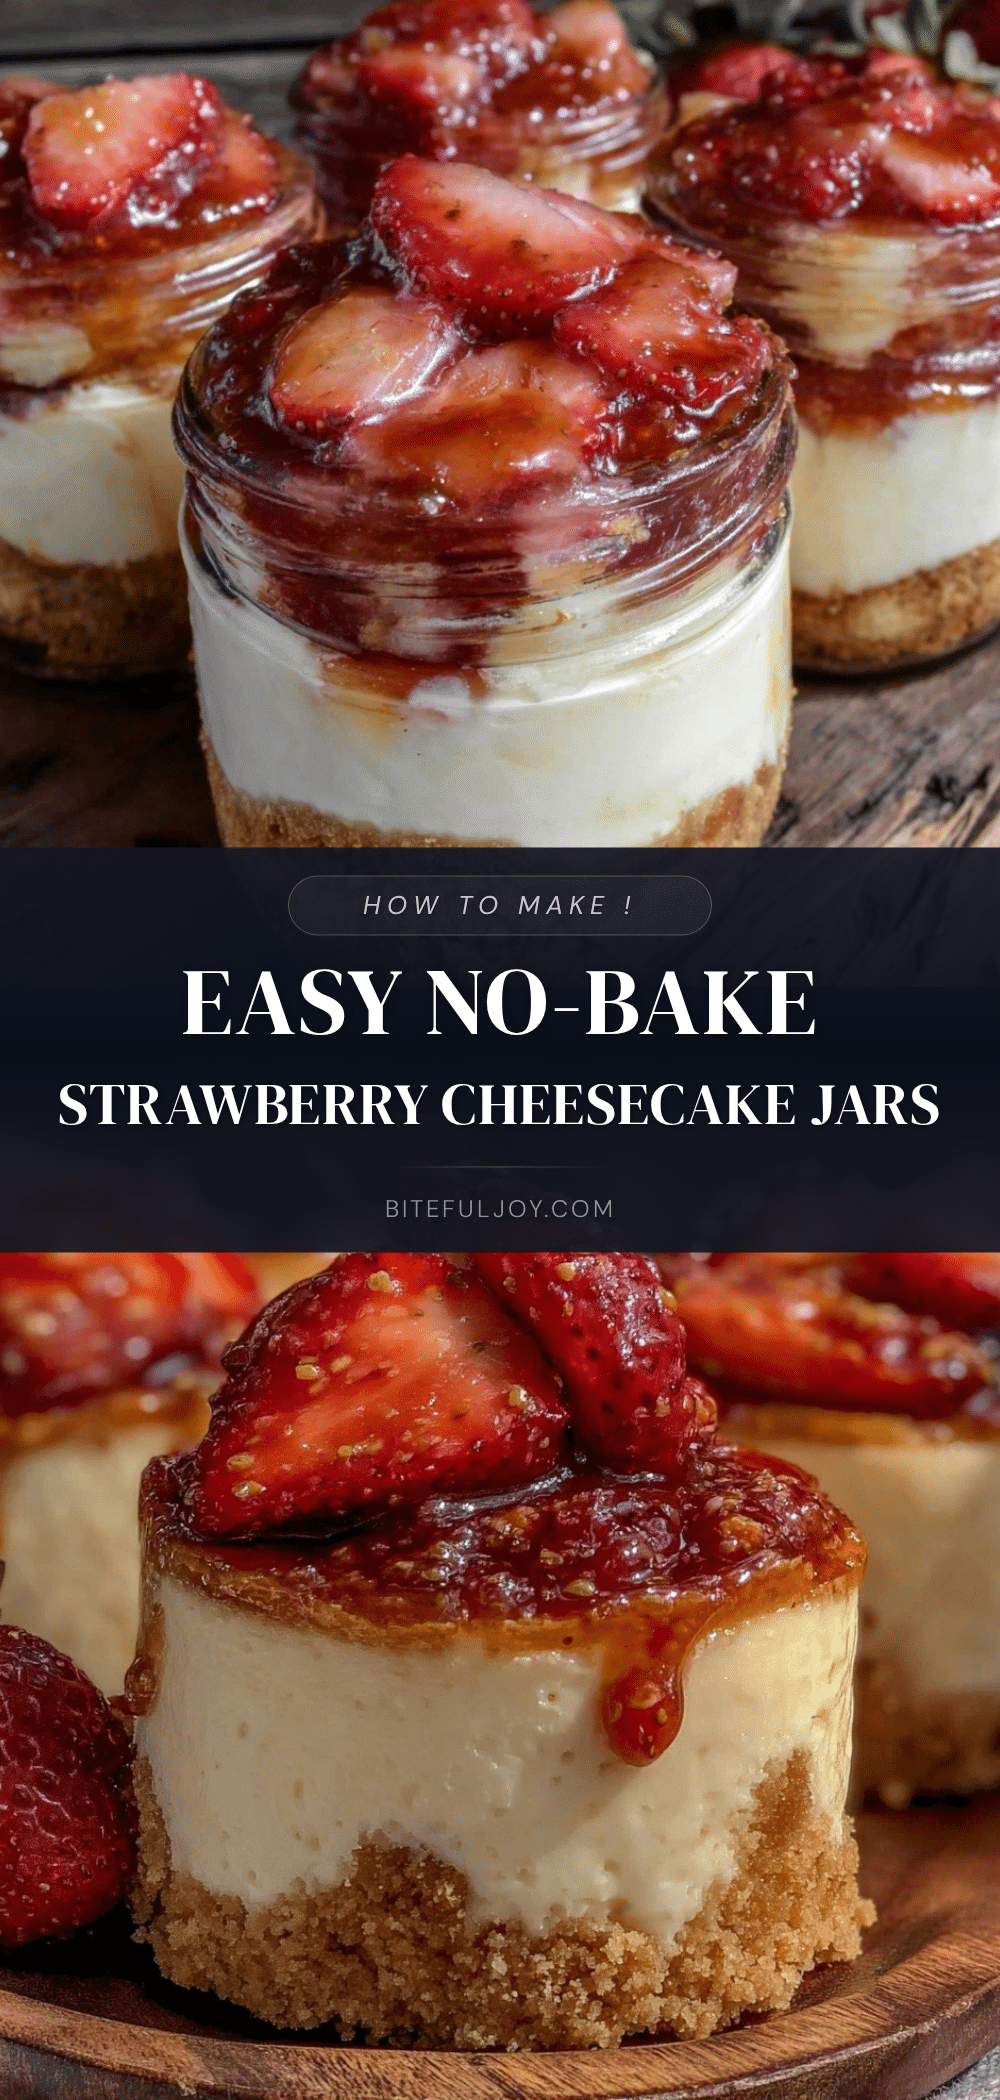
Easy No-Bake Strawberry Cheesecake Jars Recipe with Golden Oreo Crust

A quick and easy no-bake cheesecake dessert served in jars with a crunchy Golden Oreo crust and fresh strawberry topping, perfect for summer gatherings.
- Prep Time: 15 minutes
- Cook Time: 0 minutes
- Total Time: 2 hours 15 minutes
- Yield: 8 servings 1x
- Category: Dessert
- Cuisine: American
Ingredients
- 24 Golden Oreo Cookies
- 6 tablespoons unsalted butter, melted
- 16 ounces (450g) cream cheese, softened
- 3/4 cup (150g) granulated sugar
- 1 cup (240ml) heavy whipping cream, chilled
- 1 teaspoon vanilla extract
- 2 cups fresh strawberries, hulled and sliced
- 1 tablespoon freshly squeezed lemon juice
- 1/4 cup (30g) powdered sugar (optional)
Instructions
- Prepare the crust: Crush Golden Oreos finely using a food processor or place in a zip-top bag and crush with a rolling pin until fine crumbs form.
- Transfer crumbs to a bowl and stir in melted butter until mixture resembles wet sand.
- Layer the crust: Spoon about 2 tablespoons (30g) of crust mixture into each jar and press gently to form an even base.
- Make the cheesecake filling: Beat softened cream cheese with granulated sugar and vanilla extract until smooth and creamy (2-3 minutes).
- In a separate chilled bowl, whip heavy cream until soft peaks form.
- Gently fold whipped cream into cream cheese mixture until light and airy.
- Fill the jars: Layer cheesecake filling over crust in each jar, filling about 3/4 full and smooth the tops.
- Prepare strawberry topping: Toss sliced strawberries with lemon juice and optional teaspoon of sugar; let sit for 5 minutes.
- Top each jar with the strawberry mixture evenly.
- Chill jars covered in refrigerator for at least 2 hours before serving.
Notes
Use softened cream cheese for a smooth filling. Whip cream to soft peaks and fold gently to keep filling airy. Do not over-compact crust to maintain texture. Fresh strawberries can be replaced with frozen (thawed and drained). For dairy-free, substitute cream cheese and heavy cream with dairy-free alternatives and use almond flour crust.
Nutrition
- Serving Size: 1 jar (approximately
- Calories: 375
- Sugar: 22
- Sodium: 220
- Fat: 25
- Saturated Fat: 15
- Carbohydrates: 30
- Fiber: 1
- Protein: 5
Keywords: no-bake cheesecake, strawberry cheesecake, Golden Oreo crust, summer dessert, easy dessert, cheesecake jars


