
“You really think anyone’s going to eat these?” my skeptical friend asked, eyeing the misshapen, green-coated pretzel rods on the counter. I was in the middle of a last-minute Halloween prep frenzy, juggling pumpkin carving and dinner plans, when I threw together these Perfect Witch Finger Pretzel Rods with Green Candy Coating as a quick festive snack. Honestly, I wasn’t sure if they’d be more creepy or just plain weird-looking.
But as the evening wore on, and the first brave souls bit into these crunchy, sweet-and-salty fingers, the room filled with chuckles and surprised compliments. Turns out, these pretzel rods weren’t just a goofy last-minute idea — they quickly became the hit of the night. The way the green candy melted smoothly around the rod, with almond “nails” adding the perfect spooky touch, made me realize this recipe was a keeper. And hey, it didn’t hurt that they were insanely easy, which was a lifesaver on a chaotic night.
That night, between the glow of jack-o’-lanterns and the sound of kids trick-or-treating, I found myself quietly pleased that something so simple could bring that much fun. This recipe stuck with me because it’s not just about the look — it’s the crunch, the sweet coating, and the weirdly satisfying combo of salty pretzel with sugary candy that makes these witch fingers unforgettable. So, if you’re looking for a snack that’s playful but actually tastes good, this is the one to keep in your Halloween arsenal.
Why You’ll Love This Recipe
Having tested this Perfect Witch Finger Pretzel Rods recipe several times, I can say with confidence it brings a playful vibe without the fuss. It’s one of those treats you can make when you’re short on time but want to impress with something fun and festive.
- Quick & Easy: Ready in under 30 minutes, perfect for last-minute Halloween parties or casual gatherings.
- Simple Ingredients: No need for specialty stores — just pretzel rods, green candy melts, and almond slivers (you probably have these in your pantry or local grocery).
- Perfect for Halloween: They’re spooky enough to wow the crowd but still totally kid-friendly and snackable.
- Crowd-Pleaser: The salty-sweet combo wins over even the pickiest eaters — trust me, I’ve seen it firsthand at parties.
- Unbelievably Delicious: The green candy coating is smooth and sweet but not cloying, and the crunchy pretzels add a satisfying texture.
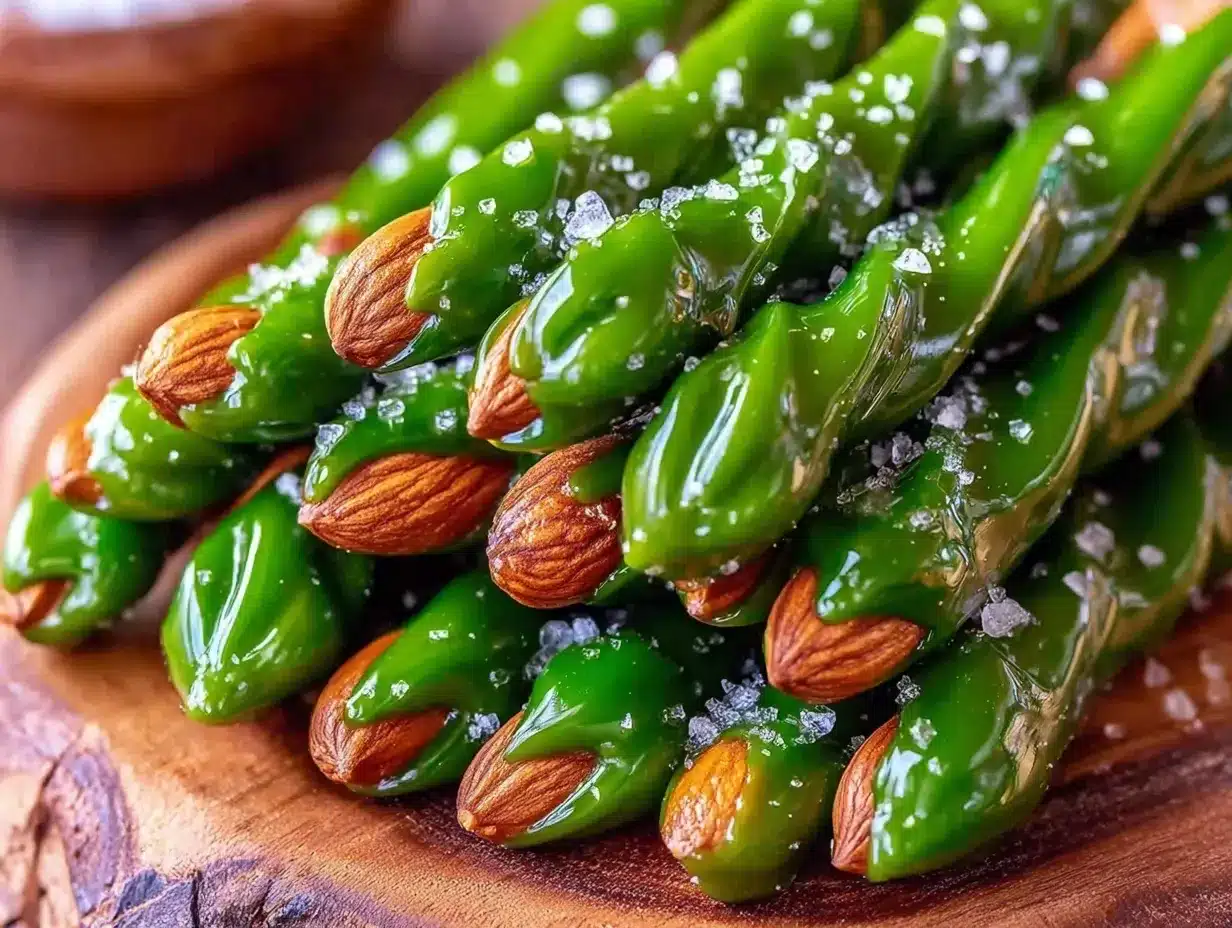
This isn’t your run-of-the-mill dipped pretzel. The secret? I’ve found that melting the candy coating slowly and dipping carefully (instead of a quick dunk) creates a more even, glossy finish. Plus, gently pressing the almond slivers on while the coating is still warm makes the “fingernails” look way more realistic.
Honestly, these witch finger pretzels are the kind of snack that makes you pause and smile — they’re festive without being over the top, and they’re just fun to make. Plus, if you enjoy creative sweet treats like the creamy passion fruit mousse cups or the fluffy lemon blueberry scones, you’ll appreciate how this recipe balances whimsy and flavor perfectly.
What Ingredients You Will Need
This recipe uses straightforward, pantry-friendly ingredients that come together to create bold flavor and a striking look without any complicated prep.
- Pretzel rods: Choose sturdy, thick rods that won’t snap easily; they form the base “finger.”
- Green candy melts: These are the star for the coating. I prefer Wilton’s brand for smooth melting and vibrant color.
- Almond slivers: These become the eerie “fingernails.” Look for thin, pointed slivers for the best effect.
- Edible black food marker or black gel icing: Optional, for adding knuckle lines if you want to get extra spooky.
- Vegetable shortening or coconut oil: Just a teaspoon or so to thin the candy melts if needed, helping to coat smoothly.
Feel free to swap out the almond slivers for cashews if you prefer a different shape or have allergies. For a dairy-free version, make sure your candy melts are vegan-friendly (there are some great brands out there). And if you want to mix things up seasonally, you could try orange or purple candy melts to create other creepy finger colors.
Equipment Needed
- Microwave-safe bowl: For melting candy melts gently without burning.
- Baking sheet lined with parchment paper or silicone mat: To place the dipped pretzels while the candy sets.
- Tongs or fork: Helpful for dipping the pretzel rods evenly and avoiding sticky fingers.
- Small spoon or toothpick: For adding fine details like knuckle lines with food coloring.
- Cooling rack (optional): Allows excess coating to drip for a neater finish.
If you don’t have parchment paper, wax paper works too, but be careful when peeling off the pretzels once set. I’ve found that a silicone mat makes cleanup a breeze, especially if you’re making a batch of these spooky snacks.
Preparation Method
- Melt the candy coating: Place 10 ounces (280 grams) of green candy melts in a microwave-safe bowl. Heat in 30-second bursts, stirring thoroughly between each, until smooth. If the coating seems too thick, add 1 teaspoon (5 ml) of vegetable shortening or coconut oil and stir to thin.
- Prepare your workspace: Line a baking sheet with parchment paper or a silicone mat. Have your almond slivers and food marker ready.
- Dip the pretzel rods: Holding a pretzel rod by one end, dip it slowly into the melted candy, twisting gently to coat evenly. Lift and let excess drip back into the bowl. Rest the coated rod on the lined sheet.
- Add fingernails: While the coating is still wet, press an almond sliver onto the tip of the pretzel to form a nail. Slightly angle it to look natural.
- Create knuckle details (optional): After the candy hardens (about 10-15 minutes), use an edible black food marker or gel icing with a toothpick to draw subtle knuckle lines and wrinkles.
- Let set completely: Allow the pretzel rods to cool and harden fully at room temperature for about 30 minutes. Avoid the fridge, as condensation can make the coating sticky.
Pro tip: If you want a smoother finish, dip the pretzels twice, letting the first layer set before adding the second. This also helps if your candy coating is thin and uneven on the first dip.
Cooking Tips & Techniques
Working with candy melts can be a bit tricky if you’re not used to them. One mistake I made the first time was overheating — candy melts seize quickly, turning grainy and unusable. To avoid that, always heat in short intervals and stir well.
Another tip is to keep your dipping area organized. Have everything ready before melting candy. Once the coating is warm, it sets quickly, so working fast is key.
When pressing almond slivers for fingernails, don’t push too hard or you’ll break the candy shell. A gentle touch creates a better look and keeps the coating intact.
If you want to add knuckle lines, wait until the coating is fully hardened — drawing on soft candy can smudge or tear the surface. I usually keep a paper towel handy to wipe my hands, too — sticky fingers make everything messier.
Lastly, patience is your friend. Letting the pretzels set at room temperature avoids condensation that happens in the fridge, keeping the candy coating crisp and glossy.
Variations & Adaptations
- Flavor twists: Add a drop of mint or almond extract to the melted candy for a subtle flavor boost.
- Color swaps: Use orange or purple candy melts for a different spooky vibe, or mix colors for an ombre effect.
- Nut-free option: Replace almond slivers with small pieces of colored candy or edible sugar decorations to avoid nut allergies.
- Gluten-free: Swap pretzel rods for gluten-free pretzels or even carrot sticks for a healthier crunch.
- Extra creepy: Use edible red gel or food coloring to add fake blood drips on the nails.
One time, I tried using white chocolate with green food coloring instead of candy melts — it worked okay but was trickier to get that smooth, shiny finish. The candy melts really do the job best.
Serving & Storage Suggestions
These witch finger pretzels are best served at room temperature so the candy coating stays crisp. Arrange them on a Halloween-themed platter or stick them upright in a decorated foam block for a fun presentation.
They pair wonderfully with drinks like a crisp apple cider or even a festive punch. If you’re hosting a party, setting these out alongside savory bites like spinach and feta croissant bake balances the sweet and salty elements nicely.
Store leftover pretzel rods in an airtight container at room temperature for up to 3 days. Avoid the fridge to keep the coating from sweating. To refresh, let them sit out for a few minutes to regain their crunch before serving again.
Nutritional Information & Benefits
Each witch finger pretzel rod (approximately 1 serving) contains around 120 calories, with 2 grams of protein and 5 grams of fat. The pretzel base provides a salty crunch with minimal fat, while the candy coating adds sweetness.
Almond slivers add a bit of healthy fat and protein, plus vitamin E and magnesium. For those mindful of allergens, swapping nuts with seed-based decorations or skipping the nails altogether is simple.
This treat is more about festive fun than everyday nutrition, but it’s a clever way to sneak some nuts and control portion size compared to other Halloween candy.
Conclusion
These Perfect Witch Finger Pretzel Rods with Green Candy Coating have earned a permanent spot in my seasonal snack rotation. They’re playful, tasty, and surprisingly easy to make — a rare combo that makes Halloween prep feel a little less chaotic and a lot more fun.
Whether you keep them classic or try one of the variations, this recipe invites creativity and a bit of whimsy. I love how it brings a smile (and sometimes a little shiver) to the table without complicated steps or fancy ingredients.
Give them a try, tweak the details to your taste, and don’t be surprised if they become your go-to party treat. And if you’re looking for more festive ideas, you might enjoy the creamy white chocolate raspberry cheesecake bars or the crispy brioche French toast with caramelized bananas — both bring that special touch to any celebration.
Frequently Asked Questions
Can I make these witch finger pretzels ahead of time?
Yes! You can make and store them at room temperature for up to 3 days. Just keep them in an airtight container to maintain freshness.
What if I don’t have candy melts? Can I use chocolate?
You can use white chocolate with food coloring, but candy melts are easier to work with and give a smoother, shinier finish. Chocolate might be trickier to coat evenly.
How do I make the fingernails stay attached?
Press the almond slivers onto the candy coating while it’s still wet. If the coating has hardened, they won’t stick well.
Can I add details like knuckle lines to the pretzels?
Definitely! Use an edible black food marker or gel icing after the coating has fully hardened to draw subtle knuckle lines for extra realism.
Are these pretzel rods gluten-free?
Traditional pretzel rods contain gluten, but you can substitute gluten-free pretzel rods or even crunchy vegetables like carrot sticks for a gluten-free version.
Pin This Recipe!
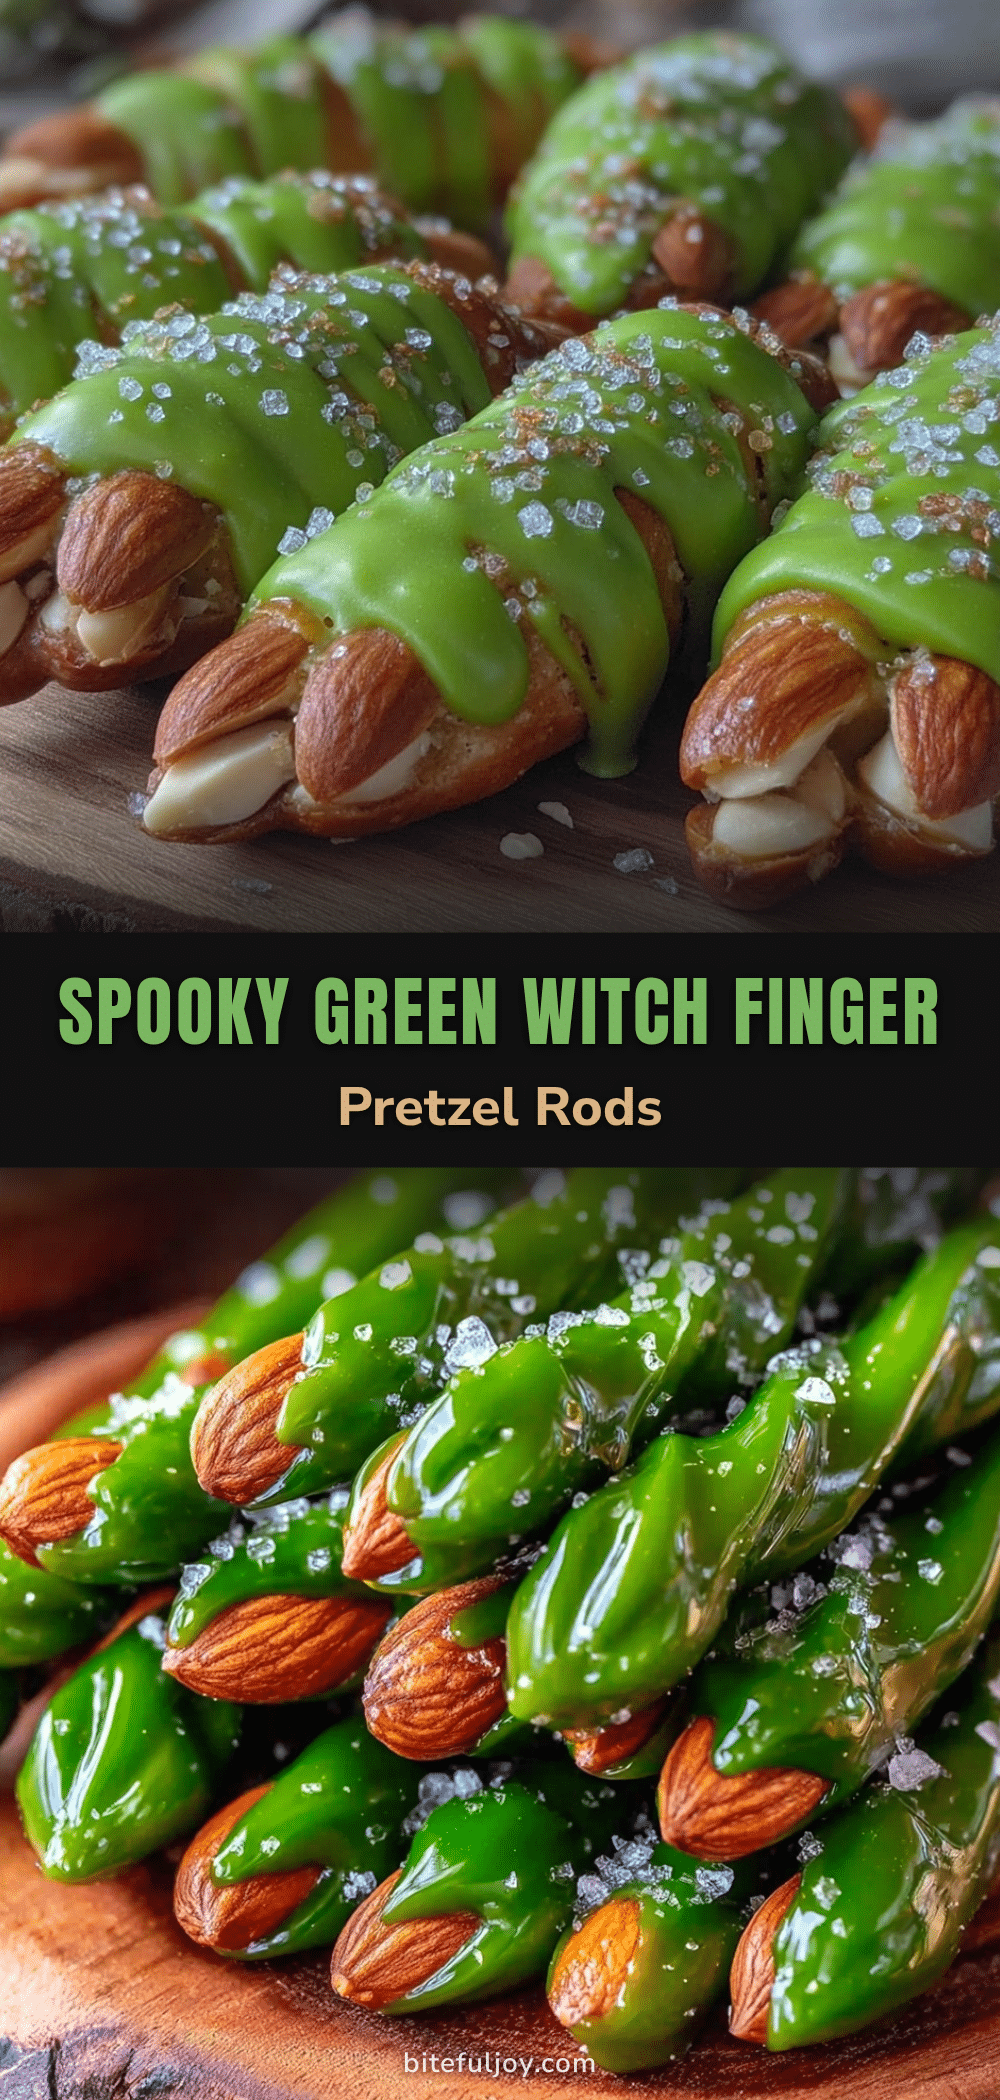
Perfect Witch Finger Pretzel Rods

Crunchy pretzel rods coated in smooth green candy melts with almond sliver fingernails, perfect for a spooky and fun Halloween snack that’s quick and easy to make.
- Prep Time: 10 minutes
- Cook Time: 15 minutes
- Total Time: 30 minutes
- Yield: 12 servings 1x
- Category: Snack
- Cuisine: American
Ingredients
- 10 ounces green candy melts
- Pretzel rods (sturdy, thick)
- Almond slivers (thin, pointed)
- 1 teaspoon vegetable shortening or coconut oil (optional, to thin candy melts)
- Edible black food marker or black gel icing (optional, for knuckle lines)
Instructions
- Place 10 ounces (280 grams) of green candy melts in a microwave-safe bowl. Heat in 30-second bursts, stirring thoroughly between each, until smooth. If the coating seems too thick, add 1 teaspoon (5 ml) of vegetable shortening or coconut oil and stir to thin.
- Line a baking sheet with parchment paper or a silicone mat. Have your almond slivers and food marker ready.
- Holding a pretzel rod by one end, dip it slowly into the melted candy, twisting gently to coat evenly. Lift and let excess drip back into the bowl. Rest the coated rod on the lined sheet.
- While the coating is still wet, press an almond sliver onto the tip of the pretzel to form a nail. Slightly angle it to look natural.
- After the candy hardens (about 10-15 minutes), use an edible black food marker or gel icing with a toothpick to draw subtle knuckle lines and wrinkles (optional).
- Allow the pretzel rods to cool and harden fully at room temperature for about 30 minutes. Avoid the fridge to prevent condensation and sticky coating.
Notes
Heat candy melts in short intervals to avoid overheating and graininess. Dip pretzels slowly for an even coating. Press almond slivers gently to avoid breaking the candy shell. Let pretzels set at room temperature to avoid condensation. For a smoother finish, dip twice letting the first layer set before the second.
Nutrition
- Serving Size: 1 pretzel rod
- Calories: 120
- Fat: 5
- Protein: 2
Keywords: Halloween, witch finger pretzels, candy melts, spooky snack, easy Halloween recipe, pretzel rods, almond slivers, green candy coating


