
“I swear, it was 10:30 PM on a random Wednesday when I found myself rummaging through the pantry, craving something sweet but without the usual stash of candy,” I told my friend the other day. Honestly, I wasn’t holding much hope for a homemade treat that late, especially since I didn’t plan for any baking that night. But then, there it was: a jar of creamy peanut butter and a bar of dark chocolate I’d forgotten about. The thought of those two flavors mingling in a luscious, creamy Easter egg was irresistible.
The kitchen was a mess in no time—spoons and bowls scattered, a cracked bowl that slipped from my hands, and my cat curiously circling around. But somehow, between the chaos and a few laughs, I whipped up what turned out to be the creamiest peanut butter Easter eggs with rich dark chocolate shells. I mean, the kind of treat where you close your eyes after the first bite and smile because it’s just that good.
Maybe you know that feeling when a simple craving leads to a recipe that sticks with you? These eggs aren’t just candy; they’re a little late-night magic, perfect for Easter or any time you want a decadent, homemade chocolate-peanut butter delight. And trust me, once you try making these, you’ll find yourself sneaking bites when no one’s looking.
This recipe stayed with me because it’s simple, indulgent, and surprisingly quick to make, even if you’re not expecting to be a chocolatier at midnight. So, if you’ve got a sweet tooth and a jar of peanut butter, let me walk you through the best way to make these creamy peanut butter Easter eggs with dark chocolate shells at home.
Why You’ll Love This Recipe
From my experience tinkering with peanut butter and chocolate combos, this recipe stands out because it balances ease and decadence like a pro. It’s not just another peanut butter egg; it’s the one that consistently gets rave reviews from friends and family, even from those who swear off sweets!
- Quick & Easy: Ready in under an hour, perfect for last-minute Easter prep or spontaneous sweet cravings.
- Simple Ingredients: No weird additives or fancy tools — just pantry staples you probably already have.
- Perfect for Easter & Beyond: Great for gifting, potlucks, or just a cozy night treat.
- Crowd-Pleaser: Kids love the creamy texture, and adults enjoy the rich dark chocolate contrast.
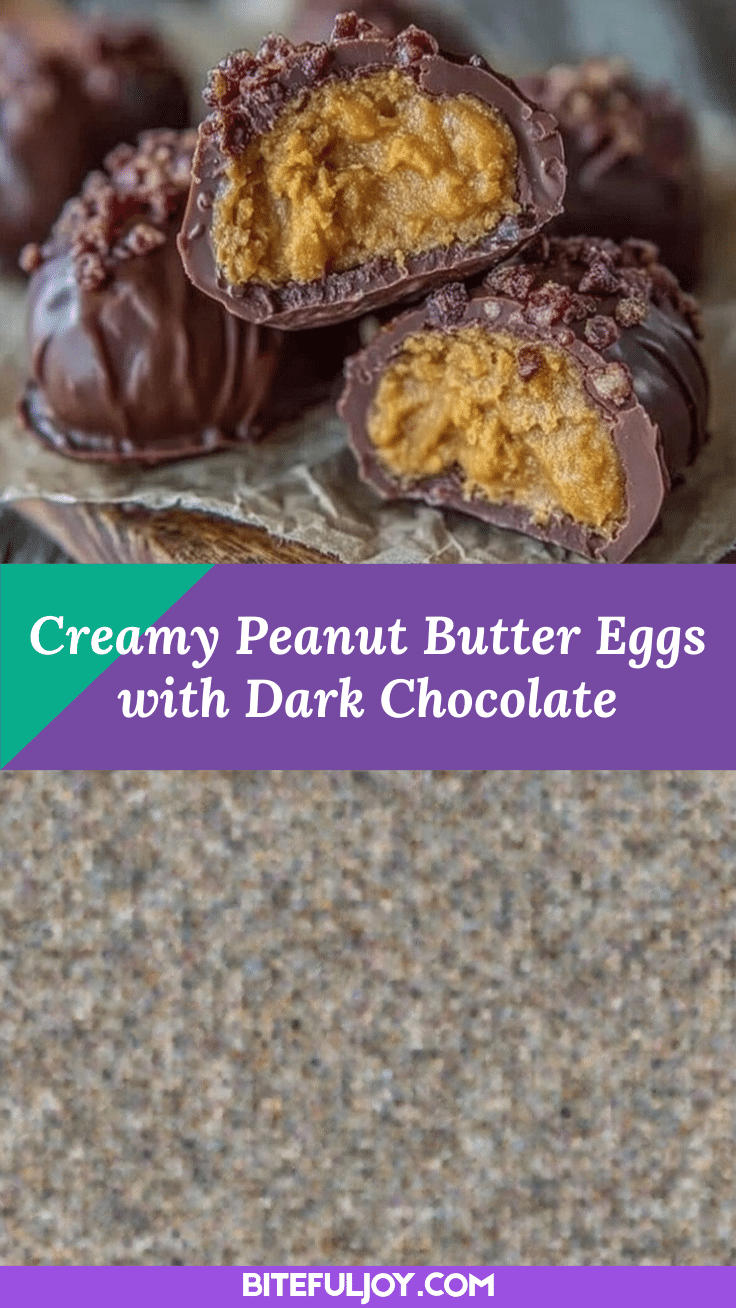
- Unbelievably Delicious: The smooth peanut butter center melts in your mouth, wrapped in a crisp, glossy chocolate shell.
What makes this recipe different? It’s all about the creamy peanut butter filling whipped to just the right texture (no gritty bits!) and a dark chocolate shell that snaps when you bite into it. I use a gentle tempering technique to make sure the chocolate sets perfectly smooth and shiny without the fussy equipment usually required.
Honestly, this recipe isn’t just a treat — it’s a comforting little moment you create yourself. Whether you’re impressing guests or indulging solo, these peanut butter Easter eggs bring that nostalgic sweetness with a grown-up chocolate twist.
What Ingredients You Will Need
This recipe uses simple, wholesome ingredients to deliver bold flavor and satisfying texture without the fuss. Most items are pantry staples, and the peanut butter filling can be easily adapted with a few swaps.
- For the Peanut Butter Filling:
- 1 cup creamy peanut butter (I recommend Skippy Natural for best texture)
- 1/2 cup powdered sugar, sifted (adds sweetness and smoothness)
- 1/4 cup unsalted butter, softened (for richness)
- 1/2 teaspoon pure vanilla extract (brightens the flavor)
- Pinch of salt (balances the sweetness)
- For the Dark Chocolate Shell:
- 8 ounces dark chocolate (70% cacao recommended, like Ghirardelli or Lindt, for that perfect bittersweet snap)
- 1 teaspoon coconut oil or vegetable oil (optional, for glossy finish and easier melting)
Ingredient Selection Tips: Use creamy peanut butter without added sugar or salt for a balanced filling. If you want it dairy-free, swap the butter for coconut oil, which also adds a subtle tropical note. For a gluten-free version, this recipe is naturally suitable, just double-check your powdered sugar brand.
Seasonal twist? Try adding a tablespoon of orange zest to the filling for a fresh citrus pop, or sprinkle flaky sea salt on the chocolate shells before they set for a salty-sweet combo.
Equipment Needed
- Mixing bowls (medium and small)
- Electric hand mixer or stand mixer (for whipping peanut butter filling smoothly)
- Microwave-safe bowl or double boiler (to melt chocolate gently)
- Spoon or small cookie scoop (to portion filling evenly)
- Plastic wrap or parchment paper (for lining trays)
- Baking sheet or tray (to set the eggs on)
- Small spatula or offset spatula (for spreading chocolate if needed)
If you don’t have a double boiler, a microwave works fine—just melt chocolate in 30-second bursts, stirring in between to avoid burning. For shaping, if you want a neater egg shape, silicone egg molds are fantastic but totally optional. I often just freeform them on parchment paper because it’s faster and more casual.
Pro tip: Keep your bowls and utensils dry—any moisture can cause your chocolate to seize up. Also, if you’re using an electric mixer, scraping down the sides occasionally helps keep the peanut butter filling perfectly smooth.
Preparation Method

- Prepare the Peanut Butter Filling (10 minutes): In a medium bowl, combine the creamy peanut butter and softened unsalted butter. Using an electric mixer, whip until smooth and creamy—about 2-3 minutes. Add the vanilla extract and a pinch of salt, mixing briefly to combine.
- Add Powdered Sugar (3-5 minutes): Gradually sift in the powdered sugar while mixing on low speed. Once fully incorporated, increase speed and whip until the mixture is light and fluffy. The filling should hold its shape but still be soft enough to scoop. If too stiff, add a teaspoon of milk (or dairy-free alternative) to loosen slightly.
- Shape the Peanut Butter Eggs (15 minutes): Line a baking sheet with parchment paper. Using a spoon or small cookie scoop, portion out oval shapes resembling eggs—about 1.5 inches (4 cm) long. Roll gently between your palms to smooth edges. Place on the tray and refrigerate for at least 30 minutes to firm up before coating.
- Melt the Dark Chocolate (5-7 minutes): Chop the dark chocolate into small pieces for even melting. Using a microwave-safe bowl, melt the chocolate in 30-second intervals, stirring well after each session until smooth. Stir in coconut oil if using, for a shiny shell and easier dipping. Be careful not to overheat; the chocolate should be warm but not hot.
- Coat the Peanut Butter Eggs (15 minutes): Remove the chilled peanut butter eggs from the fridge. Using a fork or dipping tool, dip each egg into the melted chocolate, letting excess drip off. Place back on the parchment-lined tray. If desired, sprinkle flaky sea salt or crushed peanuts on top before the chocolate sets.
- Set the Chocolate Shells (30-45 minutes): Allow the coated eggs to set at room temperature or place them in the refrigerator to speed up the process. Once the chocolate is firm and snaps when bitten, the eggs are ready to enjoy or package for gifting.
Pro Tip: If your chocolate starts to thicken while coating, gently warm it again in short bursts to keep it workable. Also, don’t rush the chilling step—the filling needs to be firm for a clean chocolate coating.
Cooking Tips & Techniques
From many attempts (and a few failures), I learned these tips make a world of difference:
- Whip the Filling Thoroughly: Don’t skip the whipping step; it transforms the peanut butter and butter blend into a fluffy, melt-in-your-mouth texture rather than dense paste.
- Melt Chocolate Slowly: Chocolate can seize if overheated. Use short microwave bursts or a low simmer double boiler, stirring often to keep it smooth.
- Keep Everything Dry: Even a drop of water can cause the chocolate to clump. Make sure utensils and bowls are dry before use.
- Chill Filling Before Coating: This prevents the filling from melting when dipped and helps create a crisp chocolate shell.
- Use Coconut Oil Sparingly: Just a teaspoon thins the chocolate slightly for easier dipping and adds a beautiful shine without softening the shell too much.
- Work Quickly with Chocolate: Once melted, chocolate starts to harden as it cools. Have your workspace ready to avoid delays during dipping.
I once tried skipping the chilling step and ended up with a melty mess that stuck to everything. Lesson learned: patience pays off!
Variations & Adaptations
Let me share some fun ways to tweak this recipe:
- Nut-Free Version: Swap peanut butter for sunflower seed butter or tahini to keep the creamy texture without nuts.
- White Chocolate Shell: Use melted white chocolate instead of dark for a sweeter, creamier shell. Add a drop of lemon juice to balance sweetness.
- Spiced Filling: Mix in a pinch of cinnamon or cayenne pepper to the peanut butter filling for a warming twist.
- Healthier Swap: Use natural peanut butter (no added sugar) and replace powdered sugar with a small amount of maple syrup, adjusting texture with a bit more butter or coconut oil.
- Seasonal Touch: Add finely chopped freeze-dried strawberries or raspberries to the filling for a fruity surprise.
One time, I tried swirling in a little honey and sea salt to the filling, which gave the eggs a delightful sweet-savory balance that disappeared fast at a family gathering!
Serving & Storage Suggestions
These creamy peanut butter Easter eggs are best served slightly chilled or at room temperature. Let them sit out for 10 minutes before eating to soften the filling just a tad.
They pair beautifully with a cup of rich coffee or a glass of cold milk. For Easter brunch, place them on a festive plate alongside fresh fruit and pastel-colored candies for a charming presentation.
Store leftovers in an airtight container in the fridge for up to two weeks. They also freeze well—just thaw in the fridge overnight before enjoying. When reheating, avoid microwaving; instead, leave at room temperature to keep the chocolate shell intact.
Flavors tend to deepen after a day, so if you can resist, letting them rest in the fridge overnight will give a more harmonious taste experience.
Nutritional Information & Benefits
Each peanut butter Easter egg (about 1.5 oz or 43 g) contains approximately:
| Calories | 220 kcal |
|---|---|
| Fat | 16 g (mostly from healthy fats in peanut butter and dark chocolate) |
| Protein | 6 g |
| Carbohydrates | 15 g (including 12 g sugars) |
The dark chocolate provides antioxidants, and the peanut butter contributes heart-healthy monounsaturated fats and protein. This treat can fit into a balanced diet when enjoyed in moderation.
For those avoiding gluten, this recipe is naturally gluten-free, and swapping ingredients can make it suitable for dairy-free diets too. Just watch for nut allergies and substitute accordingly if needed.
From a wellness perspective, making your own treats means you control the ingredients, avoiding unnecessary preservatives and excess sugar often found in store-bought candies.
Conclusion
If you’re looking for a homemade treat that’s creamy, indulgent, and surprisingly quick, these creamy peanut butter Easter eggs with dark chocolate shells fit the bill perfectly. They bring together rich, smooth peanut butter and bittersweet chocolate in a way that feels special but isn’t complicated.
Feel free to customize this recipe to suit your tastes—whether that’s swapping nut butters, adding spices, or trying different chocolate types. Honestly, I love these eggs because they remind me that sometimes the best recipes come from unexpected moments and simple ingredients.
Give them a try, share your versions, and let me know how your kitchen adventure goes. Happy Easter, and happy snacking!
FAQs about Creamy Peanut Butter Easter Eggs with Dark Chocolate Shells
Can I use crunchy peanut butter instead of creamy?
You can, but the texture will be less smooth and may affect how the filling holds together. If you like a bit of crunch, go for it, but expect a slightly different mouthfeel.
How long do these peanut butter eggs keep?
Stored in an airtight container in the fridge, they stay fresh for up to two weeks. For longer storage, freeze them and thaw in the fridge before serving.
Is it necessary to add coconut oil to the chocolate?
Not strictly necessary, but coconut oil makes the chocolate smoother and shinier, which helps with dipping and sets a nice shell.
Can I make these without an electric mixer?
Yes, but whipping by hand will take longer and require more effort to get a fluffy filling. A sturdy whisk and some patience can do the trick!
What if my chocolate seizes during melting?
If a little water gets in, chocolate can seize. Try adding a teaspoon of warm oil or butter and stir gently. If it’s too clumpy, start fresh with dry utensils and bowls.
Pin This Recipe!
Creamy Peanut Butter Easter Eggs Recipe Easy Homemade Dark Chocolate Shells

A quick and easy recipe for creamy peanut butter Easter eggs coated in rich dark chocolate shells, perfect for a decadent homemade treat.
- Prep Time: 20 minutes
- Cook Time: 15 minutes
- Total Time: 1 hour
- Yield: 12 servings 1x
- Category: Dessert
- Cuisine: American
Ingredients
- 1 cup creamy peanut butter (Skippy Natural recommended)
- 1/2 cup powdered sugar, sifted
- 1/4 cup unsalted butter, softened
- 1/2 teaspoon pure vanilla extract
- Pinch of salt
- 8 ounces dark chocolate (70% cacao recommended)
- 1 teaspoon coconut oil or vegetable oil (optional)
Instructions
- Prepare the Peanut Butter Filling: In a medium bowl, combine the creamy peanut butter and softened unsalted butter. Using an electric mixer, whip until smooth and creamy—about 2-3 minutes. Add the vanilla extract and a pinch of salt, mixing briefly to combine.
- Add Powdered Sugar: Gradually sift in the powdered sugar while mixing on low speed. Once fully incorporated, increase speed and whip until the mixture is light and fluffy. The filling should hold its shape but still be soft enough to scoop. If too stiff, add a teaspoon of milk or dairy-free alternative to loosen slightly.
- Shape the Peanut Butter Eggs: Line a baking sheet with parchment paper. Using a spoon or small cookie scoop, portion out oval shapes resembling eggs about 1.5 inches (4 cm) long. Roll gently between your palms to smooth edges. Place on the tray and refrigerate for at least 30 minutes to firm up before coating.
- Melt the Dark Chocolate: Chop the dark chocolate into small pieces for even melting. Using a microwave-safe bowl, melt the chocolate in 30-second intervals, stirring well after each session until smooth. Stir in coconut oil if using, for a shiny shell and easier dipping. Be careful not to overheat; the chocolate should be warm but not hot.
- Coat the Peanut Butter Eggs: Remove the chilled peanut butter eggs from the fridge. Using a fork or dipping tool, dip each egg into the melted chocolate, letting excess drip off. Place back on the parchment-lined tray. If desired, sprinkle flaky sea salt or crushed peanuts on top before the chocolate sets.
- Set the Chocolate Shells: Allow the coated eggs to set at room temperature or place them in the refrigerator to speed up the process. Once the chocolate is firm and snaps when bitten, the eggs are ready to enjoy or package for gifting.
Notes
Keep bowls and utensils dry to prevent chocolate from seizing. Chill peanut butter filling before coating to ensure a clean chocolate shell. Use short bursts when melting chocolate to avoid overheating. Coconut oil is optional but helps create a glossy finish.
Nutrition
- Serving Size: 1 peanut butter East
- Calories: 220
- Sugar: 12
- Fat: 16
- Carbohydrates: 15
- Protein: 6
Keywords: peanut butter eggs, dark chocolate, Easter treats, homemade candy, creamy peanut butter, chocolate shell, easy dessert


