The first time I made S’mores Rice Krispie Cups, the kitchen filled with that unmistakable scent—melting chocolate, gooey marshmallows, and a hint of toasted graham. Instant nostalgia, right? I mean, who doesn’t crave that classic campfire treat, even when there’s no campfire in sight? I started making these little cups during a summer heat wave, when turning on the oven was just asking for trouble. Honestly, these no-bake chocolate treats became my go-to for quick, shareable snacks that deliver all the s’mores magic without the mess.
This recipe for S’mores Rice Krispie Cups has seen more variations in my house than I can count. Whether it’s for a birthday party, a bake sale, or just a Tuesday night craving, these treats always disappear fast. The best part? You get all the toasty, chocolatey goodness of s’mores, but with way less fuss. Plus, if you’ve got kids hanging around, they’ll love helping press the mixture into muffin tins and swirling the melty marshmallows on top.
After testing this recipe over a dozen times (no complaints from my taste testers!), I’ve found a blend that’s sticky, chewy, and loaded with chocolate. S’mores Rice Krispie Cups are perfect for busy families, anyone with a sweet tooth, or folks wanting a quick dessert that looks fancy enough for a party. Whether you’re a s’mores purist or just need a chocolate fix, you’ll see why I keep coming back to this recipe. Ready for your new favorite no-bake treat?
Why You’ll Love This S’mores Rice Krispie Cups Recipe
Let’s face it, sometimes you want something fun, chocolatey, and impressive—without having to “bake” anything. After years as a recipe developer and entertaining countless crowds, I can confidently say these S’mores Rice Krispie Cups are a must-make. Here’s why my family, friends, and followers rave about this recipe every single time:
- Quick & Easy: No oven required! These come together in under 30 minutes, start to finish. Perfect for last-minute dessert needs or when you just can’t wait for that chocolate fix.
- Simple Ingredients: If you’ve got Rice Krispies, mini marshmallows, graham crackers, and chocolate chips, you’re already halfway there. No need for fancy or hard-to-find groceries.
- Perfect for Any Occasion: Birthday parties, potlucks, lunchbox treats, or after-school snacks—these S’mores Rice Krispie Cups fit right in. They’re especially great for summer events when you want s’mores vibes without the campfire.
- Crowd-Pleaser: Kids, adults, picky eaters—everyone loves these. They’re bite-sized and easy to grab, which makes them ideal for sharing.
- Unbelievably Delicious: The combo of crunchy cereal, gooey marshmallow, rich chocolate, and buttery graham is pure comfort food. You get all the flavors of classic s’mores, but in a neat, portable cup.
What makes this recipe extra special? I blend crushed graham crackers right into the base and press chocolate chips into the gooey tops while they’re still warm. It’s the secret to max flavor and that perfect mix of textures. I’ve tried a dozen variations, but this one nails the buttery, chocolatey, marshmallow balance every single time. If you want a treat that’s practically guaranteed to win over any crowd (and your own sweet tooth), this is it. S’mores Rice Krispie Cups are comfort food in every bite, but with a playful, party-ready twist!
What Ingredients You Will Need
This S’mores Rice Krispie Cups recipe uses classic, easy-to-find ingredients that bring all the best s’mores flavors into one irresistible, no-bake treat. Here’s what you’ll need to get started:
- For the Base:
- Rice Krispies cereal – 3 cups (75g) (classic snap, crackle, pop crunch)
- Graham crackers – 1 cup crushed (about 8 squares / 90g) (adds that toasty, sweet s’mores flavor)
- Mini marshmallows – 3 cups (150g), divided (2 cups for melting, 1 cup for topping)
- Unsalted butter – 1/4 cup (55g), cut into pieces (for richness and binding)
- Salt – 1/8 tsp (just a pinch, for balance)
- Vanilla extract – 1 tsp (for warmth and aroma)
- For the Chocolate Layer:
- Semi-sweet chocolate chips – 1 cup (175g) (melts perfectly; I love using Ghirardelli or Trader Joe’s)
- Milk chocolate chips – 1/2 cup (90g) (optional, but gives that classic s’mores flavor if you want a mix)
- For the Topping:
- Extra mini marshmallows – reserved from above (for that gooey, toasty finish)
- Graham cracker crumbs – 2 tbsp (for sprinkling on top, adds crunch and looks cute)
- Chocolate shavings or chips – optional (makes them look fancy, but totally up to you!)
Ingredient Tips: For the best texture, use fresh marshmallows (older ones don’t melt as evenly). If you need gluten-free, swap regular graham crackers for a gluten-free brand like Pamela’s or Schär. Dairy-free? Substitute vegan butter and dairy-free chocolate chips—it works like a charm. Don’t have mini marshmallows? Just chop up big ones; it’s a little messier but gets the job done! And if you’re really feeling playful, try adding a handful of peanut butter chips or a sprinkle of sea salt on top for a twist.
Equipment Needed
You don’t need anything fancy to make these S’mores Rice Krispie Cups—another reason they’re a favorite in my kitchen. Here’s what you’ll want on hand:
- 12-cup muffin tin (standard size) – For shaping the cups. If you only have a mini muffin tin, just reduce the filling per cup for bite-sized treats.
- Mixing bowls – At least two: one large for the cereal mixture and one microwave-safe for melting chocolate.
- Small saucepan – For melting butter and marshmallows, unless you use the microwave method.
- Silicone spatula or wooden spoon – For stirring the sticky mixture (trust me, silicone makes cleanup easier).
- Measuring cups and spoons – Precision matters if you want the texture just right.
- Nonstick spray or paper liners – To keep the cups from sticking. I usually go with paper liners for easy cleanup, but greasing the tin works too.
- Microwave (optional) – For melting chocolate quickly.
If you’re missing a muffin tin, you can press the mixture into a parchment-lined baking pan and cut into squares instead. I’ve even used silicone cupcake molds, which pop out super easily. Quick tip: if your spatula gets too sticky, spray it lightly with nonstick spray. Works like a charm!
Preparation Method
- Prep Your Muffin Tin: Line a 12-cup muffin tin with paper liners or lightly grease each cup with nonstick spray. This step saves you a headache when it’s time to pop out your S’mores Rice Krispie Cups.
- Crush the Graham Crackers: Place 8 squares (about 1 cup/90g) of graham crackers in a zip-top bag and crush them into fine crumbs using a rolling pin or a heavy glass. Set aside 2 tablespoons for topping later.
- Melt Butter and Marshmallows: In a large saucepan over medium-low heat, melt 1/4 cup (55g) unsalted butter. Add 2 cups (100g) mini marshmallows and stir constantly until melted and smooth—this takes about 3 minutes. Don’t walk away! Marshmallows can burn or seize quickly.
- Add Flavorings: Remove the pan from heat. Stir in 1/8 tsp salt and 1 tsp vanilla extract (it’ll sizzle a bit, that’s normal!).
- Combine Dry Ingredients: Pour the melted marshmallow mixture over 3 cups (75g) Rice Krispies cereal and the remaining crushed graham crackers (about 3/4 cup/70g) in a large mixing bowl. Mix quickly with a silicone spatula until everything is coated. The mixture will be sticky—just keep going!
- Fill Muffin Cups: Working quickly (before it cools), divide the mixture evenly between your 12 muffin cups. Press down gently with the back of a spoon or your fingers (grease them lightly if it sticks). You want a compact base, but don’t squish too hard or they’ll get dense.
- Add Marshmallow Tops: Press a few mini marshmallows (reserved from your 1 cup/50g) into the top of each cup. Use about 4-5 per cup—you want a gooey top layer.
- Toast the Marshmallows (Optional): For extra s’mores flavor, place the muffin tin under your oven’s broiler for 30-60 seconds, just until marshmallows are golden and toasty. Watch closely—they go from perfect to burnt in a blink! If you skip this step, the cups are still fantastic.
- Melt Chocolate: Place 1 cup (175g) semi-sweet chocolate chips (plus 1/2 cup/90g milk chocolate chips if using) in a microwave-safe bowl. Microwave in 20-second bursts, stirring between each, until smooth and glossy (usually 60-80 seconds total).
- Finish with Chocolate: Spoon a generous dollop of melted chocolate over the marshmallow-topped cups. Use a small spoon to swirl it over the tops—don’t worry about making it perfect!
- Decorate: Sprinkle reserved graham cracker crumbs and extra chocolate chips or shavings over the chocolate while it’s still melty.
- Let Set: Allow the cups to cool at room temperature for 45-60 minutes, or pop them in the fridge for 20 minutes to speed things up. Once set, lift out of the tin and enjoy!
Prep Note: If your kitchen is warm, the chocolate may take longer to set. Don’t rush—if you try to remove them too early, the tops might smudge. And if your cups stick, run a butter knife around the edge to coax them out.
Cooking Tips & Techniques
After many batches of S’mores Rice Krispie Cups, I’ve picked up a few tricks that make these treats turn out picture-perfect every time. Here’s what I wish I’d known from the start:
- Work Fast: Once you mix the marshmallow with the cereal, it starts firming up. Have your muffin tin ready and move quickly to press the mixture in before it gets too stiff to shape.
- Don’t Overpack: Press the base in firmly, but not too tightly. If you squish it down hard, your cups will be dense and tough instead of chewy and light.
- Chill for Clean Edges: If you want super neat cups (for gifting or parties), let them chill in the fridge before removing the liners. They pop out cleaner and keep their shape better.
- Toasty Marshmallows: Broiling the marshmallow tops is totally optional, but it adds that true campfire vibe. Just keep your eyes glued to the oven—marshmallows burn in seconds!
- Messy Chocolate? No Problem: If the melted chocolate looks streaky, just give it a good stir before spooning. And if you’re short on time, just sprinkle chocolate chips on top and let the residual heat melt them.
- Sticky Spatula Fix: Spray your spatula or spoon with nonstick spray before mixing and pressing in the base. It’s a simple trick that saves a lot of frustration.
I’ve had my share of sticky fingers and lopsided cups. One time, I left the chocolate layer too thin and it just absorbed into the marshmallow—lesson learned! Now, I always use a generous spoonful for that thick, crackly chocolate top. If you’re making these with kids, let them do the sprinkling at the end. It’s the best part, and honestly, no two cups ever look exactly alike (which just adds to the fun!).
Variations & Adaptations
The beauty of S’mores Rice Krispie Cups is how easy they are to customize. Here are some of my favorite twists and swaps:
- Gluten-Free Version: Use gluten-free Rice Krispies and replace regular graham crackers with a certified gluten-free brand. Everything else stays the same—easy win!
- Peanut Butter S’mores: Add 1/4 cup (65g) creamy peanut butter to the melted marshmallow mixture for irresistible nutty flavor. Top with chopped peanuts for crunch.
- Salted Caramel Drizzle: Swirl caramel sauce over the chocolate layer before it sets. Sprinkle with flaky sea salt—trust me, this is next-level indulgence.
- Chocolate Lovers’ Dream: Use cocoa-flavored Rice Krispies and dark chocolate chips for a richer, more intense chocolate base.
- Vegan Adaptation: Swap marshmallows for a vegan brand (like Dandies), use plant-based butter, and dairy-free chocolate chips. The texture and flavor are still fantastic!
- Mini Cups for Parties: Use a mini muffin tin and reduce the filling per cup for bite-sized treats—perfect for serving a crowd.
One time, I tossed in a handful of freeze-dried raspberries on top for a tart twist, and it was a hit! Don’t be afraid to personalize your S’mores Rice Krispie Cups—mix in sprinkles, coconut flakes, or even a pinch of cinnamon for a warm twist. The possibilities are endless and honestly, a little experimentation just adds to the fun.
Serving & Storage Suggestions
S’mores Rice Krispie Cups are best enjoyed at room temperature, where the chocolate is just set and the marshmallow is perfectly chewy. Here’s how I serve and keep them fresh:
- Serving: Arrange the cups on a fun platter or cake stand if you’re sharing with friends—they look adorable with a sprinkle of extra graham crumbs or even a drizzle of white chocolate. Pair with a cold glass of milk, hot cocoa, or fresh-brewed coffee for the full s’mores experience.
- Storage: Store leftovers in an airtight container at room temperature for up to 3 days. If your kitchen is warm, you can refrigerate them, but let them come to room temp before serving for the best texture.
- Freezer-Friendly: These freeze surprisingly well! Place in a single layer in a freezer-safe container, separating layers with wax paper. Thaw at room temperature before serving.
- Reheating: If you want that gooey, just-made marshmallow texture, pop a cup in the microwave for 5-7 seconds—just enough to soften things up (but don’t overdo it or the chocolate will melt everywhere!)
- Flavor Note: The flavors meld and get even better after a day, so don’t be afraid to make them ahead for parties or school lunches.
These S’mores Rice Krispie Cups are totally portable and mess-free, which makes them perfect for picnics or road trips. I’ve even wrapped them up as little “campfire” favors for birthday parties—always a hit!
Nutritional Information & Benefits
Each S’mores Rice Krispie Cup is about 160-180 calories, depending on chocolate and marshmallow amounts. You’ll get around 3g of protein, 5g of fat, and 28g of carbs per cup. While these are definitely a treat, they’re nut-free (unless you add peanut butter), and you can make them gluten-free or dairy-free as needed.
The key ingredients—whole grain cereal and marshmallows—offer a quick energy boost, while the chocolate satisfies that sweet craving. If you use dark chocolate, you’ll get a little antioxidant benefit, too! Just keep an eye out for allergens in the marshmallows and chocolate, especially if serving to a crowd.
From a wellness perspective, I love that these S’mores Rice Krispie Cups are portion-controlled and easy to adapt for different diets. They’re a fun way to treat yourself (or your family) without needing a ton of added sugar or heavy butter. Remember: dessert should be fun and a little nostalgic, too!
Conclusion
If you’re looking for a dessert that’s quick, fun, and delivers on both nostalgia and flavor, these S’mores Rice Krispie Cups are your answer. I’ve made them for more parties and bake sales than I can count, and they never last long—people always come back for seconds (or thirds!). Plus, they’re endlessly customizable, so you can make them your own with your favorite add-ins or dietary tweaks.
I love this recipe because it brings out the kid in me every time, but it’s also grown-up enough for dinner parties or holiday gatherings. Whether you’re a s’mores fan or just need a no-bake chocolate treat in your back pocket, you won’t regret giving these a try. If you do make them, I’d love to hear your take—drop a comment, tag me on social, or share your own twist on this classic!
So go on—whip up a batch, share them with friends, and let the chocolatey, marshmallowy goodness speak for itself. Happy (no) baking!
Frequently Asked Questions
Can I make S’mores Rice Krispie Cups ahead of time?
Absolutely! They actually taste even better the next day as the flavors meld together. Just store them in an airtight container at room temperature or in the fridge if your kitchen is warm.
How do I keep the treats from sticking to the muffin tin?
Using paper liners is the easiest way to avoid sticking, but you can also grease each cup with nonstick spray or butter. If they’re still stubborn, run a butter knife around the edge to help release them.
Can I use regular-sized marshmallows instead of mini marshmallows?
Yes! Just chop them into smaller pieces so they melt evenly. You can also use marshmallow fluff in a pinch, though the texture will be a bit softer.
Are there any nut-free or allergy-friendly options?
This recipe is naturally nut-free, as long as your chocolate and marshmallows are safe for allergies. For gluten-free, use gluten-free graham crackers and cereal. For dairy-free, substitute vegan butter and dairy-free chocolate chips.
Can I freeze S’mores Rice Krispie Cups?
Definitely. Layer them in a freezer-safe container with wax paper in between, and thaw at room temperature before serving. They keep well for up to 2 months in the freezer.
PrintS’mores Rice Krispie Cups

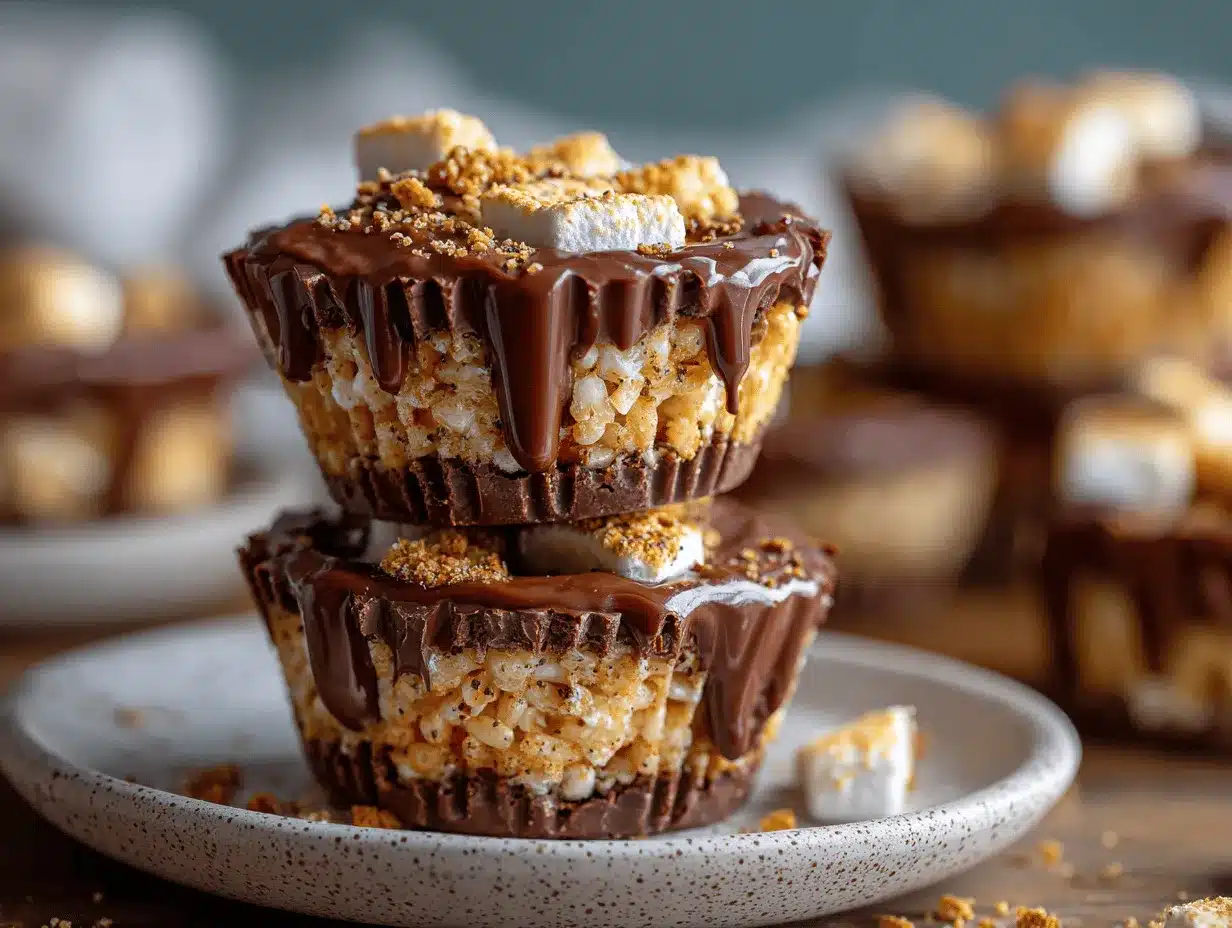
S’mores Rice Krispie Cups are easy, no-bake chocolate treats that combine all the classic campfire flavors—gooey marshmallow, rich chocolate, and toasty graham—in a fun, portable cup. Perfect for parties, bake sales, or a quick dessert fix, these treats come together in under 30 minutes and are always a crowd-pleaser.
- Prep Time: 10 minutes
- Cook Time: 5 minutes
- Total Time: 30 minutes
- Yield: 12 cups 1x
- Category: Dessert
- Cuisine: American
Ingredients
- 3 cups Rice Krispies cereal
- 1 cup graham crackers, crushed (about 8 squares)
- 3 cups mini marshmallows, divided (2 cups for melting, 1 cup for topping)
- 1/4 cup unsalted butter, cut into pieces
- 1/8 teaspoon salt
- 1 teaspoon vanilla extract
- 1 cup semi-sweet chocolate chips
- 1/2 cup milk chocolate chips (optional)
- 2 tablespoons graham cracker crumbs (for topping)
- Extra mini marshmallows (reserved from above, for topping)
- Chocolate shavings or chips (optional, for topping)
Instructions
- Line a 12-cup muffin tin with paper liners or lightly grease each cup with nonstick spray.
- Place 8 squares (about 1 cup) of graham crackers in a zip-top bag and crush into fine crumbs. Set aside 2 tablespoons for topping.
- In a large saucepan over medium-low heat, melt 1/4 cup unsalted butter. Add 2 cups mini marshmallows and stir constantly until melted and smooth, about 3 minutes.
- Remove from heat and stir in salt and vanilla extract.
- Pour the melted marshmallow mixture over Rice Krispies cereal and remaining crushed graham crackers in a large mixing bowl. Mix quickly with a silicone spatula until everything is coated.
- Divide the mixture evenly between the 12 muffin cups. Press down gently with the back of a spoon or your fingers (grease them lightly if it sticks).
- Press a few mini marshmallows (about 4-5 per cup) into the top of each cup.
- Optional: Place the muffin tin under the broiler for 30-60 seconds to toast the marshmallows. Watch closely.
- Place semi-sweet and milk chocolate chips in a microwave-safe bowl. Microwave in 20-second bursts, stirring between each, until smooth and glossy (about 60-80 seconds total).
- Spoon a generous dollop of melted chocolate over the marshmallow-topped cups and swirl with a small spoon.
- Sprinkle reserved graham cracker crumbs and extra chocolate chips or shavings over the chocolate while it’s still melty.
- Let the cups cool at room temperature for 45-60 minutes, or refrigerate for 20 minutes to set. Once set, lift out of the tin and enjoy.
Notes
Work quickly when mixing and pressing the base, as the marshmallow mixture firms up fast. For neat edges, chill the cups before removing from the tin. Broiling the marshmallow tops is optional but adds authentic s’mores flavor. To make gluten-free, use gluten-free graham crackers and cereal. For dairy-free, use vegan butter and dairy-free chocolate chips. Store in an airtight container at room temperature for up to 3 days, or freeze for up to 2 months.
Nutrition
- Serving Size: 1 cup
- Calories: 170
- Sugar: 15
- Sodium: 80
- Fat: 5
- Saturated Fat: 3
- Carbohydrates: 28
- Fiber: 1
- Protein: 3
Keywords: s'mores, rice krispie treats, no-bake dessert, chocolate, marshmallow, graham cracker, party snack, easy dessert, summer treat, kid-friendly