Introduction
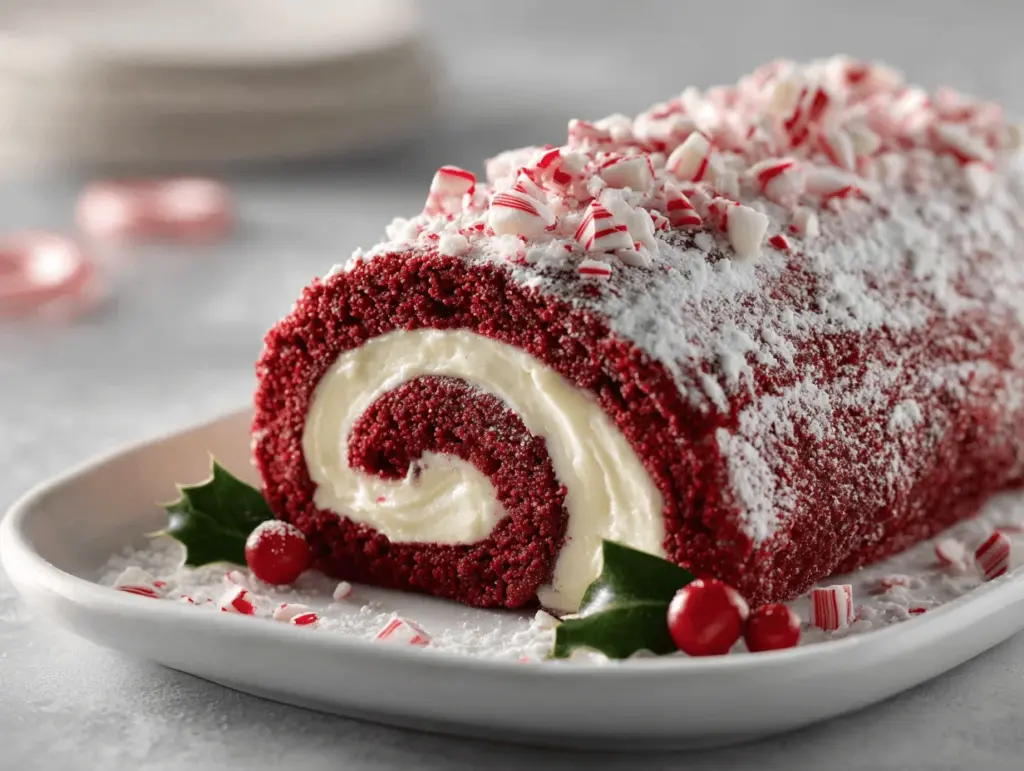
Imagine slicing into a soft, vibrant red velvet cake, the swirl revealing a creamy peppermint filling that smells like holiday magic. That’s exactly what this red velvet peppermint yule log cake brings to your table—eye-catching, festive, and so much fun to make. The first time I rolled up this cake, I was nervous about cracks (let’s face it, roulades can be intimidating), but the smooth, rich batter and that peppermint cream filling were honestly easier than I expected.
I stumbled onto this recipe during a December baking marathon, desperately wanting something show-stopping for my family’s Christmas Eve dinner. Traditional yule logs felt a little heavy, so I decided to mash up red velvet cake (my mom’s favorite) and the cool zing of peppermint (my dad’s obsession). After a few test runs—one where I definitely overfilled and had peppermint cream oozing everywhere—I finally landed on this irresistible red velvet peppermint swirl yule log cake.
It’s perfect for anyone wanting a centerpiece dessert without spending hours in the kitchen. The cake is soft, rollable, and holds its shape. The filling? Creamy, minty, and just the right amount of sweet. If you’re baking for kids, peppermint fans, or anyone who loves a good holiday dessert that doubles as a festive table decoration, this is your recipe. I’ve made it for everything from office parties to New Year’s brunch. Trust me, this roll-up cake never lasts long!
Why You’ll Love This Recipe
This red velvet peppermint yule log cake isn’t just another holiday dessert—it’s the kind that stops people in their tracks and has them reaching for seconds (and asking for the recipe). After baking dozens of holiday cakes, this one stands out for its easy technique and big payoff. Here’s what makes it a keeper:
- Quick & Easy: Comes together in under 90 minutes, so you don’t have to spend all day in the kitchen. Perfect for last-minute gatherings or when you want to impress without stress.
- Simple Ingredients: Nothing fancy here—just classic baking staples and a touch of peppermint extract. Most of it’s probably already in your pantry.
- Perfect for Holiday Celebrations: This cake is basically made for Christmas, but it fits right in at any winter party, brunch, or festive dinner.
- Crowd-Pleaser: Kids love the color and swirl (and the candy cane topping), while adults appreciate the not-too-sweet flavor and that nostalgic peppermint kick.
- Unbelievably Delicious: The cake is tender and moist, while the creamy peppermint filling melts in your mouth. It’s rich but not over the top, with just enough mint to make things interesting.
What makes this red velvet peppermint yule log cake different? The red velvet sponge bakes up soft enough to roll without splitting, and the peppermint swirl is light, not cloying, thanks to a whipped cream cheese base. I blend the cream cheese and butter until they’re super fluffy, then fold in the whipped cream and peppermint. That trick makes the filling easy to spread and keeps it from overpowering the cake.
There’s something special about making a dessert that looks like you bought it from a fancy bakery but actually came from your own oven. Plus, you can get creative—add crushed candy canes, white chocolate drizzle, or even a dusting of edible glitter. It’s comfort food made festive, and it always brings a little extra joy to my holiday table.
What Ingredients You Will Need
This red velvet peppermint yule log cake uses classic ingredients, most of which you probably have on hand. I like to keep things straightforward, but there are a few spots where you can get creative or swap for dietary needs. Here’s what you’ll need:
- For the Red Velvet Cake:
- All-purpose flour (120g / 1 cup, spooned and leveled) – for structure
- Granulated sugar (100g / ½ cup) – sweetness and tenderness
- Unsweetened cocoa powder (15g / 2 tbsp) – for the signature red velvet flavor
- Salt (¼ tsp) – balances sweetness
- Baking powder (1 tsp) – helps the cake rise
- Eggs (4 large, room temperature) – gives lift and flexibility
- Vegetable oil (60ml / ¼ cup) – keeps the cake moist
- Buttermilk (60ml / ¼ cup, room temperature) – for tang and tender crumb
- Red gel food coloring (1-2 tsp, as needed) – vibrant color without thinning batter
- Vanilla extract (1 tsp) – boosts flavor
- White vinegar (1 tsp) – classic for red velvet cakes, reacts with cocoa
- For the Peppermint Cream Cheese Filling:
- Cream cheese (170g / 6 oz, softened) – base for creamy filling (I like Philadelphia brand)
- Unsalted butter (56g / ¼ cup, softened) – adds richness and stability
- Powdered sugar (120g / 1 cup, sifted) – sweetness and a smooth texture
- Heavy whipping cream (120ml / ½ cup, cold) – lightens the filling and adds volume
- Peppermint extract (½ tsp) – adjust for your mintiness preference
- Vanilla extract (½ tsp) – rounds out the flavor
- Pinch of salt – balances out the sweetness
- For the Garnish (optional but fun!):
- Crushed peppermint candies or candy canes – for a festive crunch
- Powdered sugar – a snowy finish
- White chocolate drizzle – if you want to get fancy
Ingredient tips: Use gel food coloring for a bold red hue; liquid can make the batter too runny. For buttermilk, you can make your own by mixing 1 tsp vinegar or lemon juice with enough milk to make ¼ cup—let it sit 5 minutes. If you need a gluten-free option, swap in a 1:1 gluten-free flour blend. For dairy-free, sub in vegan cream cheese and coconut cream (though it’ll be a bit softer).
One more thing: I always sift my cocoa powder and flour to avoid lumps—trust me, it’s worth the extra step!
Equipment Needed

You don’t need anything fancy for this red velvet peppermint yule log cake, but a few specific tools make things smoother. Here’s what I use every time:
- Jelly roll pan (10×15 inches / 25×38 cm) – essential for that perfect cake thickness; if you only have a 9×13 pan, your cake will be slightly thicker but still rollable
- Electric mixer (hand or stand) – for whipping the eggs and making the filling super fluffy
- Parchment paper – makes rolling (and unrolling!) so much easier; don’t skip this
- Clean kitchen towel – for rolling the warm cake (I use an old, lint-free tea towel)
- Offset spatula – for spreading the batter and filling evenly
- Wire rack – helps the cake cool evenly
- Mixing bowls – one big for the batter, one for the filling
- Measuring cups and spoons – accuracy matters for cake rolls
If you don’t have an offset spatula, a butter knife works. And if you’re baking on a budget, I’ve rolled this cake using a silicone baking mat instead of parchment—just be gentle when flipping it out. Always wash your kitchen towel without fabric softener (it can transfer a weird taste). After a few yule logs, you’ll have your go-to setup down!
Preparation Method
- Preheat & Prepare: Preheat your oven to 350°F (175°C). Line a 10×15-inch (25×38 cm) jelly roll pan with parchment paper, leaving some overhang for easy lifting. Lightly spray or butter the paper and sides.
- Mix the Dry Ingredients: In a medium bowl, whisk together 1 cup (120g) all-purpose flour, ½ cup (100g) granulated sugar, 2 tbsp (15g) cocoa powder, ¼ tsp salt, and 1 tsp baking powder. Sift if needed to remove lumps.
- Whip the Eggs: In a large mixing bowl, beat 4 large eggs (room temp) with an electric mixer on high for 5 minutes, until thick, pale, and tripled in volume (they’ll look almost mousse-like). This step is key for a flexible cake—don’t shortchange the time!
- Add Wet Ingredients: Gently mix in ¼ cup (60ml) vegetable oil, ¼ cup (60ml) buttermilk, 1-2 tsp red gel food coloring (as vibrant as you like), 1 tsp vanilla, and 1 tsp vinegar. Mix until just combined—don’t overbeat or the cake will be dense.
- Combine Wet & Dry: Sift the dry mixture over the wet ingredients in two batches, folding gently with a spatula. Stop as soon as you don’t see dry spots. The batter will be fluffy and bright red.
- Spread & Bake: Pour the batter into your prepared pan. Use an offset spatula to spread it evenly into the corners—don’t worry if it looks a bit thin. Bake on the middle rack for 11-13 minutes, or until the top springs back when touched and a toothpick comes out clean.
- Roll While Warm: Here’s the trick! Lay a clean kitchen towel flat and dust generously with powdered sugar. While the cake is still hot, run a knife around the edges, lift out using the parchment, and flip onto the towel. Peel off the paper (careful, it’s hot!), then starting from a short end, roll the cake and towel up together into a log. Let cool completely, seam side down, for 40-60 minutes.
- Make the Peppermint Filling: In a medium bowl, beat 6 oz (170g) softened cream cheese and ¼ cup (56g) softened butter until creamy and smooth. Add 1 cup (120g) sifted powdered sugar, ½ tsp peppermint extract, ½ tsp vanilla, and a pinch of salt. Beat until fluffy. In a separate bowl, whip ½ cup (120ml) heavy cream to stiff peaks, then fold gently into the cream cheese mixture.
- Fill & Roll: Carefully unroll the cooled cake (don’t panic if it cracks a little—it will hide when re-rolled). Spread the peppermint filling evenly over the cake, leaving a ½-inch border. Reroll the cake (without the towel) as tightly as you can. Transfer to a serving platter, seam side down.
- Decorate: Dust with powdered sugar, drizzle with melted white chocolate, and sprinkle with crushed peppermint candies or candy canes. Chill for at least 30 minutes before slicing for the cleanest swirls.
Personal tip: If your cake cracks while rolling, just cover with extra filling and garnish—it’ll still look stunning and taste amazing. If your filling seems too soft, chill it for 10 minutes before spreading.
Cooking Tips & Techniques
Here’s what I’ve learned after years of making (and occasionally botching) yule logs and roll cakes:
- Whip the Eggs Well: Don’t rush the egg beating step. If they aren’t fluffy enough, your cake will be flat and won’t roll nicely. Set a timer—5 minutes on high!
- Gentle Folding: Use a spatula and fold, don’t stir, when combining wet and dry. Overmixing deflates the batter and gives you a dense cake. I learned this the hard way—trust the process.
- Roll While Warm: The cake must be rolled up immediately after baking while it’s still hot. If you wait, it cools and cracks easier. I once made the mistake of letting a cake sit too long, and it broke apart completely.
- Powdered Sugar Towel: Dust the towel with a generous layer of powdered sugar so the cake doesn’t stick. If you skimp, you’ll have cake bits stuck all over your towel (ask me how I know!).
- Chill Before Slicing: After filling, chill the rolled cake for at least 30 minutes. This helps the filling set and makes those pinwheel slices look sharp.
- Don’t Overdo the Peppermint: Peppermint extract is strong—a little goes a long way. Start with ½ tsp in the filling and taste before adding more.
- Fixing Cracks: If your cake cracks when unrolling, just keep going. A little extra filling or a heavy-handed garnish hides everything. The flavor is what counts!
Multitasking tip: While the cake cools, prep your filling and garnishes so everything’s ready to go. You’ll feel like a kitchen pro, and the process goes much faster.
Variations & Adaptations
I love how flexible this red velvet peppermint yule log cake can be. Here are some of my favorite ways to make it your own:
- Gluten-Free: Swap the all-purpose flour for a 1:1 gluten-free blend. Bob’s Red Mill has worked great for me—no one could tell the difference!
- Dairy-Free: Use vegan cream cheese, plant-based butter, and coconut cream for the filling. Almond or oat milk with a splash of vinegar stands in for buttermilk. (The texture is a tiny bit softer but still delicious.)
- Chocolate Peppermint Swirl: Add ½ cup mini chocolate chips to the filling or sprinkle them on top for a double-chocolate vibe. My kids love this twist.
- Different Flavors: Skip the peppermint and add orange zest to the filling for a chocolate-orange holiday cake. Or try almond extract for a nutty twist.
- Berry Swirl: In summer, I’ll sometimes fold in a little raspberry jam with the cream cheese filling for a fruity, tangy surprise.
One year, I even made a “grown-up” version with a splash of coffee liqueur brushed onto the cake before filling. It was a hit at our adults-only holiday party! Don’t be afraid to experiment—this recipe is forgiving and fun.
Serving & Storage Suggestions
For the best presentation, serve your red velvet peppermint yule log cake chilled but not icy cold—about 15 minutes out of the fridge is just right. Slice with a sharp, serrated knife for those clean, pretty spirals.
Pair it with a mug of hot cocoa or peppermint mocha for the full holiday experience. If you’re feeling extra, a scoop of vanilla ice cream or a drizzle of chocolate sauce won’t hurt!
To store, cover the cake with plastic wrap or place in an airtight container. It keeps in the fridge for 3-4 days. For longer storage, freeze individual slices (wrapped tightly) for up to a month. Thaw overnight in the fridge—honestly, it still tastes just as good.
A little secret: The peppermint flavor actually deepens after a day or two. If you can resist eating it all at once, the leftovers are even more magical!
Nutritional Information & Benefits
Estimated per serving (based on 12 slices): 280 calories, 16g fat, 30g carbs, 4g protein.
Key health perks: Red velvet cake uses cocoa, which brings antioxidants, while peppermint can aid digestion and give a refreshing feel. The cream cheese adds a dose of calcium and protein.
Dietary notes: This cake contains gluten, dairy, and eggs. Use suggested swaps for gluten-free or dairy-free needs. If nut allergies are a concern, double-check your ingredient labels—most versions are nut-free as written.
From a wellness point of view, I love that this dessert feels indulgent but isn’t overly rich. The portion sizes are just right, making it a perfect treat for holiday balance.
Conclusion
This red velvet peppermint yule log cake is more than just a dessert—it’s a holiday memory in the making. The swirl, the color, the creamy peppermint filling—it all comes together for a festive showstopper that’s as fun to make as it is to eat.
Don’t be afraid to customize it and make it your own. Whether you go classic or try a wild variation, it’s bound to impress your guests and make your holiday table sparkle.
Personally, this cake is my go-to for every December. It brings back memories, starts new traditions, and always gets people talking. Give it a try, and let me know how you make it special! Drop a comment, share your photos, or tag me with your own yule log twists. Happy baking and happy holidays!
FAQs
Can I make the red velvet peppermint yule log cake ahead of time?
Absolutely! This cake actually tastes even better the next day as the flavors meld. Just keep it tightly wrapped in the fridge until ready to serve.
What if my cake cracks while rolling?
It happens to the best of us. Just keep rolling and cover any cracks with extra filling or garnishes—no one will notice once it’s all decorated.
Can I use a different filling if I don’t like peppermint?
Yes! Swap the peppermint extract for vanilla, almond, or even orange zest for a different twist. Cream cheese or whipped cream fillings all work beautifully.
How do I get a really vibrant red color in the cake?
Gel food coloring is your friend here. It gives a strong color without making the batter too runny. Start with 1 tsp and add more as needed.
Can I freeze this yule log cake?
Totally. Slice the cake, wrap the pieces tightly, and freeze for up to a month. Thaw in the fridge overnight before serving for best texture.
PrintRed Velvet Peppermint Yule Log Cake
A festive and eye-catching red velvet cake roll filled with creamy peppermint cream cheese filling, perfect for holiday celebrations. This easy yule log cake is soft, rollable, and sure to impress guests with its vibrant color and refreshing minty swirl.
- Prep Time: 30 minutes
- Cook Time: 13 minutes
- Total Time: 1 hour 30 minutes
- Yield: 12 servings 1x
- Category: Dessert
- Cuisine: American
Ingredients
- 1 cup (120g) all-purpose flour, spooned and leveled
- 1/2 cup (100g) granulated sugar
- 2 tbsp (15g) unsweetened cocoa powder
- 1/4 tsp salt
- 1 tsp baking powder
- 4 large eggs, room temperature
- 1/4 cup (60ml) vegetable oil
- 1/4 cup (60ml) buttermilk, room temperature
- 1–2 tsp red gel food coloring, as needed
- 1 tsp vanilla extract
- 1 tsp white vinegar
- 6 oz (170g) cream cheese, softened
- 1/4 cup (56g) unsalted butter, softened
- 1 cup (120g) powdered sugar, sifted
- 1/2 cup (120ml) heavy whipping cream, cold
- 1/2 tsp peppermint extract
- 1/2 tsp vanilla extract
- Pinch of salt
- Crushed peppermint candies or candy canes (for garnish, optional)
- Powdered sugar (for dusting, optional)
- White chocolate, melted (for drizzle, optional)
Instructions
- Preheat your oven to 350°F (175°C). Line a 10×15-inch jelly roll pan with parchment paper, leaving some overhang. Lightly spray or butter the paper and sides.
- In a medium bowl, whisk together flour, granulated sugar, cocoa powder, salt, and baking powder. Sift if needed to remove lumps.
- In a large mixing bowl, beat eggs with an electric mixer on high for 5 minutes, until thick, pale, and tripled in volume.
- Gently mix in vegetable oil, buttermilk, red gel food coloring, vanilla extract, and vinegar. Mix until just combined.
- Sift the dry mixture over the wet ingredients in two batches, folding gently with a spatula until just combined.
- Pour the batter into the prepared pan and spread evenly with an offset spatula. Bake for 11-13 minutes, until the top springs back when touched and a toothpick comes out clean.
- Lay a clean kitchen towel flat and dust generously with powdered sugar. While the cake is still hot, run a knife around the edges, lift out using the parchment, and flip onto the towel. Peel off the paper, then starting from a short end, roll the cake and towel up together into a log. Let cool completely, seam side down, for 40-60 minutes.
- For the filling: In a medium bowl, beat softened cream cheese and butter until creamy and smooth. Add powdered sugar, peppermint extract, vanilla extract, and a pinch of salt. Beat until fluffy. In a separate bowl, whip heavy cream to stiff peaks, then fold gently into the cream cheese mixture.
- Carefully unroll the cooled cake. Spread the peppermint filling evenly over the cake, leaving a 1/2-inch border. Reroll the cake (without the towel) as tightly as you can. Transfer to a serving platter, seam side down.
- Decorate with powdered sugar, melted white chocolate, and crushed peppermint candies or candy canes. Chill for at least 30 minutes before slicing for clean swirls.
Notes
Roll the cake while it’s still warm to prevent cracks. If cracks occur, cover with extra filling and garnish. Chill the cake before slicing for the cleanest swirls. Gel food coloring gives the best red color. For gluten-free or dairy-free adaptations, use a 1:1 gluten-free flour blend or vegan dairy substitutes. The cake can be made ahead and actually tastes better the next day.
Nutrition
- Serving Size: 1 slice (1/12 of cake)
- Calories: 280
- Sugar: 20
- Sodium: 180
- Fat: 16
- Saturated Fat: 9
- Carbohydrates: 30
- Fiber: 1
- Protein: 4
Keywords: red velvet, yule log, Christmas dessert, peppermint, cake roll, holiday baking, festive dessert, cream cheese filling, roulade, easy yule log