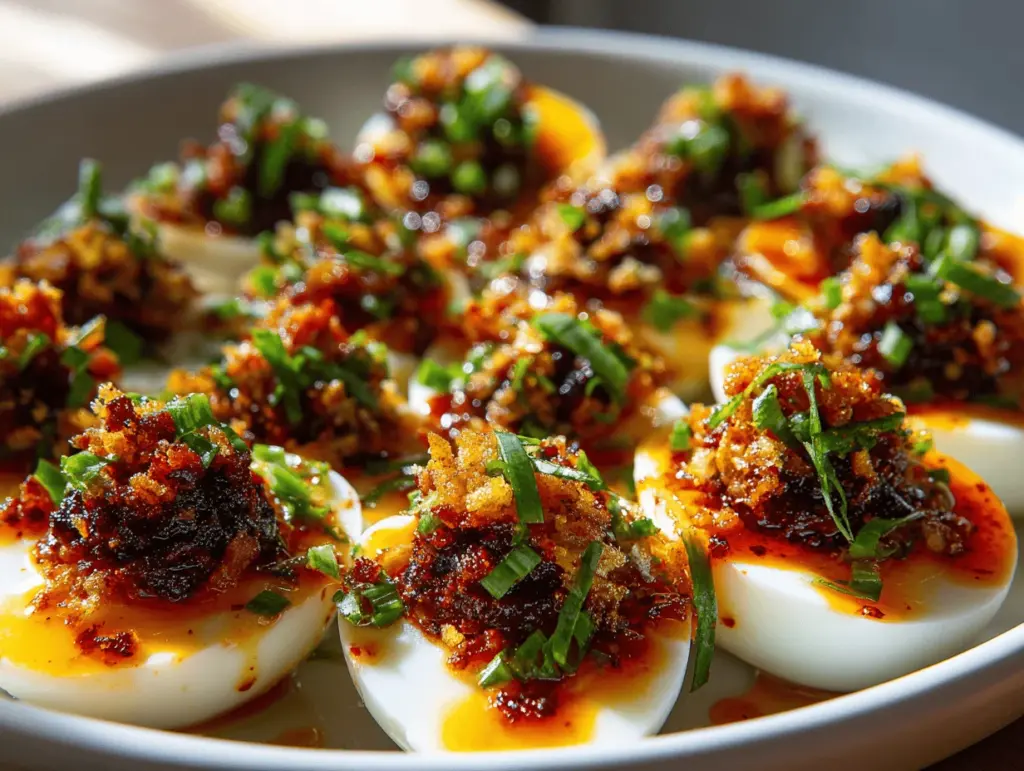
The first time the aroma of sizzling bacon mingled with the punchy scent of chili garlic hit my kitchen, I knew I was onto something addictive. These irresistible loaded spicy chili garlic bacon deviled eggs are what happens when you take classic deviled eggs and give them a flavor-packed, party-ready upgrade—think creamy, spicy, smoky, and just a little bit sassy. I whipped these up for a game day spread, and, not gonna lie, they vanished before halftime.
Deviled eggs have always been my go-to for gatherings—something about the bite-sized, creamy filling just calls to people. But after years of making the traditional kind, I wanted to shake things up. I started experimenting with different add-ins (sometimes with questionable results!), but once I tossed in crispy bacon, chili garlic sauce, and some crunchy toppings, well… let’s just say my family started requesting these spicy chili garlic bacon deviled eggs for every occasion.
What I love most about this recipe is how it packs a punch of flavor without any crazy techniques or hard-to-find ingredients. The creamy yolk filling gets a hit of tang and heat from chili garlic sauce, while the bacon adds smoky depth and irresistible crunch. Whether you’re feeding a crowd or just want a snack that’s way more exciting than plain hard-boiled eggs, these are about to become your new obsession. I’ve tested this recipe a dozen times, tweaking the spice level and testing different garnishes, so you can trust it’ll work every time. If you love bold flavors and easy appetizers, loaded spicy chili garlic bacon deviled eggs are for you!
Why You’ll Love This Recipe
- Ultimate Flavor Bomb: The blend of creamy yolks, spicy chili garlic, and smoky bacon is unforgettable. Seriously, you’ll want to lick the spoon (and maybe the bowl, too).
- Quick & Easy: These come together in under 40 minutes, from boiling the eggs to the final sprinkle of green onions. No fancy gadgets or marathon prep needed.
- Simple, Familiar Ingredients: Everything you need is probably already in your fridge or pantry. No hunting for rare spices or making special trips to gourmet stores.
- Perfect for Any Occasion: Game day, potlucks, picnics, brunches—honestly, they fit right in wherever people gather and eat with their hands.
- Always a Crowd-Pleaser: Kids and adults both love them. There’s just something about deviled eggs that makes people nostalgic, and this spicy bacon version takes it to the next level.
- Customizable Heat: Not everyone loves mouth-scorching spice. You can totally dial up or down the chili garlic sauce to suit your crowd.
- Irresistible Texture: Creamy, crunchy, and just the right amount of chew from the bacon—each bite is pure satisfaction.
What sets these loaded spicy chili garlic bacon deviled eggs apart is the way the flavors layer together. The chili garlic sauce isn’t just there for heat; it brings a gentle tang and rich umami that makes the filling seriously addictive. Bacon isn’t just a topping here—it’s mixed right in, so you get savory bites every time. And if you want to go extra (and let’s face it, sometimes you do), a sprinkle of crispy fried onions or jalapeños on top adds major crunch.
Honestly, this isn’t just another deviled egg recipe. It’s the one that makes people stop and ask, “What’s in these?!” It’s comfort food with a spicy edge, perfect for impressing guests with basically zero stress. Whether you’re new to deviled eggs or just looking to spice up your usual spread, this recipe brings pure party energy to the table.
What Ingredients You Will Need
This recipe relies on straightforward, punchy ingredients that come together to make every bite pop. You probably have most of these on hand, and if you don’t, you’ll find them at any regular grocery store—no specialty orders needed. Here’s what you’ll need for these loaded spicy chili garlic bacon deviled eggs:
- Large Eggs – 12 (for a dozen deviled eggs, hard-boiled; use the freshest you can find for easy peeling)
- Bacon – 4 slices, cooked until crispy and finely chopped (I prefer thick-cut for extra chew, but regular works too)
- Mayonnaise – 1/3 cup (about 80g; adds creaminess, use your favorite brand)
- Chili Garlic Sauce – 2 tablespoons (like Huy Fong or homemade, adjust for your heat preference)
- Dijon Mustard – 1 teaspoon (for tang and depth; yellow mustard is fine if that’s what you have)
- Apple Cider Vinegar – 1 teaspoon (rounds out the flavors; white vinegar or lemon juice can also be used)
- Garlic Powder – 1/2 teaspoon (for an extra savory kick)
- Salt & Black Pepper – To taste (about 1/4 teaspoon each, but always taste and adjust!)
- Chives or Green Onions – 2 tablespoons, finely sliced (for garnish and a mild onion bite)
- Jalapeño Slices – Optional, for garnish and extra heat
- Crispy Fried Onions – Optional, for crunch on top
Tried-and-True Tips:
- Use cold eggs straight from the fridge for boiling—they’re less likely to crack in the water.
- Thick-cut bacon holds up better in the filling, but regular bacon is totally fine. Turkey bacon works if you want a lighter option.
- Chili garlic sauce is the magic ingredient here—don’t skip it! Sriracha can work in a pinch, but the flavor will be a bit different (still tasty, though).
- For a dairy-free version, double-check your mayo choice. There are great vegan options out there now that taste just as creamy.
- If you want to go low-carb, these are naturally keto-friendly as long as your mayo is sugar-free.
Honestly, I’ve made these with all sorts of tweaks—sometimes with a bit of smoked paprika stirred in, or with pickled jalapeños for a tangy twist. Don’t be afraid to play with what you have!
Equipment Needed
- Medium Saucepan or Pot – For boiling the eggs. A 2- to 3-quart size is perfect for a dozen eggs.
- Slotted Spoon – Makes transferring eggs to an ice bath a breeze.
- Mixing Bowl – For mashing yolks and mixing the filling. I like using a glass bowl so I can check the texture easily.
- Fork or Potato Masher – For smashing the yolks. A fork works, but a small masher is faster if you have it.
- Sharp Knife – For slicing eggs in half and chopping bacon and green onions.
- Spoon or Small Spatula – For filling the egg whites. If you want to get fancy, use a piping bag, but a spoon works just fine.
- Paper Towels – For patting bacon and keeping things tidy.
- Piping Bag with Star Tip (Optional): – If you’re aiming for that picture-perfect, Pinterest-worthy swirl. Honestly, I usually just use a spoon for less mess.
If you don’t have a piping bag, cut the corner off a zip-top bag and use that to pipe the filling. No need to buy anything special. Just give your tools a quick rinse in hot soapy water after—egg yolks can be clingy!
On a budget? Most of these tools are basics, and you can find them at any dollar store. The only thing I splurge on is a sturdy saucepan—peeling eggs is so much easier when they cook evenly.
Preparation Method
-
Boil the Eggs (12 minutes):
Place 12 large eggs in a single layer in your saucepan. Cover with cold water by at least 1 inch (2.5 cm). Bring to a boil over medium-high heat. Once boiling, cover, remove from heat, and let sit for 12 minutes. (Tip: Too long and the yolks get that green ring; too short and they’re gooey!) -
Chill and Peel (5 minutes + cooling):
Transfer eggs immediately to an ice bath (bowl of ice water) and let cool for 5 minutes. Gently tap each egg on the counter and peel under running water. If shells are stubborn, roll the egg gently to crackle the whole shell, then peel. Older eggs peel easier—just a fact. -
Prepare the Bacon (10 minutes):
While eggs cool, cook 4 slices of bacon in a skillet over medium heat until crispy (about 8-10 minutes). Drain on paper towels and chop finely. Don’t drain all the fat—leave a bit for extra flavor if you like. -
Halve the Eggs and Remove Yolks (2 minutes):
Carefully cut each egg in half, lengthwise. Pop the yolks into a mixing bowl. Arrange whites on a serving platter. Use a small spoon to loosen stubborn yolks. If any whites tear, just patch them up with a bit of filling later (nobody will notice!) -
Make the Filling (5 minutes):
Mash yolks with a fork or masher until very crumbly. Add 1/3 cup mayonnaise (80g), 2 tbsp chili garlic sauce (30g), 1 tsp Dijon mustard (5g), 1 tsp apple cider vinegar (5ml), 1/2 tsp garlic powder (2g), 1/4 tsp salt (1g), and 1/4 tsp black pepper (1g). Stir until very smooth. If mixture is too thick, add a bit more mayo or a splash of milk. -
Mix in the Bacon (1 minute):
Stir in half the chopped bacon. Reserve the rest for topping. Check the heat level and add more chili garlic sauce if you dare. -
Fill the Egg Whites (5 minutes):
Using a spoon, small spatula, or piping bag, fill each egg white half generously with the yolk mixture. If you want pretty swirls, use a star-tip piping bag. For rustic charm, just pile it on with a spoon. -
Garnish and Serve (2 minutes):
Sprinkle remaining bacon, sliced chives or green onions, and optional jalapeño slices or crispy onions over the eggs. Don’t skip the garnish—it adds flavor and makes them party-ready.
Make-Ahead Note: You can prep the eggs and filling up to a day ahead. Store components separately in the fridge, then fill and garnish right before serving for best texture.
Troubleshooting: If your filling is lumpy, mash it more or run it through a food processor for ultra-smooth texture. If the egg whites tip over, slice a tiny bit off the bottom to make a flat base. And if you overcook the eggs? The filling will still be delicious—promise!
Cooking Tips & Techniques
- Perfect Boiled Eggs: Start with cold water and don’t skip the ice bath. It stops the cooking and makes peeling a breeze.
- Mash Yolks Well: Lumpy yolks make the filling less creamy. I use a small mesh strainer to press them through if I want that super-smooth, bakery-style finish.
- Don’t Overdo the Mayo: Too much and your filling can get runny. Start with the listed amount, then add more a teaspoon at a time if needed.
- Balance the Heat: Chili garlic sauce varies brand to brand—always taste as you go! Once I accidentally doubled it and, well, the eggs had quite the kick. If you’re spice-shy, start with 1 tablespoon and work up.
- Bacon Tips: Cook bacon low and slow for extra-crispy results. Drain well, and don’t be afraid to chop it tiny for even distribution in the filling.
- Keep It Cold: Deviled eggs taste best chilled. If you’re making these for a party, pop the platter in the fridge until guests arrive (but not more than 2 hours at room temp!).
- Multitasking: While eggs boil and cool, fry your bacon and prep your garnishes. Makes the whole process feel way faster.
From experience, the biggest mistake is overcooking the eggs or going heavy on the chili garlic sauce without tasting. I once brought a batch to a picnic that practically brought tears to everyone’s eyes—oops! Now, I always taste and adjust. And if you want consistency, measure your ingredients instead of eyeballing, especially if making a double batch.
Variations & Adaptations
- Keto & Low-Carb: These loaded spicy chili garlic bacon deviled eggs are already keto-friendly! Just check your mayonnaise for hidden sugars to keep it extra low-carb.
- Vegetarian-Friendly: Swap bacon for crispy smoked tempeh or coconut bacon. You still get that savory crunch without the pork.
- Dairy-Free/Allergy Adaptation: Use your favorite vegan mayo and double-check your bacon or substitute with allergy-friendly options. The taste stays rich and creamy.
- Seasonal Twist: In summer, top with diced fresh tomatoes and basil for a BLT vibe. For autumn, sprinkle with smoked paprika and roasted pumpkin seeds.
- Extra Spicy: Add minced fresh jalapeños to the filling or drizzle with a little hot sauce for a serious kick.
- Personal Favorite: Sometimes I add a teaspoon of finely diced pickles or relish to the yolk mixture. It adds tang and crunch—so good!
You can also swap out Dijon for spicy brown mustard or add a pinch of curry powder for a totally different flavor profile. Honestly, once you master the creamy base, the sky’s the limit!
Serving & Storage Suggestions
Deviled eggs are best served chilled, arranged on a pretty platter or deviled egg tray—if you’ve got one, use it! I love to sprinkle on extra green onions and a touch of smoked paprika for that pop of color. For parties, pair them with crisp crudité, crunchy chips, or a sparkling lemonade for a refreshing contrast.
Any leftovers (rare, but it happens!) should be stored in a single layer in an airtight container in the fridge. They’ll keep for up to 3 days, but are best within the first 24 hours when the bacon stays crispy. To keep the filling from drying out, press a piece of plastic wrap directly onto the surface before sealing.
To reheat, I don’t recommend microwaving—just serve them cold, straight from the fridge. The flavors actually deepen after a few hours, so making them a little ahead is never a bad idea. If you want to freeze, I’d skip it; the texture of the whites gets weird. Instead, prep the filling in advance and fill eggs the day of your event.
Nutritional Information & Benefits
Each loaded spicy chili garlic bacon deviled egg half has roughly 90 calories, 6g fat, 5g protein, and less than 1g carbs. With high-quality protein from eggs and bacon, plus healthy fats from mayo, these are great for low-carb and keto eaters.
Eggs provide choline and B vitamins for brain health, while chili garlic sauce adds a metabolism-boosting kick. If you’re watching sodium, opt for low-sodium bacon and taste the filling before adding extra salt. For allergy concerns, always check your mayo and bacon for hidden dairy or gluten.
From a personal wellness perspective, these feel indulgent but still fit into a balanced, protein-rich snack routine. They’re filling, satisfying, and way more exciting than plain hard-boiled eggs!
Conclusion
If you’re looking for an appetizer that’s bold, crowd-pleasing, and ridiculously easy to make, these loaded spicy chili garlic bacon deviled eggs are the answer. They’re packed with flavor, have just the right amount of heat, and bring a fun twist to the classic deviled egg.
I love how versatile this recipe is—customize the spice, mix up the toppings, or make them vegetarian. Every time I make these, someone asks for the recipe (and I always send them home with leftovers—if there are any!).
Give these a try at your next party or just as a treat for yourself. Drop a comment below if you make them, let me know your favorite variations, or tag me with your loaded deviled egg creations. Happy snacking—your taste buds are in for a treat!
Frequently Asked Questions
How spicy are these loaded spicy chili garlic bacon deviled eggs?
They have a definite kick, but you control the heat! Start with 1 tablespoon chili garlic sauce for mild spice, or go up to 2-3 tablespoons for more punch. Always taste the filling before stuffing the eggs.
Can I make these deviled eggs ahead of time?
Absolutely! Boil and peel eggs, and mix the filling up to a day in advance. Keep whites and filling separate until just before serving, then fill and garnish for best texture.
What if I don’t have chili garlic sauce?
You can use Sriracha or another hot sauce, though the flavor will change a bit. Add a bit of minced garlic to mimic the garlic punch, and adjust the amount for your taste.
Are these deviled eggs gluten-free?
Yes, as long as your bacon and mayonnaise are gluten-free. Always double-check labels just to be safe!
Can I make these without bacon?
Definitely. For a vegetarian version, try smoked tempeh or coconut bacon, or just leave out the bacon and add extra green onion and crispy fried onions for texture.
PrintLoaded Spicy Chili Garlic Bacon Deviled Eggs

These loaded spicy chili garlic bacon deviled eggs are a bold, flavor-packed twist on the classic appetizer. Creamy, smoky, and spicy, they’re perfect for parties, game days, or any gathering where you want to impress with minimal effort.
- Prep Time: 15 minutes
- Cook Time: 25 minutes
- Total Time: 40 minutes
- Yield: 24 deviled egg halves (12 servings) 1x
- Category: Appetizer
- Cuisine: American
Ingredients
- 12 large eggs, hard-boiled
- 4 slices bacon, cooked until crispy and finely chopped
- 1/3 cup mayonnaise (about 80g)
- 2 tablespoons chili garlic sauce (like Huy Fong or homemade, adjust to taste)
- 1 teaspoon Dijon mustard
- 1 teaspoon apple cider vinegar
- 1/2 teaspoon garlic powder
- 1/4 teaspoon salt, or to taste
- 1/4 teaspoon black pepper, or to taste
- 2 tablespoons chives or green onions, finely sliced (for garnish)
- Jalapeño slices, optional, for garnish
- Crispy fried onions, optional, for garnish
Instructions
- Place 12 large eggs in a single layer in a medium saucepan. Cover with cold water by at least 1 inch. Bring to a boil over medium-high heat. Once boiling, cover, remove from heat, and let sit for 12 minutes.
- Transfer eggs immediately to an ice bath and let cool for 5 minutes. Gently tap each egg on the counter and peel under running water.
- While eggs cool, cook 4 slices of bacon in a skillet over medium heat until crispy (about 8-10 minutes). Drain on paper towels and chop finely.
- Carefully cut each egg in half lengthwise. Pop the yolks into a mixing bowl and arrange the whites on a serving platter.
- Mash yolks with a fork or masher until crumbly. Add mayonnaise, chili garlic sauce, Dijon mustard, apple cider vinegar, garlic powder, salt, and black pepper. Stir until very smooth.
- Stir in half the chopped bacon. Reserve the rest for topping. Taste and adjust seasoning or heat as desired.
- Using a spoon, small spatula, or piping bag, fill each egg white half generously with the yolk mixture.
- Sprinkle remaining bacon, sliced chives or green onions, and optional jalapeño slices or crispy onions over the eggs. Serve chilled.
Notes
Taste the filling as you go to adjust the spice level. For vegetarian, use smoked tempeh or coconut bacon. Make ahead by preparing eggs and filling separately, then assemble before serving. For ultra-smooth filling, press yolks through a mesh strainer. Store leftovers in an airtight container in the fridge for up to 3 days.
Nutrition
- Serving Size: 1 deviled egg half
- Calories: 90
- Sodium: 180
- Fat: 6
- Saturated Fat: 2
- Carbohydrates: 1
- Protein: 5
Keywords: deviled eggs, spicy deviled eggs, bacon deviled eggs, chili garlic, party appetizer, keto, low-carb, gluten-free, easy appetizer, game day snack