You know that feeling when you walk into a party and instantly spot a tray of deviled eggs—your favorite, but with a twist so bold you can’t help but be curious? That’s exactly how I felt the first time I whipped up these Chili Garlic Deviled Eggs. The scent of roasted garlic and chili oil wafting from the kitchen was enough to get even the pickiest eaters excited. Honestly, I stumbled upon this recipe when I was craving something savory, creamy, and with just the right amount of kick. I wanted deviled eggs, but not the classic kind—something with a little attitude, you know?
As someone who loves experimenting with flavor, chili garlic has always been my go-to combo. The punchy heat, the deep umami, and that subtle tang—it’s addictive. So, I thought, why not blend it into deviled eggs for the ultimate party snack? Turns out, it was a game-changer. These Chili Garlic Deviled Eggs aren’t just your average appetizer; they’re a conversation starter, a crowd magnet, and, honestly, a little bit of edible magic. Over the years, I’ve tweaked the recipe, playing with different chili pastes and garnishes, always circling back to this version for its unbeatable flavor balance.
If you’re looking for an easy, spicy snack that’ll impress your friends (and maybe even your grandma), these deviled eggs are it. They’re perfect for game day spreads, picnics, or whenever you need a little extra zing on your table. I’ve made these for everything from birthday brunches to lazy Sunday snacks, and they never last long. Trust me, once you try Chili Garlic Deviled Eggs, you’ll wonder how you ever settled for the plain kind.
Why You’ll Love This Chili Garlic Deviled Eggs Recipe
- Packed with Flavor: The chili garlic combo adds a bold punch, making these eggs anything but boring.
- Quick & Easy: Ready in about 30 minutes, even if you’re not a kitchen pro. Perfect for last-minute gatherings or unexpected guests.
- Simple Ingredients: No specialty store run required—just pantry staples and a dash of creativity.
- Perfect Party Snack: These eggs are made for sharing—think picnics, potlucks, tailgates, or even fancy cocktail parties.
- Customizable Heat: Make them as spicy or as mild as you want. I always keep a bottle of chili crisp on the side for my heat-loving friends.
- Crowd-Pleaser: Kids love the creamy filling (just dial back the chili for the little ones), and adults rave about the layered flavors.
- Wow Factor: The vibrant color and sprinkle of fresh herbs or crispy garlic chips make these eggs look as good as they taste.
I’ve tested more deviled egg variations than I can count, but the chili garlic version wins every time. Blending the yolks with chili garlic sauce gives a smooth, creamy texture with a little heat and just the right tang. It’s not the kind of recipe that gets lost on a buffet—it stands out and disappears fast! Plus, there’s something so satisfying about making a classic appetizer feel totally new. Whether you’re a deviled egg devotee or just dipping your toes into spicy snacks, you’ll find this recipe ridiculously doable and absolutely delicious. I can’t count how many times people have asked for the recipe after just one bite—always a good sign, right?
What Ingredients You Will Need
This recipe uses accessible ingredients that pack a punch. Here’s what you’ll need to make irresistible Chili Garlic Deviled Eggs:
- Large eggs – 6, hard-boiled and peeled (fresh eggs are harder to peel, so slightly older ones work best)
- Mayonnaise – 3 tablespoons (I love using Kewpie for extra richness, but any creamy mayo works)
- Chili garlic sauce – 1 to 2 tablespoons (think Huy Fong or homemade; you can use sambal oelek plus minced garlic as a backup)
- Rice vinegar – 1 teaspoon (adds a touch of brightness—apple cider vinegar works in a pinch)
- Dijon mustard – 1 teaspoon (brings subtle tang and depth, but yellow mustard is fine for a milder flavor)
- Salt – 1/4 teaspoon, or to taste (I prefer flaky sea salt for that crunchy finish)
- Ground black pepper – 1/8 teaspoon (freshly cracked if you can!)
- Chili oil – For drizzling (optional, but totally worth it for an extra flavor punch and gorgeous color on top)
- Chives or green onions – Finely sliced, for garnish (adds freshness and a pop of color)
- Crispy fried garlic – Optional, for crunch and dramatic flair (I sometimes make my own or grab a jar from the Asian aisle)
Ingredient Notes & Substitutions:
- Eggs: If you want to scale up, this recipe easily doubles or triples.
- Mayo: Use vegan mayo for a plant-based version, or swap in Greek yogurt for a lighter, tangier spin.
- Chili Garlic Sauce: Adjust the heat to your liking. Sriracha or chili crisp work in a pinch, though the texture will change slightly.
- Vinegar: Lemon juice can sub for vinegar in a pinch—just a squeeze will do.
- Garnishes: Fresh cilantro, toasted sesame seeds, or a sprinkle of smoked paprika all make fun alternatives.
Most of these ingredients are pantry mainstays, but if you’re running low on chili garlic sauce, try blending red pepper flakes with a bit of oil and minced garlic. The flavor won’t be identical, but it’ll do the trick. Don’t stress if you’re missing a garnish—the star is that spicy, creamy filling!
Equipment Needed
- Medium saucepan – For boiling eggs; any sturdy pot will do.
- Mixing bowl – For mashing yolks and mixing the filling. Glass is my favorite, but plastic works too.
- Sharp knife – For halving eggs cleanly. Serrated edges help if you struggle with crumbly yolks.
- Spoon or small spatula – To scoop out yolks and mix the filling.
- Piping bag or zip-top bag – Optional, but makes filling the eggs neater (I usually use a sandwich bag with the corner snipped off—budget-friendly and easy to clean up).
- Serving platter or tray – For displaying your eggs; even a cutting board works in a pinch.
- Fine mesh sieve (optional) – For extra-smooth yolk filling. Sometimes I skip it when I’m in a rush—it’s not a dealbreaker.
Honestly, you don’t need fancy gadgets for this recipe. If you’re in a tiny kitchen (been there!), just use what you’ve got. I’ve made deviled eggs with nothing more than a fork and a coffee mug for mixing. If you go the sieve route, rinse it right away—egg yolk dries fast and can be a pain to clean.
How to Make Chili Garlic Deviled Eggs
-
Hard-boil the eggs (15 minutes):
Place 6 large eggs in a medium saucepan and cover with cold water by about 1 inch (2.5 cm). Bring to a gentle boil over medium-high heat. Once boiling, cover, remove from heat, and let sit for 10-12 minutes. (For creamier yolks, go for 10 minutes; for firmer, stick with 12.) Drain and transfer eggs to an ice bath for 5 minutes to stop the cooking. Tip: Older eggs peel easier! -
Peel and halve the eggs (5 minutes):
Tap each egg gently on a hard surface and peel under running water. Slice eggs in half lengthwise with a sharp knife. If yolks stick or eggs are lopsided—no worries, they’ll taste just as good! -
Scoop out yolks (2 minutes):
Use a small spoon to gently pop the yolks into a mixing bowl. Place the whites on a serving tray, cut side up. -
Make the filling (5 minutes):
Mash yolks with 3 tablespoons mayonnaise, 1-2 tablespoons chili garlic sauce (start with 1 if you’re heat-shy), 1 teaspoon rice vinegar, 1 teaspoon Dijon mustard, 1/4 teaspoon salt, and 1/8 teaspoon black pepper. Mix until creamy. For ultra-smooth filling, push the mixture through a fine mesh sieve. -
Fill the egg whites (5 minutes):
Scoop the yolk mixture into a piping bag or zip-top bag with a snipped corner. Pipe (or spoon) filling generously into each egg white. If the filling’s a bit stiff, add a touch more mayo or a splash of vinegar. -
Garnish and serve (2 minutes):
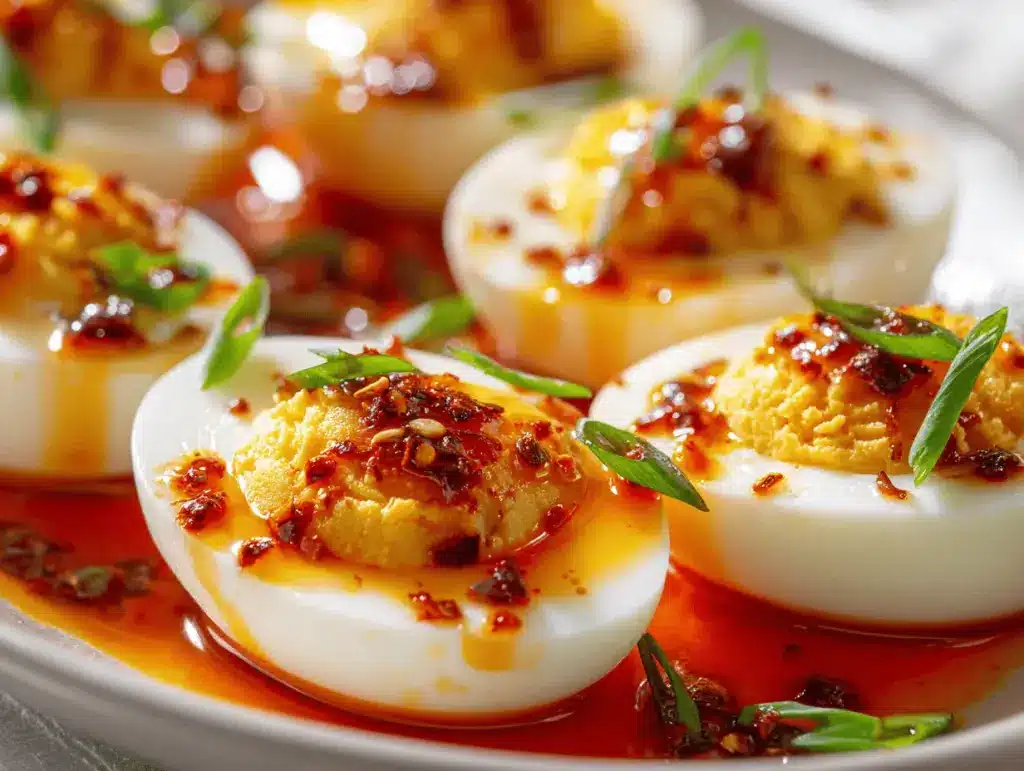
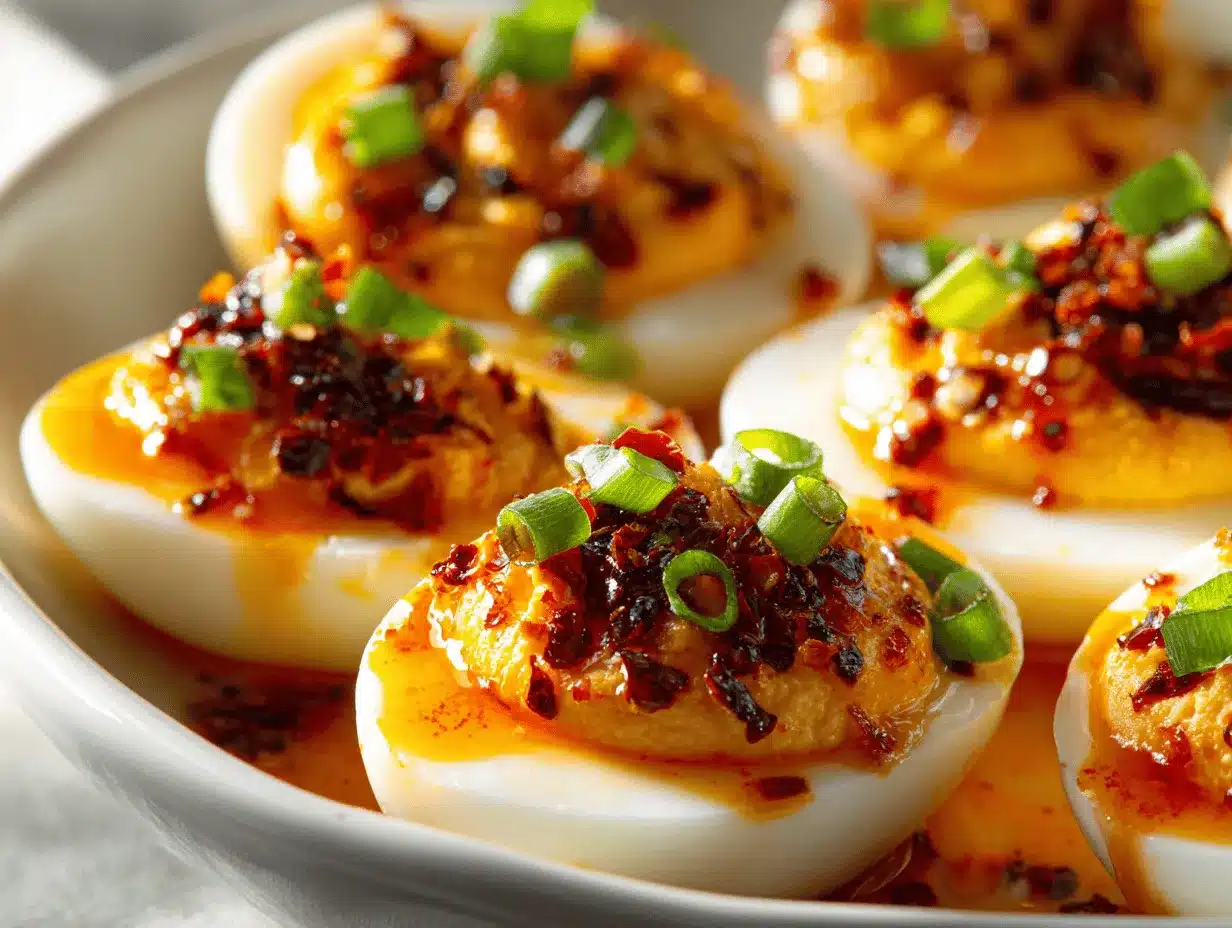
Drizzle with chili oil, sprinkle with sliced chives or green onions, and top with crispy fried garlic if using. A little goes a long way for flavor and crunch!
Troubleshooting Tips: If your eggs crack while boiling, add a splash of vinegar to the water—it helps the whites set quickly. If the filling is too loose, add a bit more yolk or mayo. And if you’re making these ahead, keep the whites and filling separate until just before serving to avoid soggy eggs.
I’ve learned the hard way not to overfill the eggs—otherwise, you’ll run out before the last few! If you have extra filling, dollop it onto crackers or tuck it into sandwiches. Waste not, want not, right?
Cooking Tips & Techniques
- Egg Doneness: For perfectly yellow yolks with no green ring, don’t overboil. The ice bath works wonders for stopping cooking and keeping yolks creamy.
- Smooth Filling: Mashing yolks with the back of a spoon or using a sieve gives a silkier texture. Sometimes, I just use a fork for a rustic, chunky feel—depends on the mood!
- Spice Control: Always taste your chili garlic sauce before adding the full amount. Some brands are way spicier than others.
- Batch Prep: If you’re making a double batch (highly recommended for parties), boil eggs in a larger pot, but don’t crowd them or they’ll crack.
- Keep it Neat: Filling eggs with a piping bag looks fancy, but honestly, a spoon works fine too. I’ve even used a plastic baggie with the corner cut off in a pinch.
- Multitasking: Boil eggs ahead and store in the fridge for up to 3 days unpeeled. Peel and fill just before serving for freshest flavor.
- Flavor Layering: Don’t skip the garnish! Even a sprinkle of green onion or a tiny drizzle of chili oil adds a finishing touch that makes these eggs pop.
I once forgot the vinegar and the filling tasted flat—so don’t leave it out. A little acid makes the flavors come alive. And if you’re worried about spice, start small and build up; you can always add more, but you can’t take it out!
Variations & Adaptations
- Vegetarian & Vegan: Swap the mayo for vegan mayo and use tofu or chickpea flour “eggs” for a plant-based twist. The chili garlic flavor still shines!
- Low-Carb/Keto: These eggs are naturally low in carbs, but you can make them even lighter by using Greek yogurt instead of mayo.
- Extra Crunch: Top with toasted sesame seeds, pickled jalapeños, or crispy shallots for more texture and flavor.
- Seasonal Spin: In summer, add minced fresh herbs like dill or basil. For a fall version, a pinch of smoked paprika or cayenne warms things up.
- Allergy-Friendly: If you’re avoiding eggs, use halved baby potatoes as the base and pile the spicy filling on top—sort of like deviled potatoes!
One of my favorite riffs was swapping chili garlic sauce for gochujang (Korean chili paste). The flavor was deeper, a little sweeter, and totally addictive. Don’t be afraid to play around—deviled eggs are basically a blank canvas for your cravings.
Serving & Storage Suggestions
How to Serve: Arrange Chili Garlic Deviled Eggs on a chilled platter, drizzle with a little extra chili oil, and scatter fresh chives or green onions on top. They look gorgeous and taste even better at room temperature—about 15 minutes out of the fridge is ideal. Pair with crisp veggies, crunchy crackers, or a sparkling lemonade for a light lunch or party spread.
Storing Leftovers: Place eggs in a single layer in an airtight container and refrigerate for up to 3 days. I recommend keeping garnishes separate until just before serving. If you’ve filled the eggs ahead, line the container with a paper towel to absorb extra moisture and keep eggs from sliding around.
Reheating: These are best served cold or at room temp. If you must, let them sit out for 10-15 minutes to take the chill off. I don’t recommend microwaving—eggs can get rubbery and the filling may separate. And I swear, the flavors get even better after a few hours in the fridge!
Nutritional Information & Benefits
Each Chili Garlic Deviled Egg half contains approximately:
- Calories: 80
- Protein: 3g
- Fat: 6g
- Carbohydrates: 1g
Eggs are a fantastic source of protein, healthy fats, and essential vitamins like B12 and choline. The chili garlic sauce brings antioxidants and a metabolism-boosting kick. Mayo can be swapped for Greek yogurt if you’re looking for a lighter version. These eggs are naturally gluten-free and low-carb, but double-check your chili garlic sauce for hidden allergens like gluten or soy. I love knowing I’m serving up a snack that’s both crave-worthy and nourishing—balance, right?
Conclusion
If you’re bored of the usual deviled eggs, Chili Garlic Deviled Eggs are the upgrade you never knew you needed. They’re spicy, creamy, and a little bit addictive—basically, everything you want in a party snack. Plus, they’re easy enough for weeknight cravings and fancy enough for special occasions. Whether you like them fiery hot or gently spiced, you can make this recipe your own.
I keep coming back to this recipe because it’s such a fun, flavorful way to jazz up a classic dish. Give it a try, then let me know how you made it yours—did you double the chili, add extra garlic, or try a new garnish? Drop a comment, share your photos, or send your favorite twist my way. Happy snacking, and may your eggs always be bold!
FAQs about Chili Garlic Deviled Eggs
How spicy are these deviled eggs?
It depends on the chili garlic sauce you use and how much you add. Start with one tablespoon and taste as you go. You can always add more for extra heat!
Can I make Chili Garlic Deviled Eggs ahead of time?
Absolutely! Prepare the eggs and filling up to a day in advance. Store the whites and filling separately, then fill and garnish just before serving for best results.
What’s the best way to peel hard-boiled eggs easily?
Use eggs that are a few days old and cool them quickly in an ice bath after boiling. Gently crack and peel under running water for smooth results.
Can I make this recipe dairy-free or vegan?
Yes! Use vegan mayo and plant-based “eggs” (like halved boiled potatoes or tofu slices) for a delicious vegan version. The spicy filling works with lots of different bases.
How long do leftovers last in the fridge?
Chili Garlic Deviled Eggs keep well for up to 3 days in an airtight container. Add garnishes right before serving to keep everything fresh and vibrant.
PrintChili Garlic Deviled Eggs

These Chili Garlic Deviled Eggs are a bold, spicy twist on the classic appetizer, featuring creamy yolks blended with chili garlic sauce and topped with fresh garnishes. Perfect for parties, picnics, or whenever you crave a zesty, crowd-pleasing snack.
- Prep Time: 15 minutes
- Cook Time: 15 minutes
- Total Time: 30 minutes
- Yield: 12 deviled egg halves (6 servings) 1x
- Category: Appetizer
- Cuisine: American
Ingredients
- 6 large eggs, hard-boiled and peeled
- 3 tablespoons mayonnaise (Kewpie or regular)
- 1 to 2 tablespoons chili garlic sauce (such as Huy Fong or homemade; sambal oelek plus minced garlic as a backup)
- 1 teaspoon rice vinegar (or apple cider vinegar)
- 1 teaspoon Dijon mustard (or yellow mustard)
- 1/4 teaspoon salt, or to taste
- 1/8 teaspoon ground black pepper
- Chili oil, for drizzling (optional)
- Chives or green onions, finely sliced, for garnish
- Crispy fried garlic, for garnish (optional)
Instructions
- Place 6 large eggs in a medium saucepan and cover with cold water by about 1 inch. Bring to a gentle boil over medium-high heat. Once boiling, cover, remove from heat, and let sit for 10-12 minutes. Drain and transfer eggs to an ice bath for 5 minutes.
- Tap each egg gently on a hard surface and peel under running water. Slice eggs in half lengthwise with a sharp knife.
- Use a small spoon to gently pop the yolks into a mixing bowl. Place the whites on a serving tray, cut side up.
- Mash yolks with mayonnaise, chili garlic sauce, rice vinegar, Dijon mustard, salt, and black pepper. Mix until creamy. For ultra-smooth filling, push the mixture through a fine mesh sieve.
- Scoop the yolk mixture into a piping bag or zip-top bag with a snipped corner. Pipe (or spoon) filling generously into each egg white.
- Drizzle with chili oil, sprinkle with sliced chives or green onions, and top with crispy fried garlic if using. Serve immediately.
Notes
For easier peeling, use eggs that are a few days old and cool them quickly in an ice bath. Adjust chili garlic sauce to your spice preference. For a vegan version, use vegan mayo and plant-based ‘eggs.’ Keep garnishes separate if making ahead. If the filling is too stiff, add a touch more mayo or vinegar. Store leftovers in an airtight container for up to 3 days.
Nutrition
- Serving Size: 1 deviled egg half
- Calories: 80
- Sodium: 120
- Fat: 6
- Saturated Fat: 1.5
- Carbohydrates: 1
- Protein: 3
Keywords: deviled eggs, chili garlic, spicy appetizer, party snack, easy deviled eggs, gluten-free, low carb, picnic, potluck, finger food