Introduction
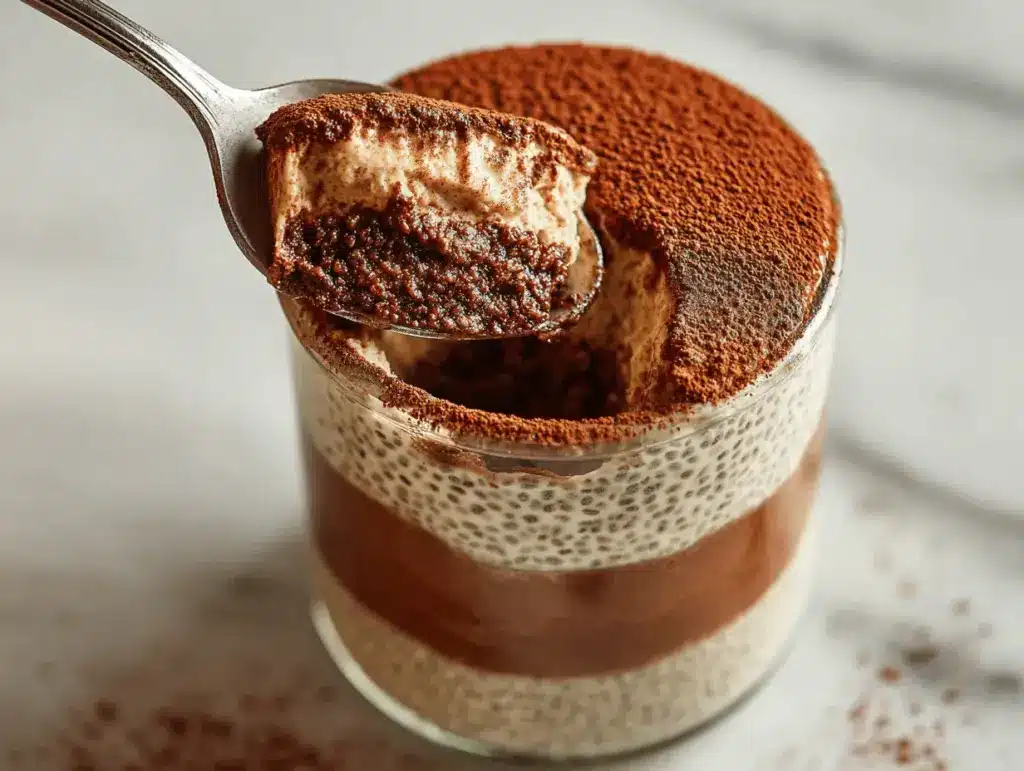
You know that moment when you dip your spoon into something creamy, chocolatey, and just a little unexpected? That’s exactly what you get with my Brownie Batter Tiramisu Chia Pudding Jars. The first time I whipped these up, I couldn’t believe how the rich, fudgy flavor mingled with that classic tiramisu coffee kick — all while keeping things light and nourishing. Seriously, who knew you could have your brownie batter and tiramisu too, in a single healthy dessert recipe?
Honestly, this recipe was born out of late-night cravings and a deep love for all things chocolate. I wanted something that tasted indulgent but wouldn’t leave me with a sugar crash. There’s this magical moment when the chia pudding sets overnight, and the cocoa and espresso flavors blend together, making each jar a little pot of creamy heaven. Plus, it’s layered, so you get that satisfying “scoop and reveal” moment with every bite — SO good for those Pinterest-worthy dessert shots, by the way.
Here’s the best part: these pudding jars are perfect for meal prep, make-ahead desserts, or just sneaking a spoonful straight from the fridge. I’ve tested and tweaked this recipe more times than I can count (it’s honestly my go-to for impressing friends at brunch or satisfying a chocolate craving after dinner). If you’re looking for a healthy dessert that feels decadent and is actually good for you, these Brownie Batter Tiramisu Chia Pudding Jars are your new best friend.
Why You’ll Love This Recipe
There’s just something about the combination of brownie batter and tiramisu that feels like a happy accident waiting to happen — and this chia pudding delivers every time. Over the years, I’ve tried dozens of chia pudding recipes, but nothing quite hits that sweet spot like this one. Here’s why you’ll want to make it again and again:
- Quick & Easy: Comes together in under 15 minutes of prep (the fridge does the rest) — perfect for busy mornings, meal prepping, or late-night dessert needs.
- Simple Ingredients: No fancy grocery trips required. Most of the items are probably already in your pantry or fridge!
- Perfect for Any Occasion: Whether it’s a brunch party, a cozy night in, or a post-workout treat, these jars fit right in.
- Crowd-Pleaser: Even the pickiest eaters (including kids!) go wild for the chocolate-meets-coffee flavor combo. Plus, everyone loves a jar dessert!
- Unbelievably Delicious: The rich brownie batter layer tastes like licking the bowl, while the tiramisu layer brings that classic creamy coffee flavor.
What sets this recipe apart? The secret is in the blending. I blend the chia pudding base for that ultra-smooth, dessert-like texture. It makes all the difference — no more weird lumps, just pure, creamy goodness. Plus, by adding just the right amount of espresso and cocoa, you get all the indulgence of tiramisu and brownie batter, but with a healthy twist (think fiber, protein, and wholesome fats).
This isn’t just another chia pudding. It’s the kind of treat that makes you do a happy dance in the kitchen. Whether you’re sharing with friends or savoring a solo treat, these jars are a little bit of chocolatey, coffee-infused comfort you can feel good about. Go ahead, treat yourself (without the guilt)!
What Ingredients You Will Need
This recipe uses simple, wholesome ingredients to deliver bold flavor and satisfying texture without the fuss. Even better? Everything is easy to find at most grocery stores, and you can swap things out to fit your needs.
- For the Brownie Batter Layer:
- Chia seeds (whole, black or white – I love Navitas Organics for consistent quality)
- Unsweetened cocoa powder (Dutch-processed for a deep chocolate flavor)
- Almond milk (or any non-dairy milk – oat or coconut milk work too)
- Maple syrup (or honey/agave for sweetness – adjust to taste)
- Natural nut butter (almond or cashew butter adds creaminess and “batter” flavor)
- Vanilla extract (real vanilla for best flavor – skip the imitation stuff if you can)
- Pinch of salt (it makes the chocolate pop!)
- For the Tiramisu Layer:
- Chia seeds (again – this layer is all about creamy texture)
- Almond milk (or your preferred milk)
- Espresso or strong brewed coffee (cooled – I usually just use leftover morning coffee!)
- Mascarpone cheese or thick Greek yogurt (for that classic tiramisu tang – use coconut yogurt for dairy-free)
- Maple syrup or honey (optional, for a touch of sweetness)
- Vanilla extract
- For Assembly & Topping:
- Dark chocolate shavings or cacao nibs (for crunch and extra chocolate hit)
- Unsweetened cocoa powder (for dusting)
- Fresh berries or a sprinkle of cinnamon (optional, but looks gorgeous!)
Ingredient tips & swaps: Use small-curd chia seeds for a smoother texture. If you want a nut-free version, swap nut butter for sunflower seed butter. For a more decadent treat, stir in mini chocolate chips or a swirl of melted chocolate. In summer, I sometimes add a layer of fresh strawberries — so good! If you’re gluten-free, you’re in luck: this recipe is naturally gluten-free as written.
Equipment Needed
- Mixing bowls: At least two medium-sized bowls for mixing each pudding layer.
- Whisk or fork: Helps break up any clumps in the chia mixture (a small whisk works wonders).
- Blender or immersion blender: Optional, but blending gives an ultra-smooth, pudding-like texture — trust me, it’s worth it!
- Measuring cups and spoons: Precision helps with the chia-to-liquid ratio.
- Glass jars or ramekins (8 oz/250 ml): Mason jars or recycled yogurt jars are perfect for layering and easy storage.
- Spatula or spoon: For layering and spreading each component.
If you don’t have a blender, don’t worry — just stir your chia pudding well and let it sit a bit longer for the seeds to soften up. I’ve used everything from recycled jam jars to clean takeout containers (hey, sometimes you gotta improvise). For cleaning, I soak my jars in warm soapy water to get rid of any sticky residue — makes life easier. If you’re shopping on a budget, dollar store jars work just as well as the fancy ones!
How to Make Brownie Batter Tiramisu Chia Pudding Jars
-
Make the Brownie Batter Chia Pudding:
In a medium bowl, whisk together 1/4 cup (40g) chia seeds, 2 tablespoons (12g) unsweetened cocoa powder, 1 cup (240ml) almond milk, 2 tablespoons (30ml) maple syrup, 2 tablespoons (32g) almond butter, 1/2 teaspoon (2.5ml) vanilla extract, and a pinch of salt. Stir well to combine — the cocoa can be tricky to mix, so give it a good whisk. Let it rest for 10 minutes, then stir again to break up any clumps.
Prep tip: If you see seeds floating on top, just stir again. The mixture will thicken as it sits. -
Make the Tiramisu Chia Pudding Layer:
In a separate bowl, combine 1/4 cup (40g) chia seeds, 3/4 cup (180ml) almond milk, 1/4 cup (60ml) cooled espresso or strong coffee, 1/4 cup (60g) mascarpone or Greek yogurt, 1 tablespoon (15ml) maple syrup (optional), and 1/2 teaspoon (2.5ml) vanilla extract. Whisk until smooth. Let sit for 10 minutes, then stir again.
Note: The mascarpone might look a bit lumpy at first, but it blends out as the chia seeds swell. -
Chill:
Cover both bowls and refrigerate for at least 2 hours, or overnight for best results. Chia pudding will thicken and set — you want a soft, pudding-like texture. If it seems too thick, add a splash more milk and stir to loosen. -
Optional: Blend for Creaminess:
For super-smooth layers, transfer each pudding mixture to a blender and blend for 10-20 seconds until creamy (totally optional, but SO worth it if you like a classic pudding vibe). -
Assemble the Jars:
Spoon half the brownie batter pudding evenly into 3-4 small jars (about 1/4 cup/60g per jar). Add a layer of tiramisu chia pudding (about 1/4 cup/60g per jar), then repeat so you have two layers of each. Use a spoon or spatula to gently spread each layer for those beautiful jar stripes.
Assembly tip: For neat layers, use a piping bag or zip-top bag with the corner snipped off. -
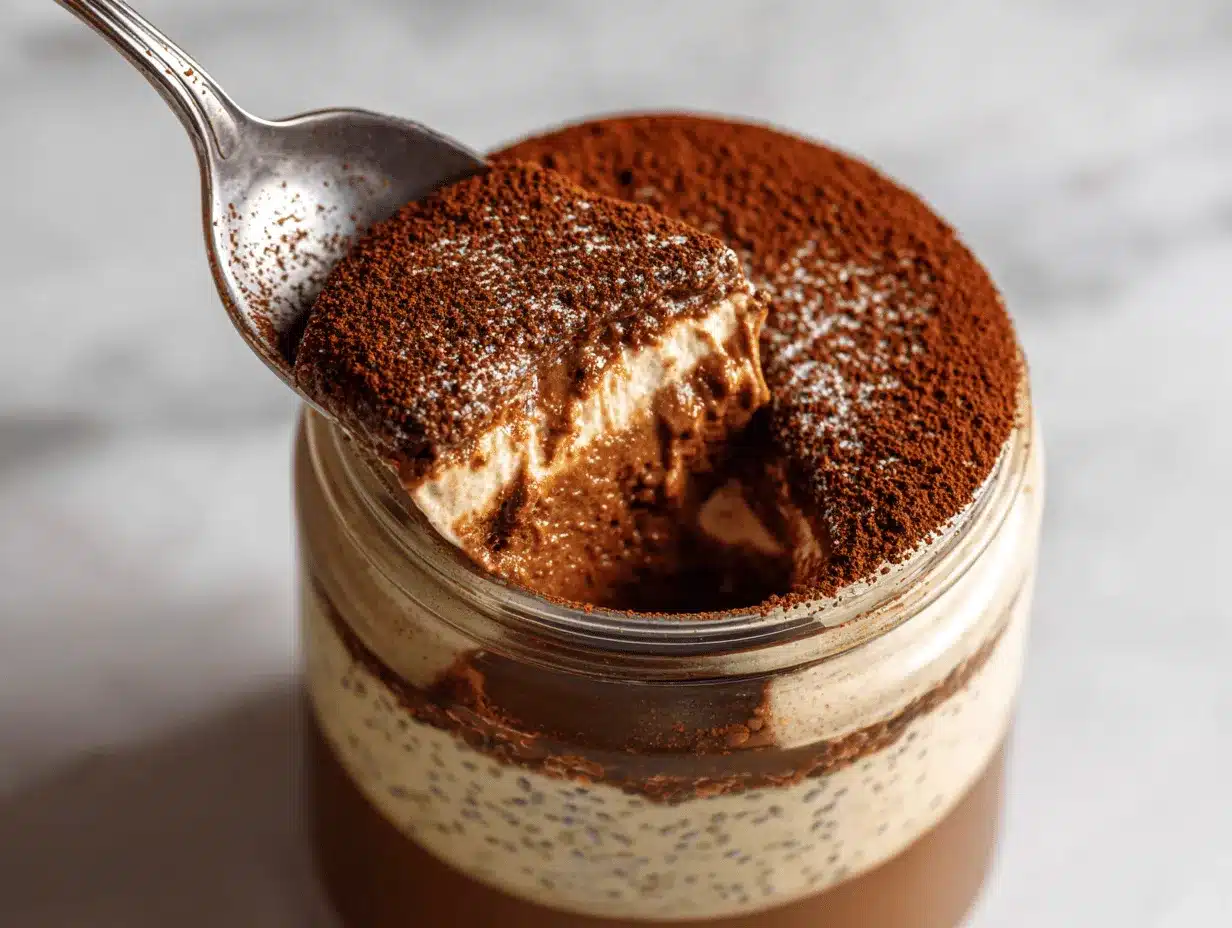
Top and Serve:
Sprinkle with dark chocolate shavings or cacao nibs, dust with cocoa powder, and add berries if you like. Serve immediately for a soft, mousse-like texture, or chill for another hour if you want the layers extra firm.
Troubleshooting: If your pudding is too runny, add 1-2 teaspoons more chia seeds and let it sit for another 30 minutes. If too thick, thin with a splash of milk. The flavor deepens after chilling, so don’t rush it! I’ve learned (the hard way) not to skip the waiting step — patience pays off with chia pudding every time.
Cooking Tips & Techniques
After countless batches, I’ve picked up a few tricks to make these Brownie Batter Tiramisu Chia Pudding Jars turn out just right — every single time.
- Even Mixing is Key: Chia seeds like to clump, especially with cocoa powder. I always whisk, let it sit, then whisk again about 10 minutes later. This helps prevent those weird “seed balls” at the bottom.
- Chill Time Matters: The longer you chill, the creamier and thicker your pudding becomes. Overnight is best, but a minimum of 2 hours will do in a pinch. If I’m in a rush, 30 minutes in the freezer gives you a soft-set pudding.
- Blending for Texture: If you want a true “pudding” feel, blend the chia mixture after it sets. I resisted this for years, but it makes such a difference! Just don’t over-blend or it can get gummy.
- Coffee Strength: Use good, strong espresso for the tiramisu layer — instant coffee works, but espresso brings out the real tiramisu vibes. Don’t go overboard or it’ll taste too bitter.
- Layering Without Mess: Use a small spatula or the back of a spoon to gently press down each layer. If you’re feeling fancy (or want Pinterest-perfect jars), use a piping bag.
I’ve made the mistake of not mixing the cocoa powder enough and ended up with bitter lumps — not fun. I also tried skipping the coffee once (don’t do it!), and the tiramisu flavor just wasn’t there. For multitasking, I always prep the puddings the night before, so assembly is a breeze in the morning. And don’t worry if your layers aren’t perfectly even — they’ll still taste amazing!
Variations & Adaptations
One of the best things about this recipe? It’s endlessly adaptable! Here are a few ways to make these jars your own:
- Dairy-Free: Use coconut yogurt or a thick, non-dairy Greek-style yogurt instead of mascarpone. The flavor is just as creamy and satisfying.
- Low-Sugar: Swap maple syrup for a sugar-free sweetener like monk fruit or stevia. You can also reduce the amount for a less-sweet treat.
- Nut-Free: Use sunflower seed butter or tahini in the brownie batter layer. Make sure your milk and yogurt are nut-free too.
- Seasonal Twist: In summer, add fresh strawberries or raspberries between the layers. In the fall, a sprinkle of cinnamon or pumpkin spice is delicious!
- Extra Protein: Stir in a scoop of chocolate or coffee-flavored protein powder to the pudding base. Just add extra milk to keep the texture creamy.
One of my favorite personal tweaks? I add a splash of orange zest to the tiramisu layer around the holidays for a chocolate-orange flavor bomb. If you’re feeling adventurous, try a swirl of peanut butter on top — it’s seriously good. Don’t be afraid to experiment — this recipe is super forgiving!
Serving & Storage Suggestions
These chia pudding jars are best served chilled, straight from the fridge. The layers hold up beautifully and look gorgeous in clear glass jars — perfect for a brunch spread or an after-dinner treat. If you want to get fancy, top each jar with a dusting of cocoa powder, chocolate shavings, and a few fresh berries or a mint sprig.
They pair well with a hot cup of espresso or herbal tea. If you’re serving for a crowd, lay out a “pudding bar” with different toppings: cacao nibs, coconut flakes, and nuts. For leftovers, simply pop the lid on your jars and store in the fridge for up to 5 days. The flavors actually get richer and more intense after a day or two! If you want to freeze them, use a freezer-safe jar and thaw overnight in the fridge before serving — the texture will be a little thicker but still delicious. To reheat (if you like it warm — some people do!), microwave in 20-second bursts until just warm, but don’t overdo it or the pudding can separate.
Nutritional Information & Benefits
These Brownie Batter Tiramisu Chia Pudding Jars pack a serious nutrition punch. Each serving (about 1 jar) has roughly 250-300 calories, 8g protein, 10g fiber, and healthy fats from chia seeds and nut butter. Chia seeds are loaded with omega-3s, while cocoa brings antioxidants and a little mood boost (not kidding!).
It’s naturally gluten-free and can be made dairy-free or low-sugar with easy swaps. Allergens to watch for: nuts (if using nut butter), dairy (if using mascarpone), and caffeine (from the espresso).
I love knowing I’m getting a dessert that’s actually good for me — it keeps me full, satisfies my sweet tooth, and doesn’t leave me with a sugar crash. Win-win!
Conclusion
Isn’t it wild that you can have the decadence of brownie batter and tiramisu in a healthy, make-ahead dessert? These Brownie Batter Tiramisu Chia Pudding Jars are the kind of treat that makes healthy eating feel like a total win. They’re flexible, meal-preppable, and endlessly riffable — plus, they look absolutely stunning layered in a jar.
If you’re craving something sweet but want to feel good about your choices, give this recipe a try. Add your own twist, swap the toppings, or make it super fancy for a special occasion. I make these all the time, and every batch is a little different (but always delicious).
Let me know how yours turn out! Drop a comment below, share your photos on Pinterest, or tell me your favorite variation. Happy pudding-making — you deserve a spoonful of joy!
Frequently Asked Questions
Can I make these Brownie Batter Tiramisu Chia Pudding Jars ahead of time?
Absolutely! In fact, they’re even better after a night in the fridge. Prep them the day before for grab-and-go breakfasts or a quick dessert.
What can I use instead of mascarpone in the tiramisu layer?
Thick Greek yogurt or coconut yogurt works great as a substitute. It keeps the layer creamy and adds that classic tang.
How do I keep my chia pudding from getting clumpy?
Whisk well, let it sit for 10 minutes, then whisk again. If you want it extra smooth, blend the pudding after it sets.
Is this recipe gluten-free?
Yes! As written, it’s naturally gluten-free. Just check your labels if you use flavored milks or toppings.
Can I use instant coffee instead of espresso?
You can! Use 1-2 teaspoons of instant coffee dissolved in hot water and let it cool before adding to your tiramisu layer. It’s not quite as bold, but still delicious.
Pin This Recipe!
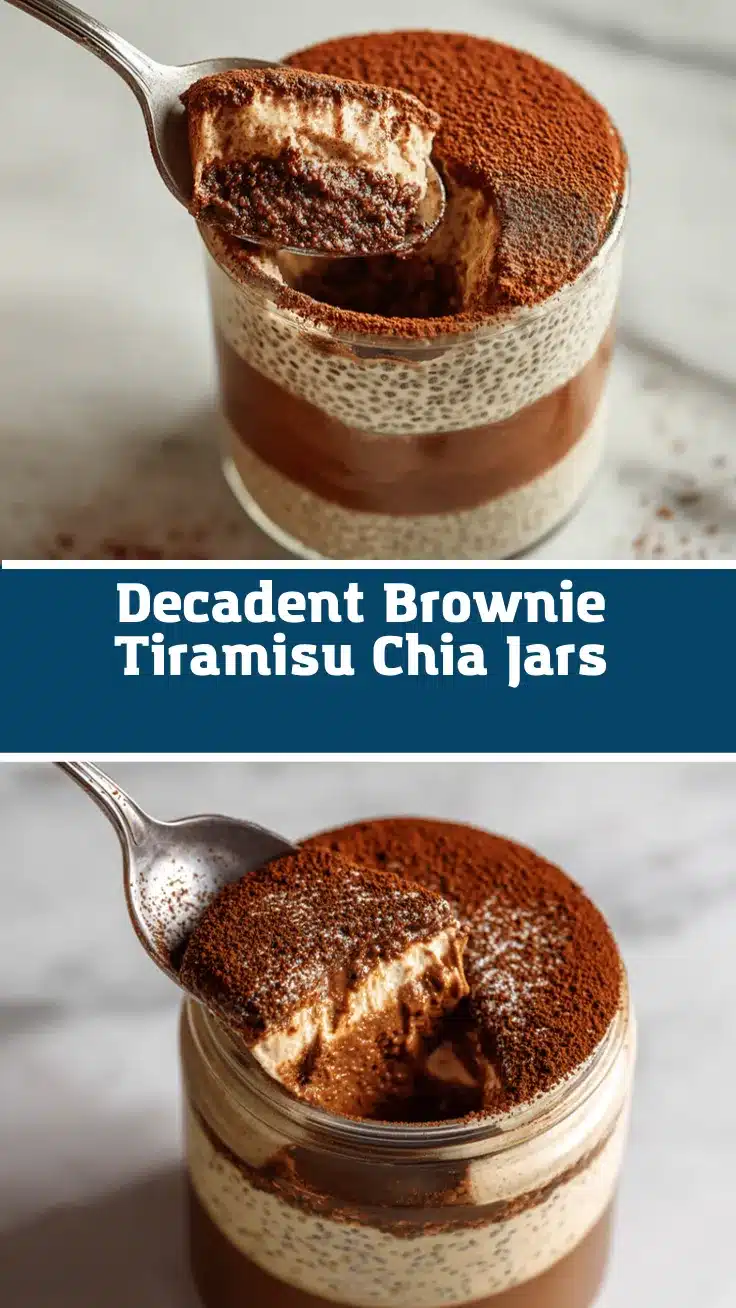
Brownie Batter Tiramisu Chia Pudding Jars
These Brownie Batter Tiramisu Chia Pudding Jars combine rich, fudgy chocolate flavor with a classic tiramisu coffee kick in a healthy, make-ahead dessert. Perfect for meal prep, brunch, or a guilt-free treat, they’re creamy, layered, and packed with wholesome ingredients.
- Prep Time: 15 minutes
- Cook Time: 0 minutes
- Total Time: 2 hours 15 minutes (includes chilling time)
- Yield: 3-4 jars (servings) 1x
- Category: Dessert
- Cuisine: Fusion
Ingredients
- 1/2 cup (80g) chia seeds, divided
- 2 tablespoons (12g) unsweetened cocoa powder (Dutch-processed preferred)
- 1 3/4 cups (420ml) almond milk, divided (or other non-dairy milk)
- 3 tablespoons (45ml) maple syrup, divided (or honey/agave, to taste)
- 2 tablespoons (32g) almond butter (or cashew butter, or sunflower seed butter for nut-free)
- 1 teaspoon (5ml) vanilla extract, divided
- Pinch of salt
- 1/4 cup (60ml) cooled espresso or strong brewed coffee
- 1/4 cup (60g) mascarpone cheese or thick Greek yogurt (or coconut yogurt for dairy-free)
- Dark chocolate shavings or cacao nibs, for topping
- Unsweetened cocoa powder, for dusting
- Fresh berries or a sprinkle of cinnamon, optional for topping
Instructions
- In a medium bowl, whisk together 1/4 cup chia seeds, 2 tablespoons cocoa powder, 1 cup almond milk, 2 tablespoons maple syrup, 2 tablespoons almond butter, 1/2 teaspoon vanilla extract, and a pinch of salt. Stir well to combine. Let rest for 10 minutes, then stir again to break up any clumps.
- In a separate bowl, combine 1/4 cup chia seeds, 3/4 cup almond milk, 1/4 cup cooled espresso or strong coffee, 1/4 cup mascarpone or Greek yogurt, 1 tablespoon maple syrup (optional), and 1/2 teaspoon vanilla extract. Whisk until smooth. Let sit for 10 minutes, then stir again.
- Cover both bowls and refrigerate for at least 2 hours, or overnight for best results. The chia pudding will thicken and set.
- Optional: For extra creaminess, blend each pudding mixture for 10-20 seconds until smooth.
- To assemble, spoon half the brownie batter pudding evenly into 3-4 small jars (about 1/4 cup per jar). Add a layer of tiramisu chia pudding (about 1/4 cup per jar), then repeat so you have two layers of each. Use a spoon or spatula to gently spread each layer.
- Top with dark chocolate shavings or cacao nibs, dust with cocoa powder, and add berries or cinnamon if desired. Serve immediately for a soft texture, or chill for another hour for firmer layers.
Notes
For best texture, blend the chia pudding after it sets. Adjust sweetness to taste. Use coconut yogurt for dairy-free, and sunflower seed butter for nut-free. The pudding thickens as it chills; add a splash of milk if too thick. Store in the fridge for up to 5 days. Flavors deepen after a day or two.
Nutrition
- Serving Size: 1 jar (about 8 oz/250 ml)
- Calories: 250300
- Sugar: 10
- Sodium: 120
- Fat: 13
- Saturated Fat: 3
- Carbohydrates: 28
- Fiber: 10
- Protein: 8
Keywords: chia pudding, tiramisu, brownie batter, healthy dessert, meal prep, gluten-free, dairy-free option, chocolate, coffee, make-ahead