Let me tell you, the smell of cinnamon-spiced apples bubbling away under a golden, flaky crust is enough to make anyone’s mouth water and heart skip a beat. The first time I baked this Classic Cozy Apple Pie with Ultimate Flaky Crust, I was instantly hooked—honestly, the kind of moment where you pause, take a deep breath, and just smile because you know you’re onto something truly special. It all started years ago, when I was knee-high to a grasshopper, watching my grandma whip up her legendary pies on chilly fall afternoons. There’s just something magical about the way those tender apples and buttery crust come together, a real hug in dessert form.
You know what’s funny? I stumbled upon this recipe during a rainy weekend, trying to recreate that nostalgic warmth without the fuss. My family couldn’t stop sneaking slices off the cooling rack (and I can’t really blame them). It’s dangerously easy to make, yet every bite delivers pure, nostalgic comfort that brightens up any table, whether it’s a holiday feast, a cozy night in, or a sweet treat for the kids after school.
Honestly, this Classic Cozy Apple Pie with Ultimate Flaky Crust has become a staple for family gatherings, neighborhood potlucks, and even gifting around the holidays. After testing this recipe multiple times in the name of research, of course, I can tell you it’s one you’re going to want to bookmark and keep coming back to—because nothing says “home” quite like this pie.
Why You’ll Love This Recipe
Let’s face it, the perfect apple pie is a bit of an art form, but this recipe nails it with a few simple tricks that make all the difference. I’ve tested this over and over (sometimes twice in one week), and here’s why it stands out:
- Quick & Easy: Comes together in under an hour, perfect for busy weeknights or last-minute dessert cravings.
- Simple Ingredients: No fancy grocery trips—just pantry staples you likely already have on hand.
- Perfect for Any Occasion: Great for potlucks, holiday dinners, or a cozy Sunday afternoon treat.
- Crowd-Pleaser: Always gets rave reviews from kids and adults alike—there’s rarely any pie left!
- Unbelievably Delicious: The texture combo of tender apples with a buttery, flaky crust hits that comfort food spot like no other.
What sets this Classic Cozy Apple Pie apart? It’s the crust, honestly. The ultimate flaky crust comes from a simple technique of keeping everything cold and handling the dough just right—no tough, dense bottom here. Plus, the filling’s balanced with just the right amount of cinnamon, nutmeg, and a hint of lemon to brighten things up, so it’s never overly sweet or soggy.
This isn’t just another apple pie; it’s the kind that makes you close your eyes after the first bite and smile. Comfort food without the extra fuss—perfect for impressing guests or turning a simple meal into a memorable moment.
What Ingredients You Will Need
This recipe uses simple, wholesome ingredients to deliver bold flavor and that satisfying flaky texture without any fuss. Most are pantry staples, but I’ll share a few tips to get the best results.
- For the crust:
- 2 ½ cups (320g) all-purpose flour (I recommend King Arthur for best texture)
- 1 tsp salt
- 1 tsp granulated sugar (just a touch to balance savory)
- 1 cup (226g) unsalted butter, cold and cubed (use a good-quality butter like Plugrá or Kerrygold for richness)
- 6-8 tbsp ice water (keep it as cold as possible!)
- For the filling:
- 6-7 medium apples (about 3 lbs/1.4 kg) – a mix of Granny Smith and Honeycrisp works beautifully
- ¾ cup (150g) granulated sugar
- ¼ cup (50g) packed light brown sugar
- 2 tsp ground cinnamon
- ¼ tsp ground nutmeg
- ½ tsp salt
- 1 tbsp fresh lemon juice (to keep apples bright and prevent browning)
- 2 tbsp all-purpose flour (helps thicken the filling)
- 1 tsp vanilla extract (optional, but adds warmth)
- For the topping:
- 1 egg, beaten (for egg wash to get that golden crust)
- 1 tbsp coarse sugar (like turbinado or sanding sugar) for sprinkling
If you want to keep it gluten-free, you can swap the all-purpose flour for a gluten-free blend that measures cup-for-cup. For dairy-free, use a plant-based butter substitute chilled the same way. In summer, feel free to swap in fresh peaches or pears for a seasonal twist. Trust me, this base is forgiving but always delivers.
Equipment Needed
- 9-inch (23 cm) pie dish – glass or ceramic works best for even baking
- Mixing bowls – at least two, one for dough and one for filling
- Pastry cutter or food processor (a food processor speeds up cutting butter into flour, but a pastry cutter works just fine)
- Rolling pin – essential for even crust
- Sharp knife or apple corer – to prep the filling apples
- Measuring cups and spoons – for precise ingredient amounts
- Pastry brush – for applying the egg wash
If you don’t have a pastry cutter, two forks or even your fingers (quickly!) can do the trick. For rolling, I love using a silicone mat to make cleanup easier, but parchment paper works too. Keeping your tools cold and dry is key to flaky crust success.
Preparation Method
- Prepare the crust: In a large bowl, whisk together the flour, salt, and sugar. Add the cold, cubed butter. Use a pastry cutter or fingers to work the butter into the flour until it resembles coarse crumbs with pea-sized bits. (Tip: Work quickly so the butter stays cold.)
- Add ice water: Sprinkle 6 tablespoons of ice water over the mixture. Use a fork to gently mix, adding more water one tablespoon at a time until the dough just holds together when pressed. Avoid overmixing to keep the crust tender.
- Form and chill dough: Divide the dough in half and shape each into a flat disk. Wrap tightly in plastic wrap and refrigerate for at least 1 hour (or up to 2 days). This rest time is crucial for flaky layers.
- Prepare the filling: Peel, core, and thinly slice the apples (about ¼-inch thick). In a large bowl, toss the apples with lemon juice, sugars, cinnamon, nutmeg, salt, flour, and vanilla extract until evenly coated. Set aside to let the flavors meld.
- Roll out the bottom crust: On a lightly floured surface, roll one dough disk into a 12-inch (30 cm) circle, about ⅛-inch thick. Carefully transfer to your pie dish, letting the excess hang over the edge.
- Add the filling: Pour the apple mixture into the crust, spreading evenly and mounding slightly in the center.
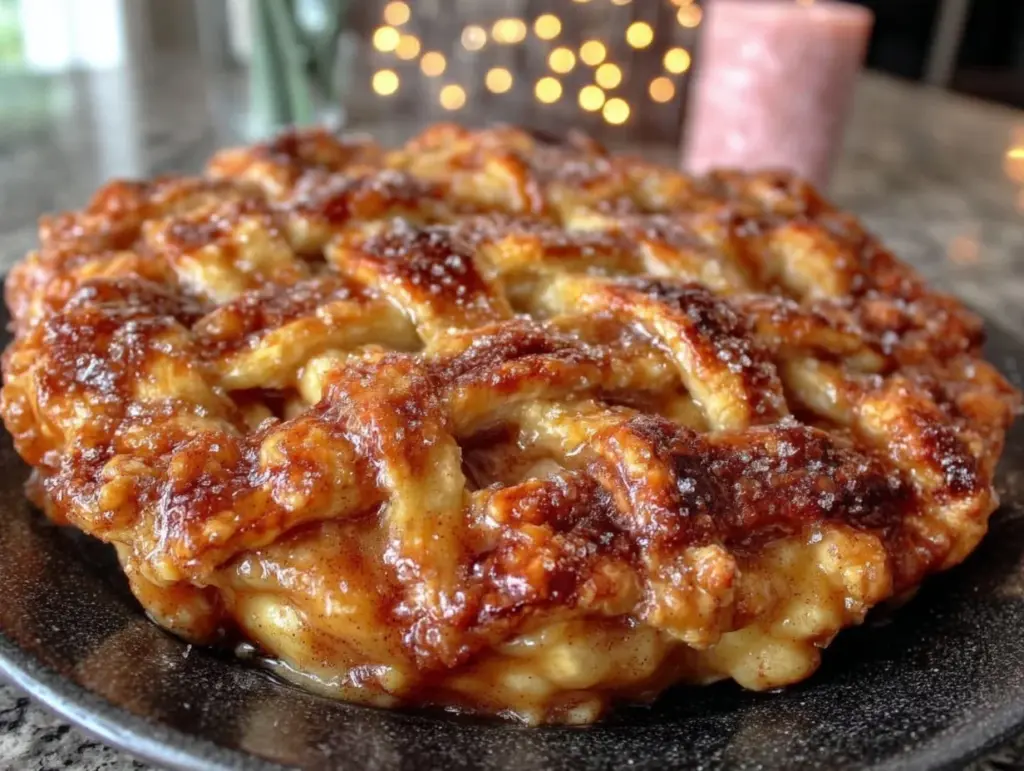
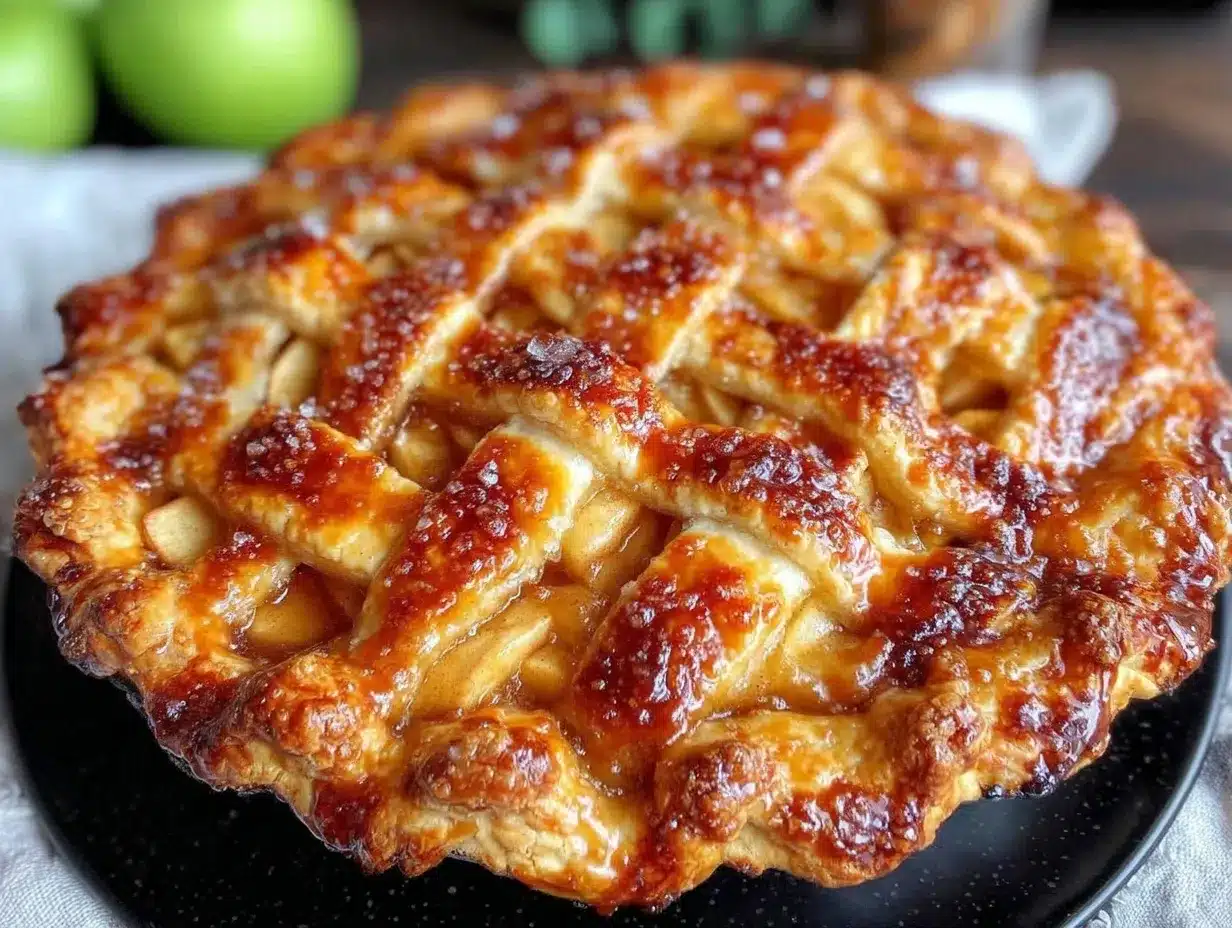
- Roll out the top crust: Roll the second dough disk into another 12-inch circle. You can either place it whole on top or cut into strips for a lattice design (pro tip: a lattice lets steam escape and looks gorgeous).
- Seal and crimp edges: Trim any excess dough, then press edges together with your fingers or a fork. Crimp decoratively if you like.
- Apply egg wash and sugar: Brush the top crust with beaten egg for that golden shine. Sprinkle with coarse sugar for a little sparkle and crunch.
- Cut vents: If using a solid top crust, cut a few slits to allow steam to escape during baking.
- Bake: Place the pie on the center rack of a preheated oven at 425°F (220°C). Bake for 15 minutes, then reduce heat to 350°F (175°C) and bake another 40-50 minutes until the crust is deep golden and filling bubbles through vents.
- Cool: Let the pie cool on a wire rack for at least 2 hours to set the filling. (Patience here is key to avoid runny slices!)
Cooking Tips & Techniques
One of the trickiest parts of making apple pie is mastering the crust. Here’s what I’ve learned from plenty of trial and error:
- Keep everything cold: Butter, water, even flour can benefit from a quick chill. Cold butter creates steam pockets that puff up while baking, giving you that flaky texture.
- Don’t overwork the dough: Overmixing develops gluten and leads to a tough crust. Mix just until the dough holds together.
- Use a mix of apple varieties: Combining tart Granny Smith with sweet Honeycrisp creates a filling that’s balanced—neither too sweet nor bland.
- Pre-bake the crust? Not necessary here: This recipe’s sturdy crust and thick filling bake perfectly together, saving you a step.
- Watch the oven temperature: Starting hot helps set the crust, then lowering prevents burning while the filling cooks through.
- Don’t forget to vent: Otherwise, your pie might bubble over or the crust gets soggy on top.
- Cool before slicing: I can’t stress this enough! The filling needs time to thicken. Cutting too soon means juicy mess.
Honestly, a few tweaks and you’ll be baking pies that draw compliments and requests for seconds. I still remember the first time a neighbor peeked in the window, drawn by that scent, and begged for a slice!
Variations & Adaptations
While this Classic Cozy Apple Pie is delicious as-is, you can easily tweak it to fit your taste, dietary needs, or the season.
- Gluten-Free Option: Swap the all-purpose flour for a gluten-free flour blend. Add a tablespoon of xanthan gum if your blend doesn’t include it for better texture.
- Vegan Version: Use coconut oil or vegan butter instead of butter, and replace the egg wash with a plant-based milk brushed on the crust.
- Spiced Up: Add a pinch of ground cloves or allspice to the filling for a warmer spice profile that’s perfect around the holidays.
- Fruit Mix: Try adding ½ cup dried cranberries or chopped pecans to the filling for extra texture and flavor.
- Rustic Style: Skip the top crust and bake as an open-faced galette for a quicker and more casual presentation.
One variation I love is adding a splash of Calvados (apple brandy) into the filling for grown-up gatherings—adds a subtle depth that’s dangerously good. Feel free to play around till you find your perfect spin!
Serving & Storage Suggestions
This apple pie is best served slightly warm or at room temperature, ideally with a scoop of vanilla ice cream or a dollop of whipped cream. The contrast between warm filling and cold cream is pure bliss.
For drinks, a hot cup of spiced tea, coffee, or even a glass of cold milk pairs wonderfully. It’s a dessert that feels right at home on a chilly evening or a festive brunch table.
Store leftover pie covered loosely with foil or plastic wrap at room temperature for up to 2 days, or refrigerate for up to 5 days. To freeze, wrap the whole pie tightly in plastic wrap and foil and freeze for up to 3 months.
When reheating, warm slices in a 350°F (175°C) oven for 10-15 minutes to bring back that fresh-baked magic. Over time, the flavors deepen and meld beautifully, so leftovers can be even better the next day.
Nutritional Information & Benefits
A typical slice of this Classic Cozy Apple Pie (1/8th of pie) contains roughly 350-400 calories, with a good balance of carbs from the apples and sugars, and fats from the buttery crust. The apples provide dietary fiber and vitamin C, while cinnamon offers antioxidants and may help regulate blood sugar.
This recipe can fit into a balanced diet when enjoyed in moderation. Using fresh, whole ingredients means you avoid unnecessary additives found in many store-bought pies.
For those watching gluten or dairy, simple swaps make this recipe inclusive without losing that signature flavor and texture. It’s a dessert that’s not just comforting but mindful too.
Conclusion
So, there you have it—the Classic Cozy Apple Pie with Ultimate Flaky Crust that’s easy to make, irresistibly tasty, and perfect for any occasion. Whether you’re a seasoned baker or a newbie, this recipe invites you to make it your own, adding personal touches or sticking to the tried-and-true classic.
I love this pie because it’s more than dessert—it’s a warm memory, a family tradition, and a simple way to bring a little happiness to the kitchen. Give it a try, tweak it to your liking, and don’t forget to share how it turned out!
Drop me a comment below with your favorite pie tweaks or stories. And hey, if you loved this recipe, sharing it with friends means more cozy moments all around. Happy baking!
FAQs
What type of apples work best for apple pie?
A mix of tart and sweet apples like Granny Smith and Honeycrisp gives the best balance of flavor and texture. Avoid super soft apples that turn mushy.
How do I keep the pie crust from getting soggy?
Use a thickening agent like flour in the filling, keep the crust cold, and bake at a high temperature initially to set the crust quickly. Also, vent the top crust so steam escapes.
Can I make the pie crust ahead of time?
Absolutely! You can prepare and chill the dough disks up to 2 days in advance. Just keep them wrapped tightly in the refrigerator.
How do I store leftover apple pie?
Cover loosely at room temperature for 2 days or refrigerate for up to 5 days. For longer storage, freeze whole or sliced pie wrapped well for up to 3 months.
Can I use this recipe for other fruit pies?
Yes! The crust and basic filling method work well with pears, peaches, berries, or mixed fruits. Just adjust sugar and thickener quantities depending on the fruit’s sweetness and juiciness.
Pin This Recipe!

Classic Cozy Apple Pie Recipe Easy Homemade Flaky Crust Guide

A nostalgic and easy-to-make apple pie featuring a tender cinnamon-spiced apple filling and an ultimate flaky buttery crust. Perfect for family gatherings, holidays, or cozy nights in.
- Prep Time: 20 minutes
- Cook Time: 55 minutes
- Total Time: 2 hours 15 minutes
- Yield: 8 servings 1x
- Category: Dessert
- Cuisine: American
Ingredients
- 2 ½ cups (320g) all-purpose flour
- 1 tsp salt
- 1 tsp granulated sugar
- 1 cup (226g) unsalted butter, cold and cubed
- 6–8 tbsp ice water
- 6–7 medium apples (about 3 lbs/1.4 kg) – mix of Granny Smith and Honeycrisp
- ¾ cup (150g) granulated sugar
- ¼ cup (50g) packed light brown sugar
- 2 tsp ground cinnamon
- ¼ tsp ground nutmeg
- ½ tsp salt
- 1 tbsp fresh lemon juice
- 2 tbsp all-purpose flour
- 1 tsp vanilla extract (optional)
- 1 egg, beaten (for egg wash)
- 1 tbsp coarse sugar (turbinado or sanding sugar)
Instructions
- Prepare the crust: In a large bowl, whisk together flour, salt, and sugar. Add cold, cubed butter and work into flour until coarse crumbs with pea-sized bits form. Work quickly to keep butter cold.
- Add ice water: Sprinkle 6 tablespoons of ice water over mixture. Mix gently with a fork, adding more water one tablespoon at a time until dough holds together when pressed. Avoid overmixing.
- Form and chill dough: Divide dough in half, shape into flat disks, wrap in plastic wrap, and refrigerate for at least 1 hour or up to 2 days.
- Prepare filling: Peel, core, and thinly slice apples. Toss with lemon juice, granulated sugar, brown sugar, cinnamon, nutmeg, salt, flour, and vanilla extract until evenly coated. Set aside.
- Roll out bottom crust: On a lightly floured surface, roll one dough disk into a 12-inch circle about 1/8-inch thick. Transfer to pie dish, letting excess hang over edge.
- Add filling: Pour apple mixture into crust, spreading evenly and mounding slightly in center.
- Roll out top crust: Roll second dough disk into a 12-inch circle. Place whole on top or cut into strips for lattice design.
- Seal and crimp edges: Trim excess dough and press edges together with fingers or fork. Crimp decoratively if desired.
- Apply egg wash and sugar: Brush top crust with beaten egg and sprinkle with coarse sugar.
- Cut vents: If using solid top crust, cut slits to allow steam to escape.
- Bake: Place pie on center rack of preheated oven at 425°F (220°C). Bake 15 minutes, then reduce heat to 350°F (175°C) and bake 40-50 minutes until crust is deep golden and filling bubbles.
- Cool: Let pie cool on wire rack for at least 2 hours before slicing to set filling.
Notes
Keep all ingredients cold to ensure a flaky crust. Do not overmix dough to avoid toughness. Use a mix of tart and sweet apples for balanced flavor. Vent the top crust to prevent sogginess. Cool pie completely before slicing to set filling.
Nutrition
- Serving Size: 1 slice (1/8th of pi
- Calories: 375
- Sugar: 30
- Sodium: 210
- Fat: 18
- Saturated Fat: 11
- Carbohydrates: 52
- Fiber: 3
- Protein: 3
Keywords: apple pie, classic apple pie, flaky crust, homemade pie, cozy dessert, cinnamon apple pie, easy apple pie recipe


