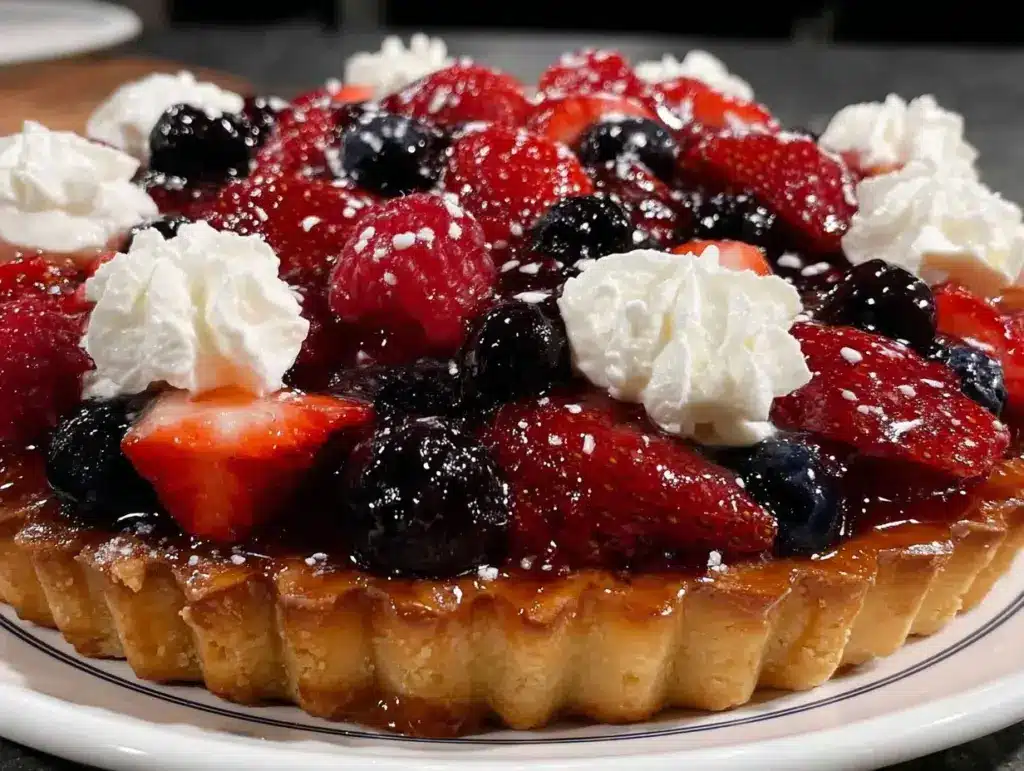
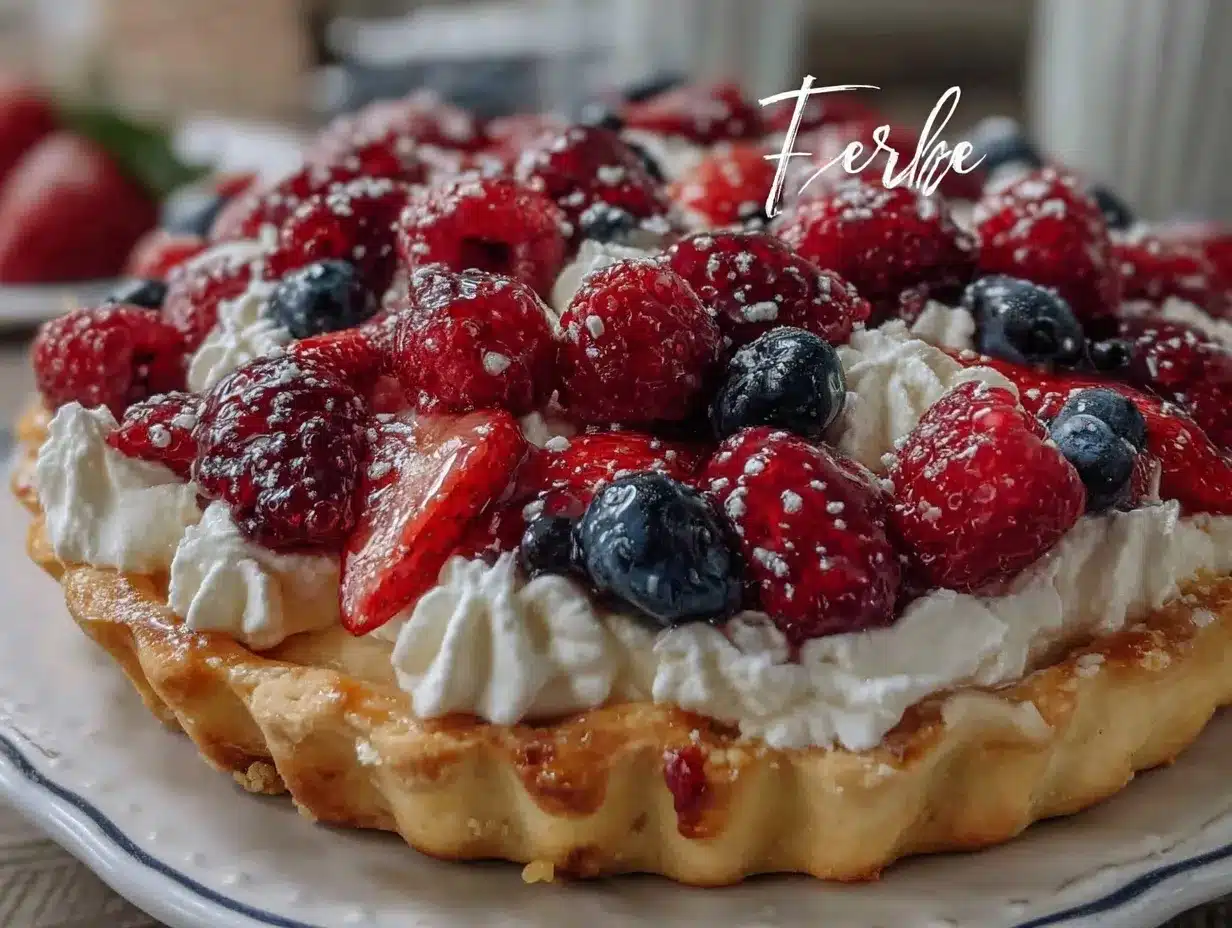
There’s just something magical about the way a fresh Red White and Blue Fruit Tart looks on the table—vivid berries glistening in the sunlight, creamy filling peeking out from a buttery golden crust, and the scent of ripe strawberries and blueberries mixing with sweet vanilla. Honestly, if you close your eyes for a second, you can almost hear the laughter of a backyard party and feel the anticipation of that first, juicy bite. The first time I made this red white and blue fruit tart was for a Fourth of July block party—let me tell you, folks were circling the dessert table like bees around a honey pot. I remember pausing, just soaking in the moment, thinking, “Yep… I’m definitely onto something special here.”
This tart has roots in my family’s tradition of making fruit desserts every summer. When I was knee-high to a grasshopper, my grandma used to pile us grandkids into the kitchen for berry-washing duty. She had a knack for simple, show-stopping desserts, and this recipe is a nod to her style—classic, easy, and always crowd-pleasing. I first stumbled on the idea of arranging red, white, and blue fruits in a patriotic pattern during a rainy Memorial Day weekend (you know, when you have all the time in the world to tinker in the kitchen). I wish I’d discovered how dangerously easy this tart could be years ago—it would have saved me from many a last-minute dessert scramble!
My family can’t help but sneak slices straight from the fridge, and honestly, I can’t blame them. The tart’s got that pure, nostalgic comfort—like a warm hug, but chilled and fruity. It’s become a staple for family gatherings, gifting to friends, or brightening up my Pinterest board with its festive vibes. Whether you’re looking for a sweet treat for your kids, a potluck showstopper, or just something to make your weekend a bit more special, this red white and blue fruit tart is going to be your new favorite. I’ve tested and tweaked it more times than I can count (all in the name of research, of course), and every time, it feels like a little celebration. Trust me—you’re going to want to bookmark this one.
Why You’ll Love This Red White and Blue Fruit Tart Recipe
After years of whipping up desserts for both family and friends (plus a few failed tarts along the way—let’s be honest), I can say this Red White and Blue Fruit Tart has all the makings of a go-to festive dessert. Here’s why you’ll want to make it again and again:
- Quick & Easy: You can put this together in under an hour, and most of that time is hands-off. Perfect for those busy holiday mornings or last-minute party invites.
- Simple Ingredients: No need for fancy-pants specialty items. If you’ve got fresh berries, a few pantry staples, and maybe a lemon, you’re set.
- Perfect for Gatherings: This tart is a stunner for Fourth of July, Memorial Day, or really any summer event. It’s as pretty as it is tasty (and it’ll brighten up any dessert table or Pinterest board).
- Crowd-Pleaser: Kids and adults both go back for seconds. Even the “I’m not a dessert person” types can’t resist the fresh fruit and creamy filling combo.
- Unbelievably Delicious: The crisp crust, velvety vanilla cream, and juicy fruit together create a flavor and texture combo that’s pure comfort.
What sets this tart apart? It’s all about balance. I use a blend of cream cheese and Greek yogurt for the filling—ultra-smooth and just a little tangy. The crust is buttery but sturdy enough to hold up to juicy fruits. And arranging the berries in a starburst or flag pattern? That’s my little creative twist that never fails to get oohs and aahs.
This isn’t just another fruit tart. It’s the kind that makes you pause after the first bite, close your eyes, and just enjoy. It’s comfort food for festive moments—lighter, fresher, and a whole lot easier than you’d think. Whether you’re out to impress guests or just want an easy, memorable treat, this red white and blue fruit tart is a winner. It’s been tested (and devoured) by my pickiest eaters and always gets rave reviews. Honestly, I can’t think of a better “pin now, bake later” kind of dessert for your next celebration.
What Ingredients You Will Need for Red White and Blue Fruit Tart
This recipe uses simple, fresh ingredients to deliver bold flavor and eye-catching color, all without any complicated steps. Most of these you probably have on hand, and you can easily swap or adjust depending on what’s in your fridge or at the farmers’ market.
- For the Tart Crust:
- 1 1/4 cups (160g) all-purpose flour
- 1/4 cup (30g) powdered sugar (for tenderness)
- 1/2 teaspoon salt
- 1/2 cup (115g) unsalted butter, cold and cubed
- 1 large egg yolk
- 1-2 tablespoons (15-30ml) cold water (just enough to bring the dough together)
- For the Creamy Filling:
- 8 oz (225g) cream cheese, softened (I like Philadelphia for texture)
- 1/2 cup (120g) plain Greek yogurt (adds tang, swap for coconut yogurt for dairy-free)
- 1/3 cup (40g) powdered sugar (adjust to taste)
- 1 teaspoon pure vanilla extract
- 1 teaspoon lemon zest (optional, but I love the brightness)
- For the Red, White, and Blue Topping:
- 1 cup (150g) fresh strawberries, hulled and sliced
- 1 cup (140g) fresh blueberries
- 1 cup (135g) fresh raspberries
- 1 small banana, sliced (or use mini marshmallows for a fun twist)
- For the Glaze (Optional):
- 2 tablespoons (30g) apricot jam or apple jelly (thinned with 1 teaspoon water)
Ingredient Tips: For the crust, keep your butter cold for best flakiness. If you’re gluten-free, swap in a 1:1 gluten-free flour blend (like Bob’s Red Mill). For the filling, full-fat Greek yogurt gives the creamiest result, but you can use low-fat if you want to lighten things up. Out of fresh berries? Frozen (thawed and patted dry) work in a pinch, though they’ll be softer. And for the “white” stripes, banana slices are easiest, but mini marshmallows get kids excited! This tart is super flexible—use what you have, and it’ll still be a hit.
Equipment Needed for Red White and Blue Fruit Tart
- 9-inch (23cm) tart pan (preferably with a removable bottom—makes your life easier when unmolding the tart)
- Mixing bowls (one medium for the crust, one small for the filling)
- Pastry cutter or fork (for cutting butter into the flour; a food processor works, too)
- Rolling pin (or just use a wine bottle in a pinch—been there, done that!)
- Measuring cups and spoons
- Whisk or electric mixer (to get the filling super smooth)
- Offset spatula (for spreading the filling evenly—an ordinary butter knife works, too)
- Small saucepan (if making the glaze)
- Sharp knife (for slicing fruit)
You don’t need a fancy tart pan—any pie dish or even a springform pan will do. If you have a silicone baking mat, it makes rolling out the dough less sticky. For cleaning, make sure to dry any tart pan thoroughly so it doesn’t rust (especially if it’s metal). I’ve used dollar-store pans and high-end ones; honestly, the tart tastes great no matter what!
How to Make a Fresh Red White and Blue Fruit Tart
-
Make the Tart Crust:
- In a medium bowl, whisk together 1 1/4 cups (160g) flour, 1/4 cup (30g) powdered sugar, and 1/2 teaspoon salt.
- Add 1/2 cup (115g) cold, cubed butter. Cut it in with a pastry cutter or fork until the mixture looks like coarse crumbs (pea-sized bits are what you want).
- Stir in 1 egg yolk. Add 1 tablespoon of cold water and mix gently—add more water, 1 teaspoon at a time, if needed. The dough should just come together when squeezed—don’t overwork it or it’ll get tough.
- Press the dough into a flattened disk, wrap in plastic, and chill for at least 30 minutes. (Tip: If you’re impatient, freeze it for 10 minutes instead!)
-
Shape and Bake the Crust:
- Preheat your oven to 375°F (190°C).
- On a lightly floured surface, roll the dough out to about 1/8 inch (3mm) thick. Drape it over your tart pan and press it gently into the edges. Trim any overhang with a sharp knife.
- Prick the bottom with a fork (this stops air bubbles). Chill the pan for 10 minutes if you have time.
- Line with parchment and fill with pie weights or dry beans. Bake for 15 minutes, remove weights, and bake another 10-12 minutes until lightly golden. Let cool completely. (If the crust cracks, patch with a little raw dough—it happens to the best of us!)
-
Make the Creamy Filling:
- In a small bowl, beat 8 oz (225g) softened cream cheese until smooth. Add 1/2 cup (120g) Greek yogurt, 1/3 cup (40g) powdered sugar, 1 teaspoon vanilla, and zest of 1 lemon. Beat until creamy and lump-free. Taste and add more sugar if you want it sweeter.
- Spread the filling evenly over the cooled crust with an offset spatula (or the back of a spoon).
-
Decorate with Fruit:
- Arrange 1 cup (150g) strawberries, 1 cup (140g) blueberries, and 1 cup (135g) raspberries in stripes or a starburst pattern for that festive red, white, and blue look. Tuck banana slices or marshmallows in between for the “white.”
- Press the fruit in gently so it sticks to the filling.
-
Glaze (Optional):
- Warm 2 tablespoons (30g) apricot jam with 1 teaspoon water in a small saucepan until melted. Brush lightly over the fruit for shine and to help keep berries from drying out.
-
Chill and Serve:
- Chill the tart in the fridge for at least 1 hour before serving. This helps the filling set and makes slicing easier.
- Slice with a sharp knife (wipe between cuts for clean edges) and serve cold or at cool room temperature.
Prep Notes: If your crust shrinks a little, that’s normal—mine sometimes does, too. Make sure your cream cheese is really soft for the silkiest filling. If the berries are super juicy, pat them dry with paper towels before arranging so your tart doesn’t get soggy. This recipe is forgiving—mistakes usually get covered up by a pretty fruit design!
Pro Cooking Tips & Techniques for the Best Fruit Tart
- Chill Everything: Cold butter and a chilled crust prevent shrinkage and give you that perfect, crumbly bite. I used to skip the chilling step and always wondered why my crust was tough—lesson learned!
- Use an Offset Spatula: Spreading the filling evenly is so much easier with a small offset spatula. If you don’t have one, a butter knife works, but be gentle so you don’t tear the crust.
- Dry Your Fruit: After washing, lay berries out on paper towels and pat dry. This keeps the filling from getting watery (I’ve had a few soggy-bottom tarts—trust me, you don’t want that).
- Arrange Beforehand: Lay out your fruit pattern on a plate before transferring to the tart. It saves time and you’ll avoid messy re-dos.
- Don’t Overbake the Crust: It should be just lightly golden. Overbaking makes it tough (if you’re unsure, err on the side of slightly underdone—it’ll firm up as it cools).
- Softening Cream Cheese: If you forget to take it out ahead, microwave unwrapped cheese for 10-15 seconds. Just don’t melt it!
- Make Ahead: The crust and filling can be made a day in advance. Assemble with fruit close to serving time for best texture.
- Keep It Simple: Especially if you’re short on time or making with kids. A rustic pattern looks just as pretty as a perfect flag!
Honestly, I’ve had my share of kitchen mishaps—cracked crusts, runny fillings, you name it. But this tart is forgiving, and every “mistake” just gives you a chance to get creative with the design or patch things up with extra fruit. If you run behind, remember: chilling fixes almost everything! Multitask by prepping the filling while the crust bakes, and keep a damp towel nearby for sticky hands.
Variations & Adaptations for Red White and Blue Fruit Tart
- Gluten-Free: Swap the all-purpose flour for a 1:1 gluten-free blend. I’ve tried Bob’s Red Mill and King Arthur with great results. No one will even notice the difference!
- Dairy-Free: Use vegan cream cheese and coconut yogurt in the filling. The crust works with plant-based butter, too—just keep it cold.
- Flavor Twists: Add a tablespoon of orange zest to the filling for a citrusy kick, or use almond extract instead of vanilla for a nutty note.
- Seasonal Fruits: Blackberries, cherries, or even sliced peaches work beautifully if you don’t have all the traditional berries. In winter, try kiwi and pomegranate for a holiday vibe.
- Mini Tarts: Make the recipe in mini tart pans or muffin tins for party-perfect, individual servings. My niece loves decorating her own mini tart!
- Allergen Swaps: For nut allergies, stick with basic vanilla extract and avoid almond toppings. For egg-free, use a tablespoon of milk in the crust instead of yolk—it’ll still come together nicely.
Personally, I love using a swirl of lemon curd under the fruit for an extra tangy surprise (highly recommend for lemon fans). This red white and blue fruit tart is endlessly adaptable—just use what you have, and make it your own!
Serving & Storage Suggestions
For the prettiest presentation, serve your fruit tart chilled on a white platter or cake stand to make those festive colors pop. It’s best sliced with a sharp, thin knife—wipe the blade after each cut for clean wedges. I like to garnish with a few mint leaves or a dusting of powdered sugar for an extra touch.
This tart pairs perfectly with a glass of sparkling lemonade, iced tea, or a crisp glass of white wine (if you’re feeling fancy). If you’re hosting brunch, serve alongside a simple quiche or yogurt parfaits for a full spread.
Leftovers (if you’re lucky enough to have any) keep well in the fridge for up to 3 days. Cover loosely with foil or plastic wrap—just avoid airtight containers, as they can make the crust soggy. For freezing, I recommend freezing the crust and filling separately; assemble with fruit the day you serve. To refresh slices, pop in the fridge for 15 minutes or serve straight from the cold. The flavors actually deepen overnight, making this a great make-ahead dessert for busy holidays!
Nutritional Information & Benefits
Each slice of this red white and blue fruit tart (1/8 of a tart) is about 250 calories, with 12g fat, 30g carbs, and 4g protein. Most of the sugar comes from the fruit, not added sweeteners. Thanks to the fresh berries, you’re getting a nice dose of antioxidants, vitamin C, and fiber in every bite.
If you use Greek yogurt and opt for a lower-sugar glaze, this tart is lighter than most traditional desserts. It’s gluten-free and dairy-free adaptable, and you can control the sweetness based on your preferences. Potential allergens include dairy, eggs, and gluten—see the adaptations above for swaps. Personally, I love that it satisfies my sweet tooth without feeling heavy, and it’s a treat I feel good about sharing with the whole family, even on a regular weeknight.
Conclusion
If you’re searching for a dessert that’s as easy as it is stunning, this Red White and Blue Fruit Tart is the one to try. It hits every note: creamy, crisp, juicy, and just the right amount of sweet. Whether you keep things classic or riff with your own favorite fruits and flavors, you’ll end up with a showstopper that looks right at home on any holiday table or Instagram feed.
I love this tart because it’s simple enough for a casual family dinner but special enough for big celebrations. Plus, it’s a recipe you can truly make your own—swap the crust, the filling, the fruit, whatever works for you. If you give it a try, let me know how it goes! Drop a comment below, share your photos, or tell me your favorite fruit combo—I love seeing everyone’s creative spins. Here’s to more sweet, colorful moments (and maybe a few extra slices just for you)!
Frequently Asked Questions: Red White and Blue Fruit Tart
Can I make the tart crust ahead of time?
Yes! You can bake the crust up to two days ahead. Just store it covered at room temperature, and fill and decorate when you’re ready to serve.
What if I don’t have a tart pan?
No worries. A pie dish or even a springform pan works just fine. Your tart might be a little deeper, but it’ll taste just as good.
How do I keep the fruit from making the tart soggy?
Pat all your fruit dry before arranging it, and don’t add the fruit until just before serving if you’re making ahead. The optional glaze also helps seal in freshness.
Can I use frozen berries instead of fresh?
Yes, but thaw them completely and pat dry. Frozen berries are softer, so the tart may look a bit more rustic, but it’ll still taste great!
Is it possible to make this tart gluten-free or dairy-free?
Absolutely! Use a gluten-free flour blend for the crust and swap in dairy-free cream cheese and yogurt for the filling. It’s just as delicious and festive.
Pin This Recipe!

Red White and Blue Fruit Tart

This easy, festive fruit tart features a buttery crust, creamy vanilla filling, and a vibrant arrangement of strawberries, blueberries, raspberries, and banana for a patriotic red, white, and blue look. Perfect for summer gatherings, it’s a crowd-pleasing dessert that’s as beautiful as it is delicious.
- Prep Time: 25 minutes
- Cook Time: 25 minutes
- Total Time: 1 hour 20 minutes
- Yield: 8 servings 1x
- Category: Dessert
- Cuisine: American
Ingredients
- 1 1/4 cups all-purpose flour
- 1/4 cup powdered sugar
- 1/2 teaspoon salt
- 1/2 cup unsalted butter, cold and cubed
- 1 large egg yolk
- 1–2 tablespoons cold water
- 8 oz cream cheese, softened
- 1/2 cup plain Greek yogurt
- 1/3 cup powdered sugar
- 1 teaspoon pure vanilla extract
- 1 teaspoon lemon zest (optional)
- 1 cup fresh strawberries, hulled and sliced
- 1 cup fresh blueberries
- 1 cup fresh raspberries
- 1 small banana, sliced (or mini marshmallows)
- 2 tablespoons apricot jam or apple jelly (optional, thinned with 1 teaspoon water)
Instructions
- In a medium bowl, whisk together flour, powdered sugar, and salt.
- Add cold, cubed butter and cut in with a pastry cutter or fork until mixture resembles coarse crumbs.
- Stir in egg yolk and 1 tablespoon cold water, adding more water as needed until dough just comes together.
- Press dough into a disk, wrap in plastic, and chill for at least 30 minutes (or freeze for 10 minutes).
- Preheat oven to 375°F (190°C). Roll dough to 1/8 inch thick, fit into a 9-inch tart pan, and trim edges.
- Prick bottom with a fork, chill pan for 10 minutes, then line with parchment and fill with pie weights.
- Bake crust for 15 minutes, remove weights, and bake another 10-12 minutes until lightly golden. Cool completely.
- In a small bowl, beat softened cream cheese until smooth. Add Greek yogurt, powdered sugar, vanilla, and lemon zest; beat until creamy.
- Spread filling evenly over cooled crust.
- Arrange strawberries, blueberries, raspberries, and banana slices (or marshmallows) in a festive pattern over the filling.
- Warm apricot jam with water in a small saucepan until melted. Brush lightly over fruit for shine (optional).
- Chill tart in fridge for at least 1 hour before serving. Slice and serve cold or at cool room temperature.
Notes
For best results, keep butter and crust cold before baking. Pat fruit dry before arranging to prevent sogginess. The tart is adaptable for gluten-free and dairy-free diets by swapping flour and dairy ingredients. Make crust and filling ahead, but add fruit close to serving time. Use any combination of berries or seasonal fruit.
Nutrition
- Serving Size: 1 slice (1/8 of tart
- Calories: 250
- Sugar: 16
- Sodium: 180
- Fat: 12
- Saturated Fat: 7
- Carbohydrates: 30
- Fiber: 3
- Protein: 4
Keywords: fruit tart, patriotic dessert, Fourth of July, summer dessert, easy tart, red white and blue, berry tart, festive dessert


