
Introduction
Let me paint you a picture: the kitchen is alive with the sweet, nutty aroma of creamy peanut butter mingling with rich, melted chocolate. The holidays are in full swing, and honestly, the scent wafting from my stovetop is enough to make the whole family hover near the counter like bees to honey. The first time I made this Creamy Peanut Butter Chocolate Swirl Fudge for Christmas, it was a chilly December afternoon. Snowflakes were drifting past the window, and I was knee-high to a grasshopper, perched on a stool, helping my grandma stir the fudge mixture in her well-loved saucepan.
She had a way of making even the simplest treats feel magical, you know? I remember her saying, “If you’re patient and stir just right, you’ll get the silkiest fudge you’ve ever tasted.” That moment—watching the peanut butter and chocolate swirl together into mesmerizing ribbons—was the kind that makes you pause, take a deep breath, and just smile because you know you’re onto something truly special.
Years later, I found myself trying to recreate that dreamy fudge on a rainy weekend (in the name of research, of course). The result was so dangerously easy and melt-in-your-mouth delicious that my family couldn’t stop sneaking pieces off the cooling rack. I can’t really blame them; this fudge is pure, nostalgic comfort. Trust me, it’s perfect for holiday parties, Christmas gifting, or just brightening up your Pinterest dessert board. If you’re looking for a treat that feels like a warm hug and disappears faster than you can wrap it up, you’re going to want to bookmark this one. It’s become a staple at our family gatherings, and I wish I’d discovered this shortcut years ago!
Why You’ll Love This Recipe
After years of holiday baking, I can say with confidence (and a bit of fudge expertise) that this Creamy Peanut Butter Chocolate Swirl Fudge is a standout Christmas treat. I’ve tested dozens of fudge recipes, but this one strikes the perfect balance: rich, creamy, and beautifully marbled. You know what? It’s the kind of dessert that always gets requests for seconds.
- Quick & Easy: Comes together in under 20 minutes—no fancy candy thermometer required!
- Simple Ingredients: You probably already have everything in your pantry (seriously, no wild goose chases at the grocery store).
- Perfect for Christmas: Ideal for holiday parties, cookie trays, or last-minute gifting. It’s festive and always looks impressive.
- Crowd-Pleaser: Both kids and adults go wild for the classic peanut butter and chocolate combo (I’ve watched grown-ups sneak extras when they think nobody’s looking).
- Unbelievably Delicious: The fudge is creamy, soft, and has just the right amount of chocolate swirl to keep things interesting.
What sets this recipe apart? A few secrets: using real creamy peanut butter (none of that dry, crumbly stuff), adding a touch of vanilla for warmth, and swirling the chocolate at just the right moment for those gorgeous patterns. I also skip complicated steps like boiling sugar—this is a no-fuss, microwave-friendly fudge that’s practically foolproof.
Honestly, this isn’t just another fudge recipe—it’s the kind of treat that makes you close your eyes after the first bite. It’s comfort food with a holiday twist that comes together quicker than you’d expect. Imagine impressing your guests with homemade fudge that looks bakery-worthy but takes less effort than most cookies. If you’re looking for a way to make your Christmas sweeter (without stress), this fudge is your ticket. Trust me, once you try it, you’ll see why it’s earned a permanent spot in my holiday lineup.
What Ingredients You Will Need
This creamy peanut butter chocolate swirl fudge uses simple, wholesome ingredients to deliver bold flavor and a perfectly soft texture—no complicated steps or specialty items. Most of these are pantry staples, and you can easily make swaps if needed for dietary preferences or what you have on hand.
- For the Peanut Butter Layer:
- Creamy peanut butter (smooth, not natural—Skippy or Jif are my go-to for the best texture)
- Unsalted butter (room temperature; adds richness and helps set the fudge)
- Powdered sugar (sifted, for a silky finish and sweetness)
- Vanilla extract (real vanilla adds warmth and depth)
- Salt (just a pinch, to balance the sweetness and enhance flavor)
- For the Chocolate Swirl:
- Semi-sweet chocolate chips (I recommend Ghirardelli or Nestlé for a smooth melt; you can use bittersweet if you prefer a richer taste)
- Heavy cream (or half-and-half; for a creamy, glossy chocolate swirl)
- Optional Add-ins:
- Chopped roasted peanuts (for crunch—totally optional!)
- Festive sprinkles (for a Christmas touch, especially if you’re sharing with kids)
Substitution Tips: If you need a dairy-free fudge, swap the butter for coconut oil and use dairy-free chocolate chips. Almond butter works too—just make sure it’s creamy and unsweetened. For a gluten-free treat, all these ingredients are naturally gluten-free, but always check your chocolate chips for cross-contamination warnings.
Ingredient selection really matters here. I’ve found that using classic, shelf-stable peanut butter gives the fudge a firmer set and smoother texture. If you’re using natural peanut butter, stir well to avoid oily separation. And trust me—sift the powdered sugar! It makes a world of difference for that melt-in-your-mouth feel. When I’m feeling festive, I like to sprinkle a little flaky salt on top, but that’s totally optional. In summer, you can swap in white chocolate for a lighter version, or swirl in raspberry jam for a berry twist.
Every holiday, I stock up on chocolate chips and peanut butter just for this recipe. I’ve tried store brands and name brands, and honestly, the difference is noticeable—so go for your favorites. And if you want to add a little crunch, roasted peanuts are a game-changer. All in all, these ingredients deliver maximum flavor with minimum fuss, making this fudge a holiday classic in my house.
Equipment Needed
You don’t need a fancy kitchen setup to make creamy peanut butter chocolate swirl fudge—just a few basic tools and maybe a bit of patience.
- Microwave-safe bowl (for melting chocolate; glass or ceramic works best)
- Medium saucepan (for combining fudge base; a heavy-bottomed pan helps prevent burning)
- Whisk or wooden spoon (for smooth mixing and swirling; I like using a silicone spatula for easy cleanup)
- 8×8-inch (20x20cm) square baking pan (for setting the fudge; you can use a loaf pan for thicker pieces)
- Parchment paper or nonstick foil (to line the pan for easy removal)
- Butter knife or skewer (for swirling the chocolate into the peanut butter layer)
- Measuring cups and spoons (precise measurements matter for fudge texture)
If you don’t have a microwave-safe bowl, you can melt chocolate chips gently over a double boiler. I’ve used both glass Pyrex and ceramic bowls; just watch for overheating. For the pan, I’ve even used a silicone baking mold—no sticking and super easy cleanup! If your whisk or spatula starts to get sticky, a quick rinse in hot water helps. And if you’re gifting fudge, small decorative tins or parchment-wrapped bundles make it extra special.
For budget-friendly options, you don’t need anything fancy. My grandma made this fudge with an old saucepan and a wooden spoon, and it turned out perfect every time. Just keep an eye on your tools—clean and dry them after each use, especially if you work with chocolate. That way, you’re always ready for your next holiday batch!
Preparation Method
- Line the Pan: Line your 8×8-inch (20x20cm) baking pan with parchment paper, leaving an overhang for easy removal. (Trust me, this step saves you from sticky fudge disasters later.)
- Prepare Peanut Butter Base: In a medium saucepan, combine 1 cup (240g) creamy peanut butter and 1/2 cup (115g) unsalted butter. Heat over medium-low, stirring constantly until melted and smooth (about 2-3 minutes). Don’t let it boil—just gently melt together.
- Add Sugar & Flavorings: Remove from heat. Stir in 2 cups (240g) sifted powdered sugar, 1 teaspoon vanilla extract, and a pinch of salt. Mix until completely smooth and no lumps remain. The mixture will be thick and creamy (almost like cookie dough).
- Spread Peanut Butter Layer: Transfer peanut butter mixture to the prepared pan, spreading evenly with a spatula. Try to get it as smooth as possible, but don’t stress over perfection—swirls will cover any bumps.
- Melt Chocolate Swirl: In a microwave-safe bowl, combine 1 cup (175g) semi-sweet chocolate chips and 3 tablespoons (45ml) heavy cream. Microwave in 20-second bursts, stirring after each, until fully melted and glossy (about 1 minute total). If the chocolate seizes, add a splash more cream and stir until smooth.
- Swirl Chocolate: Dollop spoonfuls of melted chocolate over the peanut butter layer. Use a butter knife or skewer to create swirls. Don’t overdo it—just a few gentle figure-eights make beautiful patterns.
- Add Toppings (Optional): Sprinkle chopped roasted peanuts or festive sprinkles over the top if desired. (My kids love adding red and green sprinkles for Christmas flair!)
- Chill to Set: Refrigerate the pan for at least 2 hours, or until firm. For faster setting, pop it in the freezer for 45 minutes. The fudge should be solid but still creamy when pressed.
- Cut & Serve: Lift the fudge from the pan using parchment overhang. Cut into 1-inch (2.5cm) squares with a sharp knife (wipe between cuts for clean edges). If the fudge sticks, warm the knife in hot water and dry.
- Troubleshooting: If your fudge is too soft, refrigerate longer. If the chocolate layer cracks when cutting, let the pan sit at room temperature for 5 minutes before slicing.
Prep Notes: If you’re in a rush, make sure every ingredient is measured out beforehand (“mise en place” as chefs say). When swirling chocolate, less is more—it keeps the patterns crisp. And don’t worry if the first batch isn’t perfect. The flavor always wins, and honestly, homemade fudge tastes better with a little character. I’ve made this dozens of times, and every batch turns out a bit different—embrace it!
Efficiency Tip: Double the batch and use two pans if you’re gifting to a crowd. Clean as you go, and you’ll be done before you know it!
Cooking Tips & Techniques
After a few fudge flops over the years (let’s just say I learned the hard way about overheating chocolate!), these tips will help you nail creamy peanut butter chocolate swirl fudge every time.
- Don’t Overheat: Melt peanut butter and butter gently—high heat can make the mixture grainy or burn. Stir constantly and remove as soon as it’s smooth.
- Chocolate Melting: Use short microwave bursts and stir well. If it seizes (gets lumpy), add a splash of cream and keep stirring. I’ve ruined a batch by microwaving too long, so now I stick to 20-second intervals.
- Swirl Timing: Swirl the chocolate while it’s still warm and peanut butter layer is soft. If it cools too much, the swirl won’t blend. Work quickly but don’t rush—gentle swirls look best.
- Consistency Matters: Sift your powdered sugar for a smoother fudge. If you skip this (I have, more than once), you’ll get tiny lumps. Not the end of the world, but smoother is better!
- Multitasking: While the fudge chills, clean up your kitchen and prep containers for gifting.
- Batch Size: You can double the recipe, but use a larger pan and watch chilling time. Thicker fudge takes longer to set.
- Personal Lesson: The first time I tried making this for a holiday party, I didn’t line the pan—total mess! Don’t skip the parchment; it’s a lifesaver.
Even if you’re new to fudge, this recipe is forgiving. Most common mistakes (soft fudge, lumpy chocolate) are easy to fix with a little patience. Trust your senses—creamy, shiny, and fragrant is what you’re after. And remember, homemade fudge always beats store-bought, imperfections and all!
Variations & Adaptations
One of my favorite things about creamy peanut butter chocolate swirl fudge is how easy it is to adapt to different tastes, diets, or holiday moods. Here are a few ways to make it your own:
- Dietary Variation: For a vegan or dairy-free version, use coconut oil instead of butter and dairy-free chocolate chips. Substitute heavy cream with canned coconut milk—works like a charm!
- Seasonal Twist: Swirl in raspberry or strawberry jam with the chocolate for a festive fruity note, or add a sprinkle of cinnamon for a warm winter flavor.
- Flavor Customizations: Try almond butter instead of peanut butter for a milder, nuttier taste. Use white chocolate chips for the swirl, or add a drizzle of caramel for extra richness.
- Cooking Method: If you prefer stovetop, gently melt all ingredients together over low heat, stirring constantly. For firmer fudge, chill overnight.
- Allergen Substitutions: Use sunflower seed butter for a nut-free version, and always check your chocolate chips for allergy warnings.
- Personal Favorite: Last Christmas, I added crushed candy canes on top for a peppermint crunch—my family loved it, and it looked super festive!
Don’t be afraid to experiment. Every batch can feel new with a simple tweak, and honestly, the possibilities are endless. Whether you’re making fudge for a party, a gift, or just yourself, you can match it to any craving or dietary need. That’s the beauty of homemade treats—customization is half the fun!
Serving & Storage Suggestions
This fudge is best served chilled or at cool room temperature. I like to cut it into small squares and arrange them on a festive platter—for Christmas, a sprinkle of colored sugar makes it pop! It pairs beautifully with hot cocoa, coffee, or even a glass of cold milk (my family’s go-to after opening presents).
For storing, keep fudge in an airtight container lined with parchment paper. Refrigerate up to 2 weeks, or freeze for up to 3 months. If freezing, wrap tightly in plastic and thaw in the fridge overnight before serving. You’ll notice the flavors deepen after a day or two—honestly, it tastes even richer after sitting for a bit.
To reheat (if you like fudge a little soft), microwave a piece for 5 seconds. Just be careful—it melts quick! For gifting, package pieces in festive tins or cellophane bags tied with ribbon. Whether you’re sharing at a holiday party or saving some for cozy winter nights, this fudge is sure to disappear fast. And if you’re lucky enough to have leftovers, they make a sweet midnight snack!
Nutritional Information & Benefits
Each piece of creamy peanut butter chocolate swirl fudge (about 1-inch square) packs around 110 calories, 7g fat, 11g carbs, and 2g protein. Peanut butter brings healthy fats and a bit of plant-based protein, while chocolate chips add antioxidants (and happiness, honestly).
This fudge is naturally gluten-free, and can be adapted for dairy-free diets. Watch out for common allergens: peanuts, milk, and soy (in some chocolate chips). If you’re keeping an eye on sugar, use powdered erythritol or monk fruit sweetener for a lower-carb treat. Personally, I enjoy this fudge as a small holiday indulgence—because sometimes, celebrating means treating yourself to something sweet, homemade, and shared with loved ones.
Conclusion
If you’re looking for a holiday treat that’s creamy, chocolatey, and dangerously easy, creamy peanut butter chocolate swirl fudge is worth every bite. It’s quick to make, impressive to serve, and customizable for every family or occasion. Honestly, I love how it brings together tradition and simplicity—just like those afternoons spent with my grandma, making fudge on snowy days.
Don’t be afraid to tweak the recipe to suit your taste or dietary needs. That’s part of the fun! Whether you’re gifting, hosting, or just treating yourself, this fudge will win hearts (and maybe a few repeat requests). If you try it, let me know in the comments how you make it your own, or share your favorite holiday fudge memories.
Wishing you a sweet, cozy Christmas—may your treats be delicious and your fudge never stick to the pan!
Frequently Asked Questions
Can I use natural peanut butter for this fudge?
You can, but the texture may be softer and more oily. Stir well and consider adding a bit more powdered sugar to help it set.
How long does the fudge need to chill before serving?
At least 2 hours in the refrigerator, or 45 minutes in the freezer for a quicker set. Overnight chilling gives the best texture.
Can I make this fudge without a microwave?
Absolutely! Melt the chocolate chips and cream gently on the stovetop over low heat, stirring constantly until smooth.
How do I keep my fudge from sticking to the pan?
Line your pan with parchment paper or nonstick foil, leaving an overhang for easy lifting. This makes removal clean and simple.
Is this fudge suitable for gluten-free diets?
Yes! All the ingredients are naturally gluten-free, but double-check your chocolate chips for any cross-contamination warnings.
Pin This Recipe!
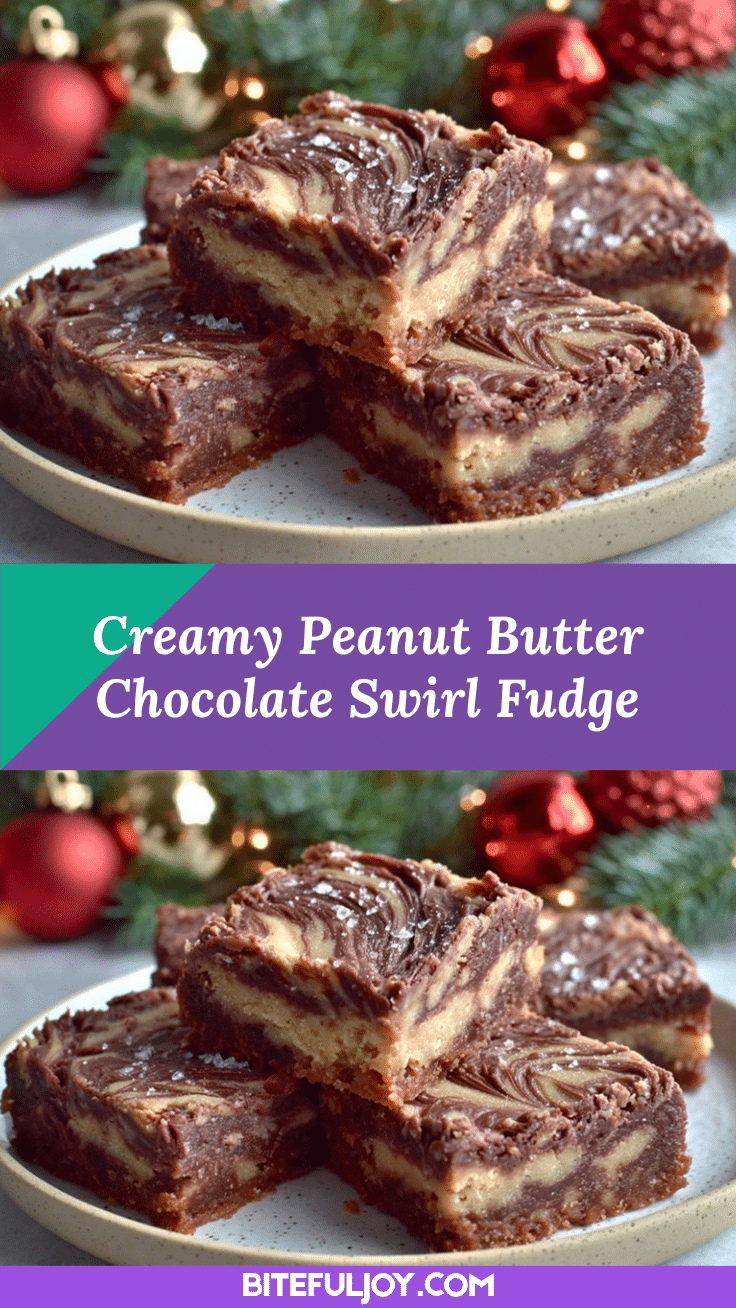
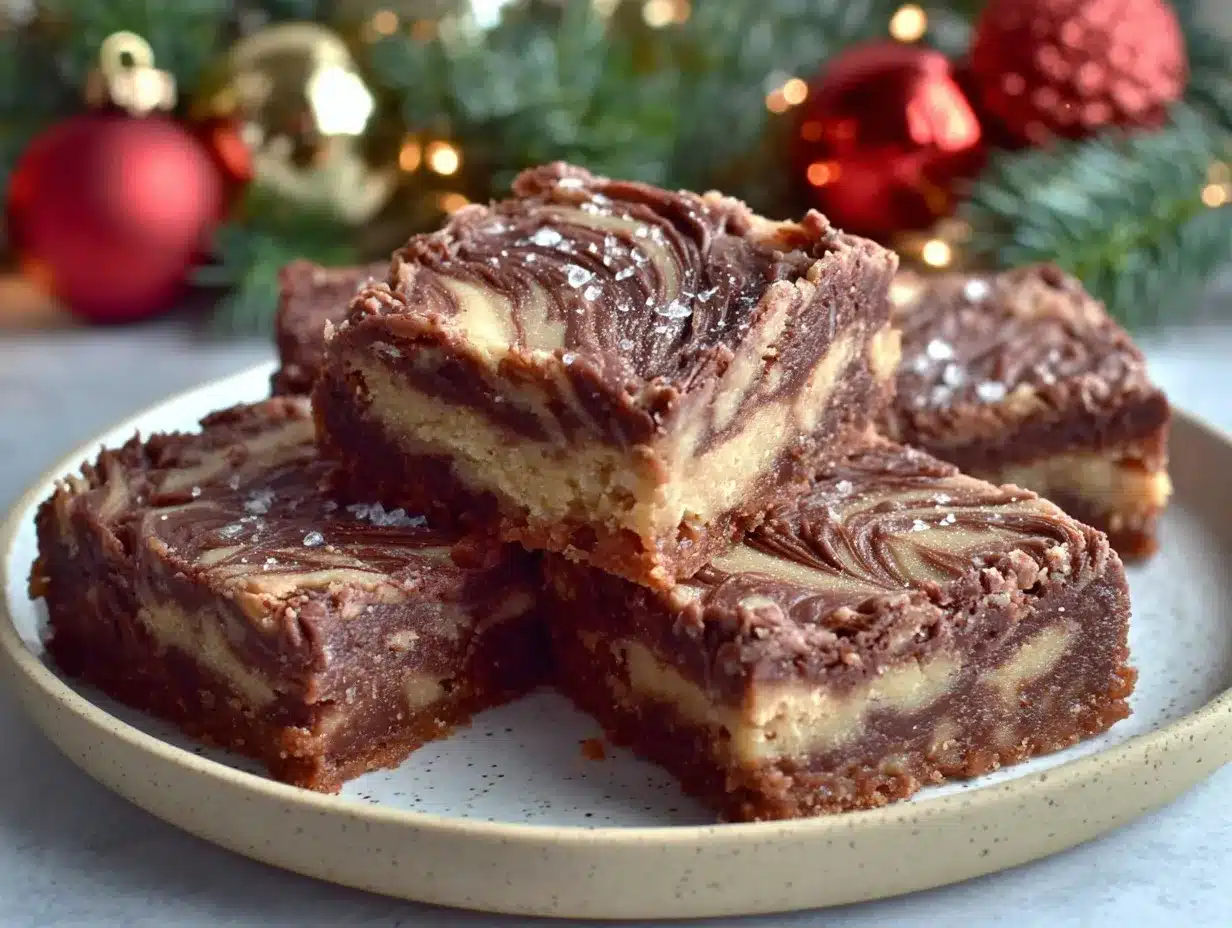
Creamy Peanut Butter Chocolate Swirl Fudge

This easy, creamy peanut butter chocolate swirl fudge is a nostalgic holiday treat that comes together in under 20 minutes. Rich, marbled, and melt-in-your-mouth delicious, it’s perfect for Christmas gifting or festive parties.
- Prep Time: 10 minutes
- Cook Time: 5 minutes
- Total Time: 2 hours 15 minutes
- Yield: 36 pieces 1x
- Category: Dessert
- Cuisine: American
Ingredients
- 1 cup creamy peanut butter (smooth, shelf-stable like Skippy or Jif)
- 1/2 cup unsalted butter (room temperature)
- 2 cups powdered sugar (sifted)
- 1 teaspoon vanilla extract
- Pinch of salt
- 1 cup semi-sweet chocolate chips
- 3 tablespoons heavy cream (or half-and-half)
- Optional: 1/4 cup chopped roasted peanuts
- Optional: Festive sprinkles
Instructions
- Line an 8×8-inch baking pan with parchment paper, leaving an overhang for easy removal.
- In a medium saucepan, combine peanut butter and unsalted butter. Heat over medium-low, stirring constantly until melted and smooth (about 2-3 minutes). Do not let it boil.
- Remove from heat. Stir in powdered sugar, vanilla extract, and a pinch of salt. Mix until completely smooth and no lumps remain.
- Transfer peanut butter mixture to the prepared pan, spreading evenly with a spatula.
- In a microwave-safe bowl, combine chocolate chips and heavy cream. Microwave in 20-second bursts, stirring after each, until fully melted and glossy (about 1 minute total).
- Dollop spoonfuls of melted chocolate over the peanut butter layer. Use a butter knife or skewer to create swirls.
- Sprinkle chopped roasted peanuts or festive sprinkles over the top if desired.
- Refrigerate the pan for at least 2 hours, or until firm. For faster setting, freeze for 45 minutes.
- Lift the fudge from the pan using parchment overhang. Cut into 1-inch squares with a sharp knife (wipe between cuts for clean edges).
- If fudge is too soft, refrigerate longer. If chocolate cracks when cutting, let the pan sit at room temperature for 5 minutes before slicing.
Notes
For dairy-free or vegan fudge, substitute butter with coconut oil, heavy cream with canned coconut milk, and use dairy-free chocolate chips. Sift powdered sugar for the smoothest texture. Line the pan with parchment for easy removal. Fudge can be stored in an airtight container in the fridge for up to 2 weeks or frozen for up to 3 months.
Nutrition
- Serving Size: 1 piece (about 1-inc
- Calories: 110
- Sugar: 10
- Sodium: 40
- Fat: 7
- Saturated Fat: 3
- Carbohydrates: 11
- Fiber: 1
- Protein: 2
Keywords: fudge, peanut butter, chocolate, Christmas, holiday, easy dessert, gluten-free, homemade fudge, no bake, gifting


