
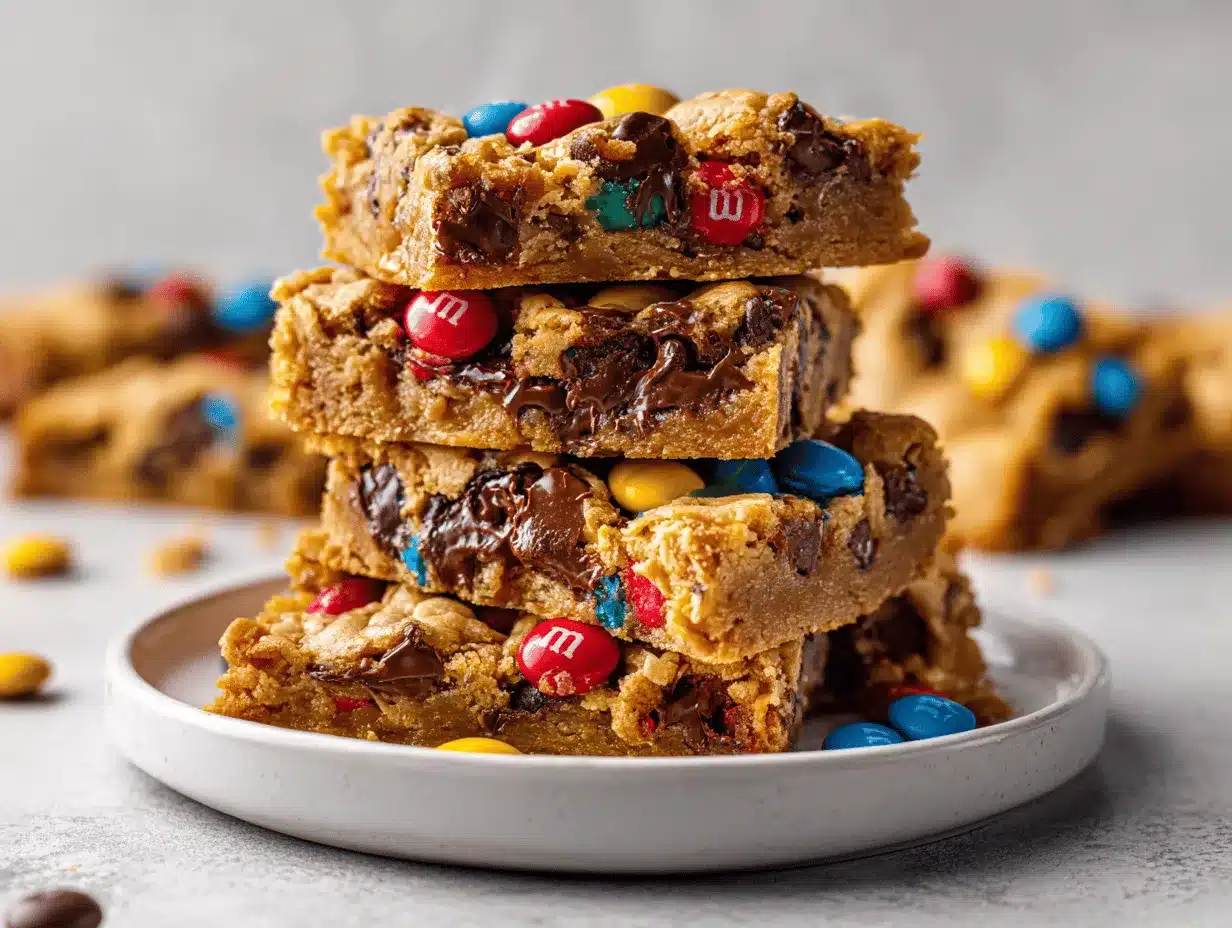
The moment you pull a pan of monster cookie bars from the oven, you know something amazing is about to happen. That warm, gooey blend of peanut butter, melty chocolate chips, and candy-coated M&Ms practically dares you to dig in before it cools. Trust me, I’ve burned my tongue more than once because, honestly, who can wait? These bars are the ultimate mashup of everything you crave in a dessert—chewy, crunchy, and totally over the top in the best way possible.
Monster cookie bars have been my go-to for bake sales, birthdays, and those “just because” days when you need a little extra joy. They’re perfect for sharing (if you can resist eating the whole pan yourself). My obsession started years ago when I wanted all my favorite cookie flavors in one bite. The original monster cookie was great, but the bar form? Game changer. No scooping, no chilling, just mix, press, bake, and devour.
What I love most is how these monster cookie bars combine the nostalgia of classic oatmeal cookies with the fun of M&Ms and a generous hit of peanut butter. Whether you’re baking with kids, prepping treats for a party, or sneaking a midnight snack, this recipe is pure happiness. And if you’re like me, you’ll appreciate that it’s nearly impossible to mess up—I’ve tweaked it a dozen ways and they always disappear fast.
So, if you’re on the hunt for the best monster cookie bars recipe—loaded with M&Ms, peanut butter, and chocolate—pull up a chair and grab your mixing bowl. Let’s make dessert memories together!
Why You’ll Love This Monster Cookie Bars Recipe
Honestly, these monster cookie bars are the dessert equivalent of a hug—warm, comforting, and exactly what you want after a long day. After dozens of batches (and plenty of taste tests), I can say with confidence: this recipe is a keeper. Here’s why you’ll want to bake it again and again:
- Quick & Easy: No chilling, no fuss. Just mix, press, and bake. You’ll have fresh monster cookie bars in under 40 minutes—perfect when you need a last-minute treat.
- Simple Ingredients: Everything you need is probably stocked in your pantry. No specialty flours or exotic add-ins—just the classic combo of oats, peanut butter, and chocolate.
- Perfect for Any Occasion: These bars are a hit at potlucks, birthday parties, school events, or cozy movie nights. They transport well and always get a “wow!”
- Crowd-Pleaser: It’s hard to beat the combo of gooey peanut butter, slightly crispy edges, and those bright, crunchy M&Ms. Kids and adults both go back for seconds.
- Unbelievably Delicious: Each bite is loaded with texture—chewy oats, creamy peanut butter, melty chocolate chips, and the crunch of M&Ms. It’s a flavor explosion in every square.
What sets this monster cookie bars recipe apart? I blend the oats just a bit for a tender, cookie-like base. The peanut butter gets whipped in for extra creaminess, so you never get dry bars. Plus, I throw in a generous mix of semi-sweet chocolate chips and M&Ms for that signature monster cookie magic. If you love a thick, bakery-style bar with perfectly gooey middles and crisp edges, this is the one for you.
For me, monster cookie bars are pure nostalgia with a modern twist. Whether you’re baking for a crowd, a special celebration, or just because you need a pick-me-up, these bars deliver the kind of joy that’s impossible to fake. And let’s face it—even if you botch the slicing, nobody complains about eating the “messy” pieces.
What Ingredients You Will Need
This monster cookie bars recipe is all about simple, familiar ingredients coming together for a decadent treat. Most of these are pantry staples, and a few can be swapped for what you have on hand. Here’s what you’ll need:
- Old-fashioned rolled oats (2 cups / 180g) – Bring chewiness and heartiness to the bars. Quick oats work in a pinch, but rolled oats give the best texture.
- All-purpose flour (1 cup / 125g) – Helps bind the dough and gives structure.
- Baking soda (1 tsp / 5g) – For a little lift and softness.
- Salt (1/2 tsp / 3g) – Just enough to balance the sweetness.
- Unsalted butter (1/2 cup / 113g, softened) – Makes the bars rich and tender. Salted butter can work; just reduce added salt a touch.
- Creamy peanut butter (1 cup / 260g) – The star of the show! I love using Jif or Skippy for the classic flavor. Natural peanut butter works, but the bars may be a bit more crumbly.
- Brown sugar (1 cup / 200g, packed) – Adds deep, caramel-like sweetness and helps keep the bars moist.
- Granulated sugar (1/2 cup / 100g) – For a hint of crispness.
- Large eggs (2, room temperature) – Binds everything together and adds richness.
- Vanilla extract (2 tsp / 10ml) – For that classic cookie aroma. I use pure vanilla whenever possible.
- Semi-sweet chocolate chips (3/4 cup / 130g) – Melty pockets of chocolate in every bite. Milk chocolate chips are fun, too.
- M&Ms (1 cup / 180g, plus extra for topping) – Bring color, crunch, and that signature monster cookie look. I like using regular-sized, but mini M&Ms work for extra color spread.
Optional add-ins & swaps:
- Swap half the chocolate chips for chopped peanut butter cups for an extra-decadent touch.
- Use almond butter or sunflower seed butter for a peanut-free version.
- For gluten-free, substitute a 1:1 gluten-free baking flour and certified gluten-free oats.
Honestly, this recipe is forgiving—use what you have and don’t stress the details. I’ve tossed in butterscotch chips, white chocolate, or even pretzel bits when I needed to clear out my pantry. Every batch is a little different, but always delicious.
Equipment Needed
You don’t need a fancy kitchen to whip up these monster cookie bars. Here’s what I use every time:
- 9×13-inch baking pan – The classic size for perfect bar thickness. I’ve also used two 8×8 pans when my big one was missing.
- Parchment paper – For easy removal and cleanup. You can grease the pan well if you’re out of parchment, but trust me, it makes life easier.
- Mixing bowls – One large for the dough, one medium for dry ingredients.
- Hand mixer or stand mixer – Makes quick work of creaming the butter and sugars, but a sturdy wooden spoon and elbow grease will do if you’re feeling old school.
- Measuring cups and spoons – For accuracy. I always double-check my flour and oats; it’s easy to overdo them.
- Rubber spatula or wooden spoon – For folding in chips and candy without crushing them.
- Wire rack – To cool the bars evenly (though sometimes I just use the stovetop burners in a pinch).
If you bake a lot, a good nonstick pan is a game changer—mine has survived years of monster cookie bars and brownies. Just don’t forget to line it or grease it well. For cleaning, soak sticky pans with a little hot water and dish soap; it saves your sponge (and your sanity).
How to Make Monster Cookie Bars – Step-by-Step
-
Preheat and Prep:
Preheat your oven to 350°F (175°C). Line a 9×13-inch baking pan with parchment paper, leaving a slight overhang for easy lifting. Give it a light spritz of nonstick spray. This is your insurance against sticking! -
Mix Dry Ingredients:
In a medium bowl, whisk together 2 cups (180g) rolled oats, 1 cup (125g) all-purpose flour, 1 tsp (5g) baking soda, and 1/2 tsp (3g) salt. If you like a finer texture, pulse the oats in a food processor 2-3 times. Set aside. -
Cream Butter, Peanut Butter & Sugars:
In a large mixing bowl, beat 1/2 cup (113g) softened unsalted butter and 1 cup (260g) creamy peanut butter together until smooth and fluffy—about 1 minute with a mixer on medium speed. Add 1 cup (200g) packed brown sugar and 1/2 cup (100g) granulated sugar. Beat for another 1-2 minutes, scraping the bowl as needed. It should look light and creamy. -
Add Eggs & Vanilla:
Beat in 2 large eggs, one at a time, mixing well after each. Pour in 2 tsp (10ml) vanilla extract and blend until combined. If the mixture looks curdled, don’t panic—it smooths out once you add the dry ingredients. -
Combine Wet & Dry Ingredients:
Gradually add the dry mixture to the wet, stirring on low speed or with a spatula until just combined. Avoid overmixing; you want everything just incorporated. -
Fold in Mix-Ins:
Gently fold in 3/4 cup (130g) semi-sweet chocolate chips and 1 cup (180g) M&Ms. Save a handful of M&Ms for sprinkling on top before baking. -
Press & Top:
Scoop the dough into your prepared pan. Use a spatula (or your clean hands) to press it evenly into all corners. Scatter the reserved M&Ms on top and lightly press them in so they stay put. -
Bake:
Bake in the preheated oven for 22-26 minutes. The edges should be golden and set, but the center may still look a tad soft—that’s good! Overbaking leads to dry bars. -
Cool & Slice:
Place the pan on a wire rack. Let the bars cool completely in the pan for best slicing—about 1 hour. If you’re impatient (me, always), you can chill them in the fridge for 20-30 minutes to speed things up. -
Serve:
Use the parchment overhang to lift the bars from the pan. Slice into squares or rectangles—whatever size fits your mood! Store leftovers in an airtight container.
Troubleshooting Tips:
- If the bars seem greasy, double-check your peanut butter type—natural versions often need an extra tablespoon of flour.
- If they’re dry, bake a couple minutes less next time or measure flour with the spoon-and-level method.
- Too runny? Chill the dough in the pan for 10 minutes before baking.
The bars should be lightly golden with melty chocolate and a soft, chewy center. Your kitchen will smell amazing—seriously, it’s hard to resist cutting in right away!
Cooking Tips & Techniques for Perfect Monster Cookie Bars
After countless pans of monster cookie bars (and a few kitchen fails), I’ve picked up some tricks for getting them just right:
- Don’t Overbake: The bars firm up as they cool. Pull them when the edges are set but the center is slightly underdone. If you wait for the middle to look fully baked, you’ll end up with dry bars (been there, regretted that).
- Even Spreading: Press the dough evenly into the pan for consistent thickness. I use an offset spatula or, in a pinch, the back of a measuring cup.
- Mix-Ins Last: Fold in your chocolate chips and M&Ms gently—if you stir too much, the candy shells can crack and bleed color. Not a disaster, but they look prettier when added last.
- Let Them Cool: I know, it’s tough! But bars slice so much cleaner—and taste better—if you let them cool completely. I sometimes pop them in the fridge for quick cooling when impatience wins out.
- Customize Your Candy: Swap in seasonal M&Ms or add a handful of chopped nuts for crunch. I love using mini M&Ms for more color per bite.
One time, I tried baking with chunky peanut butter for extra texture. It turned out great, but I had to warn folks about the occasional peanut piece. If you’re baking for a crowd, stick to creamy for broad appeal.
If you’re multitasking, start mixing the dough while your oven preheats—no need to wait around. And don’t forget to line your pan! It makes removing and slicing the bars so much easier, especially when you’re in a rush to serve (or just hungry).
Consistency is all about the right bake time and not skimping on the mix-ins. Don’t be shy—load up that dough! Every batch is a little different, but when you’re generous with the chocolate and M&Ms, you can’t go wrong.
Variations & Adaptations
Monster cookie bars are made to be played with! Here are a few ways I’ve switched things up—sometimes on purpose, sometimes because I ran out of something (real life):
- Gluten-Free Monster Cookie Bars: Swap the all-purpose flour for a 1:1 gluten-free blend and make sure your oats are certified gluten-free. The bars are just as chewy and crowd-pleasing.
- Nut-Free Option: Use sunflower seed butter or soy nut butter instead of peanut butter. Double-check your chocolate chips and candies for hidden nuts if allergies are a concern.
- Extra Chocolatey: Add chopped peanut butter cups, white chocolate chips, or swirl in a bit of Nutella before baking. You can also use dark chocolate chips for a richer flavor.
- Seasonal Twist: Mix in crushed peppermint candies and red/green M&Ms for the holidays, or pastel M&Ms for spring gatherings. I’ve even made a Halloween version with orange and purple candies—super fun for kids’ parties.
- Less Sugar: Use half the amount of sugar if you like a less-sweet bar, or swap in coconut sugar for a subtle caramel note.
My personal favorite? Swapping half the M&Ms for butterscotch chips. The combo of peanut butter, chocolate, and butterscotch is unreal. Don’t be afraid to experiment—monster cookie bars are forgiving and fun for mixing up based on your cravings or what’s in the pantry.
Serving & Storage Suggestions
Monster cookie bars are best enjoyed slightly warm, when the chocolate chips are still a bit melty and the edges are crisp. I love serving them straight from the pan with a scoop of vanilla ice cream—it’s pure comfort food. For parties, cut them into bite-sized squares and pile them high on a platter. They make a colorful, crowd-pleasing centerpiece.
Pair these bars with a cold glass of milk, hot coffee, or even a milkshake if you’re feeling fancy. For an extra treat, drizzle a little chocolate or caramel sauce on top before serving.
To store, place cooled bars in an airtight container at room temperature for up to 5 days. If your kitchen runs warm, pop them in the fridge—they’ll stay chewy and delicious. For longer storage, freeze individual bars wrapped in plastic and foil for up to 2 months. Thaw at room temp or zap in the microwave for 10-15 seconds for that “fresh-baked” magic.
Over time, the flavors meld and the bars get even chewier—if they last that long. Honestly, I’ve never had leftovers for more than a week!
Nutritional Information & Benefits
Here’s a quick snapshot of what you’re getting with these monster cookie bars (per serving, based on 24 bars):
- Calories: ~220
- Fat: 10g
- Protein: 4g
- Carbs: 28g
- Sugar: 16g
- Fiber: 2g
The rolled oats add a bit of whole grain fiber and make these bars just a touch more wholesome. Peanut butter brings healthy fats and a bit of protein, so you get some staying power with your sweet treat.
For gluten-free adaptations, use certified GF oats and flour. If you need to avoid nuts, sunflower seed butter swaps in easily (but check candy labels for hidden allergens!). As always, these bars are a treat—enjoy in moderation. I love making them as a fun family dessert or special snack after a long hike.
Conclusion
If you’re looking for a dessert that’s easy, crowd-pleasing, and absolutely loaded with chocolatey, peanut buttery goodness, this monster cookie bars recipe is it. Every batch is a hit—whether you stick to the classic or try one of my favorite twists. They’re the kind of treat that brings people together (and sparks a little nostalgia while you’re at it).
I love these bars not just because they taste amazing, but because they’re so forgiving and fun to make with my kids. There’s something about pressing M&Ms into dough that never gets old! Don’t be afraid to play around with flavors and make it your own.
Give this recipe a try, and let me know how your monster cookie bars turn out. Drop a comment, share your favorite mix-ins, or tag me on social media with your colorful creations. Happy baking, friends—here’s to gooey, chocolate-studded memories!
Frequently Asked Questions about Monster Cookie Bars
How do I keep monster cookie bars from getting too dry or crumbly?
The secret is not to overbake them—pull the bars when the edges are set but the center looks a bit underdone. Also, make sure to measure your flour and oats correctly. Spoon and level them, rather than scooping, to avoid extra dryness.
Can I use natural peanut butter in this recipe?
Yes, but the texture will be a bit more crumbly and less chewy. If using natural peanut butter, add an extra tablespoon or two of flour to help the dough hold together.
How long do monster cookie bars stay fresh?
When stored in an airtight container at room temperature, they stay chewy and delicious for up to 5 days. You can also freeze them for up to 2 months for longer storage.
What’s the best way to cut the bars without them falling apart?
Let the bars cool completely before cutting, and use a sharp knife. For super clean slices, chill the bars in the fridge for 30 minutes, then slice and bring to room temp before serving.
Are monster cookie bars gluten-free?
They can be! Just use gluten-free oats and swap in your favorite 1:1 gluten-free flour blend. The result is just as chewy and delicious as the original.
Pin This Recipe!
Monster Cookie Bars

These monster cookie bars are a quick, easy, and crowd-pleasing dessert loaded with peanut butter, chocolate chips, and colorful M&Ms. Chewy, gooey, and perfect for bake sales, parties, or a fun family treat.
- Prep Time: 15 minutes
- Cook Time: 25 minutes
- Total Time: 40 minutes
- Yield: 24 bars 1x
- Category: Dessert
- Cuisine: American
Ingredients
- 2 cups old-fashioned rolled oats
- 1 cup all-purpose flour
- 1 teaspoon baking soda
- 1/2 teaspoon salt
- 1/2 cup unsalted butter, softened
- 1 cup creamy peanut butter
- 1 cup brown sugar, packed
- 1/2 cup granulated sugar
- 2 large eggs, room temperature
- 2 teaspoons vanilla extract
- 3/4 cup semi-sweet chocolate chips
- 1 cup M&Ms, plus extra for topping
Instructions
- Preheat your oven to 350°F (175°C). Line a 9×13-inch baking pan with parchment paper, leaving an overhang for easy lifting. Lightly spray with nonstick spray.
- In a medium bowl, whisk together rolled oats, flour, baking soda, and salt. For a finer texture, pulse oats in a food processor 2-3 times. Set aside.
- In a large mixing bowl, beat softened butter and peanut butter together until smooth and fluffy (about 1 minute with a mixer on medium speed).
- Add brown sugar and granulated sugar. Beat for another 1-2 minutes until light and creamy, scraping the bowl as needed.
- Beat in eggs, one at a time, mixing well after each. Add vanilla extract and blend until combined.
- Gradually add the dry mixture to the wet ingredients, stirring on low speed or with a spatula until just combined. Do not overmix.
- Gently fold in chocolate chips and M&Ms, reserving a handful of M&Ms for topping.
- Scoop the dough into the prepared pan. Use a spatula or clean hands to press it evenly into all corners. Scatter reserved M&Ms on top and lightly press them in.
- Bake for 22-26 minutes, until the edges are golden and set but the center is still slightly soft.
- Place the pan on a wire rack and let the bars cool completely in the pan (about 1 hour). For faster cooling, chill in the fridge for 20-30 minutes.
- Use the parchment overhang to lift the bars from the pan. Slice into squares or rectangles. Store leftovers in an airtight container.
Notes
Do not overbake; bars firm up as they cool. For gluten-free, use certified gluten-free oats and a 1:1 gluten-free flour blend. For nut-free, substitute sunflower seed butter. Let bars cool completely before slicing for clean cuts. Customize with different mix-ins like butterscotch chips, white chocolate, or seasonal M&Ms.
Nutrition
- Serving Size: 1 bar (1/24 of recipe)
- Calories: 220
- Sugar: 16
- Sodium: 120
- Fat: 10
- Saturated Fat: 4
- Carbohydrates: 28
- Fiber: 2
- Protein: 4
Keywords: monster cookie bars, peanut butter, M&Ms, chocolate chip bars, easy dessert, bake sale, chewy bars, oatmeal cookie bars


