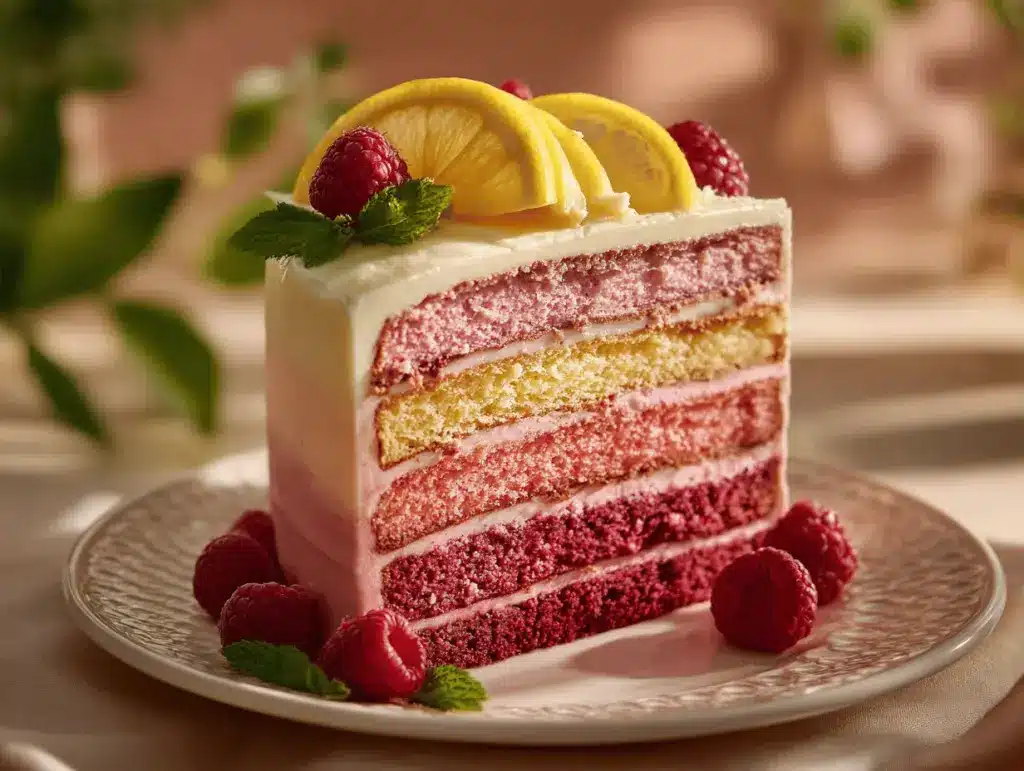
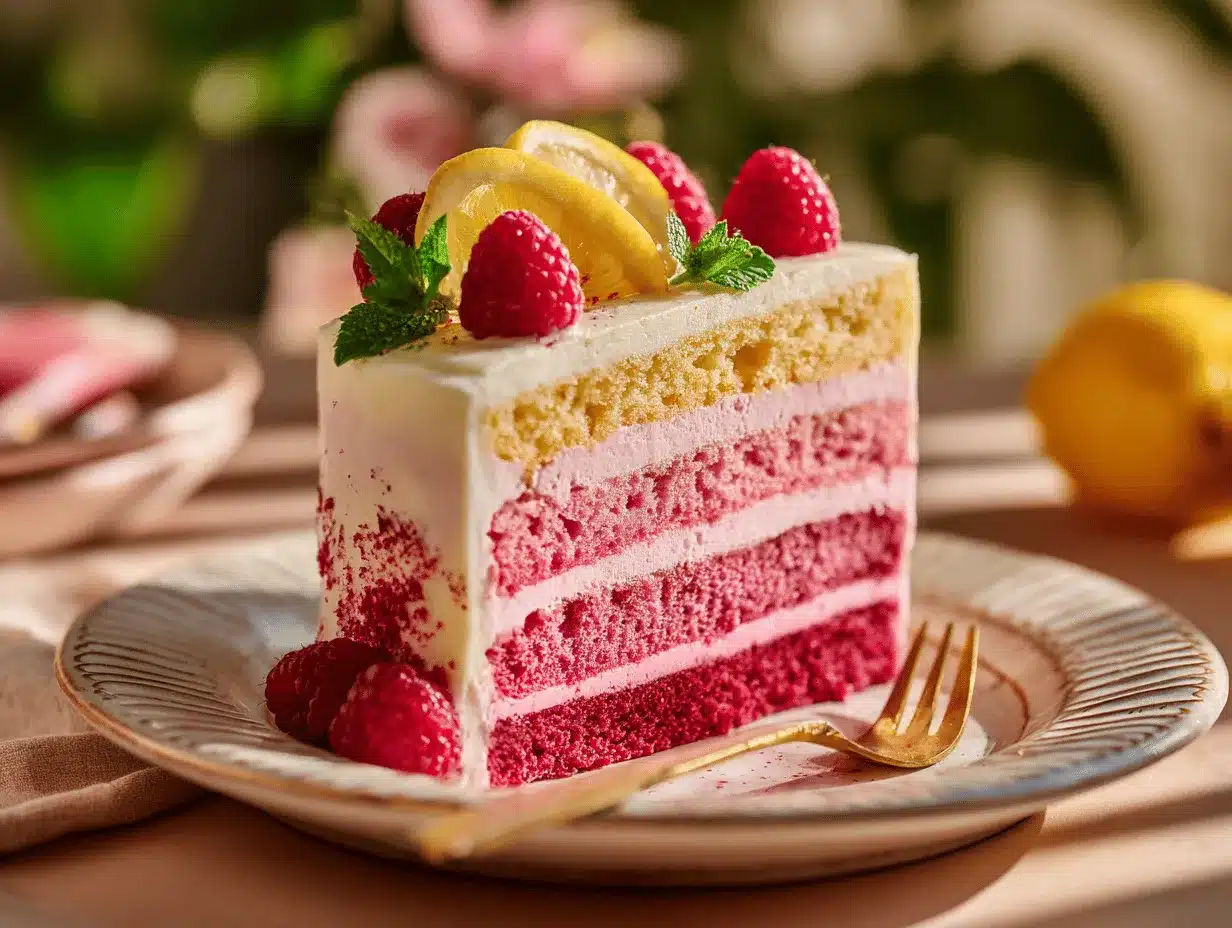
Pink, fluffy, and bursting with tangy-sweet flavor—the first time I sliced into this raspberry lemonade ombre layer cake, I think I actually gasped. There’s just something about the soft gradation of pinks, the bright citrus scent, and that hint of juicy raspberry that feels like a celebration in every bite. You know, whenever I want to make a birthday extra special (or just wow a crowd), this is the cake I turn to. It’s not just a dessert—it’s an experience. The ombre layers always get oohs and ahhs, and honestly, it’s way easier than it looks!
I first made this raspberry lemonade ombre layer cake for my niece’s birthday party after she begged for “something pink and pretty, but not too sweet.” I tinkered with a few lemon cake recipes, added real raspberries, and ended up with a cake that’s fluffy and moist, with just the right balance of tart and sweet. Now, it’s a family tradition—my sister even requests one for her own birthday!
This dreamy cake isn’t just about looks, though. The combination of zesty lemon and fresh raspberry is a match made in dessert heaven. Plus, the ombre effect makes it look super fancy (even if you’re a beginner baker). Whether you’re hosting a birthday bash, a baby shower, or you just love all things pink and fruity, this raspberry lemonade ombre layer cake will absolutely steal the show. I’ve made it more times than I can count, and every time, it’s a hit. If you’re ready for a cake that’s as fun to bake as it is to eat, let’s get into the details!
Why You’ll Love This Raspberry Lemonade Ombre Layer Cake
- Showstopper Looks, Simple Steps: The ombre effect looks super impressive, but you don’t need any fancy skills—just a few bowls and some food coloring.
- Fresh, Fruity Flavor: Each bite is layered with zesty lemon and real raspberries. It’s not your average birthday cake—this one is bright and refreshing!
- Perfect for Celebrations: Whether it’s a birthday, bridal shower, or picnic, this cake brings big “wow” energy to any table.
- Kid and Adult Approved: Seriously, every time I make this, kids scrape their plates clean and adults sneak seconds. The tart lemon balances the sweet raspberry—everyone wins.
- Moist, Tender Crumb: Thanks to buttermilk and real fruit, the cake layers are soft and never dry. No crumbly disasters here!
- Make-Ahead Friendly: You can bake the layers ahead and assemble the day of your party. I love how low-stress it is (especially with all the frosting fun).
- Customizable Ombre: You get to play artist with the color—go from barely-blush to bold magenta, or even add a little yellow for a lemony twist.
Here’s what sets my raspberry lemonade ombre layer cake apart: I use a combination of lemon zest, lemon juice, and pureed raspberries for maximum flavor. Plus, I’ve tested different food colorings and found the best way to get those dreamy layers without weird aftertastes (trust me, not all pinks are created equal). The frosting? It’s a silky lemon-raspberry buttercream—light, fluffy, and not too sweet. If you’ve ever had a “pretty but bland” birthday cake, this one will totally change your mind.
But honestly, what I love most is that moment when you cut the first slice and everyone’s eyes light up. It’s not just cake—it’s a memory in the making. I promise, this raspberry lemonade ombre layer cake brings big birthday energy (without big stress) every single time.
What Ingredients You Will Need
This raspberry lemonade ombre layer cake uses everyday ingredients, but when you put them together—magic happens! I always say, the best cakes start with the basics done right. Here’s what you’ll need:
- For the Cake Layers:
- 2 1/2 cups (310g) all-purpose flour (sifted for extra fluffiness)
- 2 tsp baking powder
- 1/2 tsp baking soda
- 1/2 tsp salt
- 1 cup (225g) unsalted butter, softened (adds richness and that classic cake crumb)
- 1 3/4 cups (350g) granulated sugar
- 4 large eggs, room temperature
- 1 tbsp lemon zest (from about 2 large lemons)
- 1/3 cup (80ml) fresh lemon juice (don’t use bottled—trust me!)
- 1 cup (240ml) buttermilk, room temperature (keeps the cake moist and tender)
- 1/2 cup (120g) raspberry puree (about 1 cup fresh or frozen raspberries, pureed and strained)
- Pink and/or red food coloring (gel works best for bold ombre layers)
- For the Lemon-Raspberry Buttercream:
- 1 1/2 cups (340g) unsalted butter, softened
- 5 cups (600g) powdered sugar, sifted
- 2 tbsp lemon juice (fresh is best)
- 2–3 tbsp raspberry puree (for color and flavor)
- 1 tsp vanilla extract
- Pinch salt
- 1–2 tbsp milk or cream, as needed (for spreading consistency)
- Optional: Extra lemon zest or freeze-dried raspberry powder for garnish
- For Assembly:
- Fresh raspberries (decoration and extra pop of flavor)
- Lemon slices or zest curls (for garnish)
Ingredient Tips: For the raspberry puree, I like to use frozen raspberries when fresh aren’t in season—they puree beautifully and are easy on the budget. If you need a dairy-free cake, swap buttermilk for your favorite plant-based milk with 1 tbsp lemon juice stirred in. Gluten-free flour blends also work, though the crumb will be a bit denser. Don’t have buttermilk? Mix whole milk with a tablespoon of lemon juice and let it sit for 5 minutes—it’s a great hack!
For food coloring, I’ve had the best luck with AmeriColor gels (they don’t taste weird or fade in the oven). And if you’re short on time, store-bought lemon curd makes an awesome bonus filling between layers!
Equipment Needed
- Stand Mixer or Hand Mixer: For whipping up that fluffy cake batter and buttercream. I’ve made this cake with both—my trusty hand mixer did the job before I saved up for a stand mixer.
- 3 or 4 8-inch (20cm) Cake Pans: You can go with three thicker layers or four thinner ones for a more dramatic ombre. If you only have two pans, just bake in batches.
- Parchment Paper: For lining cake pans—lifts the layers out like a dream, no sticking.
- Mixing Bowls: Several, for dividing and coloring the batter.
- Offset Spatula & Bench Scraper: For swooping and smoothing frosting. A butter knife works in a pinch!
- Wire Rack: For cooling your cakes evenly (no soggy bottoms).
- Kitchen Scale: Optional, but super handy for dividing batter evenly between pans—my cakes used to be lopsided until I started weighing them out.
- Toothpicks or Cake Tester: To check for doneness.
- Budget Tip: Dollar store pans and hand mixers work just fine—don’t let fancy equipment stop you from making this cake!
I’ve learned through a few stuck-cake mishaps: always line your pans and give them a good spritz with baking spray. If you’re using older pans, make sure there’s no rust (the lemon can react and give a weird flavor). Wipe down your mixer with a little white vinegar if you’re switching between batter and frosting, especially if you’re using food coloring—it keeps colors vibrant!
How to Make Raspberry Lemonade Ombre Layer Cake
- Prep Cake Pans and Oven (10 minutes): Preheat your oven to 350°F (175°C). Grease 3 or 4 8-inch (20cm) cake pans and line the bottoms with parchment paper. Set aside. This step is key for easy release—trust me, I’ve lost a layer to sticking before!
- Mix Dry Ingredients (5 minutes): In a medium bowl, whisk together 2 1/2 cups (310g) all-purpose flour, 2 tsp baking powder, 1/2 tsp baking soda, and 1/2 tsp salt. Set aside.
- Cream Butter & Sugar (3-4 minutes): In a large mixing bowl or stand mixer, beat 1 cup (225g) softened butter and 1 3/4 cups (350g) sugar until light and fluffy. Scrape down the bowl as needed.
- Add Eggs & Lemon (3 minutes): Beat in 4 eggs, one at a time, mixing well after each. Add 1 tbsp lemon zest and 1/3 cup (80ml) fresh lemon juice. The mixture might look a little curdled—don’t panic, it’ll smooth out in the next step.
- Alternate Dry Ingredients & Buttermilk (5 minutes): With the mixer on low, add the flour mixture in three batches, alternating with 1 cup (240ml) buttermilk. Start and end with flour. Mix just until combined—overmixing makes tough cake!
- Divide & Color the Batter (10 minutes): Divide the batter evenly into 3 or 4 bowls (use a kitchen scale for precision). Stir in raspberry puree to each bowl, adding more to each subsequent bowl for a deeper pink. Add a drop or two of food coloring to boost the ombre effect (light pink, medium, and bold magenta).
- Bake the Layers (22–26 minutes): Pour each batter into its own prepared pan and smooth the tops. Bake for 22–26 minutes, rotating the pans halfway through. Cakes are done when a toothpick inserted in the center comes out clean and the tops spring back when lightly pressed. If you’re baking in batches, refrigerate the extra batter.
- Cool Completely (45 minutes): Let cakes cool in the pans for 10 minutes, then run a knife around the edges and flip onto a wire rack. Peel off parchment paper and let cool completely before frosting. Warm cakes will melt your buttercream—learned that the hard way!
- Make the Lemon-Raspberry Buttercream (10 minutes): In a clean bowl, beat 1 1/2 cups (340g) butter until creamy. Gradually add 5 cups (600g) powdered sugar, 2 tbsp lemon juice, 2–3 tbsp raspberry puree, 1 tsp vanilla, and a pinch of salt. Beat until fluffy, adding milk as needed for spreadable consistency. Taste and adjust tartness or color as you like.
- Assemble the Ombre Cake (20–30 minutes): Place the darkest layer on a cake board or plate. Spread a thin layer of frosting, then top with the next-lightest cake. Repeat, ending with the lightest layer on top. Crumb coat the whole cake (a thin layer of frosting to seal in crumbs) and chill for 15 minutes. Finish with a final, thick layer of buttercream—get creative with swirls or an ombre effect on the outside!
- Decorate (as you wish): Arrange fresh raspberries and lemon slices on top. Sprinkle with lemon zest or freeze-dried raspberry powder for a fancy finish. Take a minute to admire your work before slicing!
Troubleshooting: If cakes dome too much, just slice off the tops to level before stacking. If your frosting splits, beat in a little extra powdered sugar or a splash of milk. And if your ombre looks wonky—who cares? The flavor wins every time!
Cooking Tips & Techniques
- Don’t Overmix: It’s tempting to keep mixing until ultra-smooth, but overdoing it makes the crumb tough. Stop just as the flour disappears.
- Room Temp Ingredients: Butter, eggs, and buttermilk blend together best when not cold. Cold ingredients can make batter lumpy or cause curdling.
- Coloring Batter: Add food coloring slowly—a little goes a long way! I once ended up with neon cake layers by accident, so go light-handed and build up the color.
- Even Layers: Weigh each bowl of batter for perfectly even layers. If you don’t have a scale, use a measuring cup and trust your eye. Wonky layers still taste great!
- Frost Like a Pro: For a smooth finish, dip your spatula in hot water and wipe dry before smoothing the buttercream. Makes it look bakery-worthy!
- Chill for Clean Cuts: After assembling and frosting, chill the cake for 30 minutes before slicing—this keeps the layers tidy and prevents frosting smears.
- Learn from Mistakes: My first try, I rushed and frosted warm cake (total meltdown). Let everything cool fully to avoid a mess!
- Multitasking: While cakes bake, wash up, prep frosting, or set up your decorating station. It cuts down on mess and helps keep things moving.
Consistency comes with practice, but these little habits really change the game. And hey, if your ombre isn’t perfect, just pile on the raspberries and call it “rustic chic”—it always works for me!
Variations & Adaptations
- Gluten-Free: Swap all-purpose flour for a 1:1 gluten-free baking blend. The result will be a touch denser but still delicious. Add 1/4 tsp xanthan gum if your blend doesn’t have it.
- Dairy-Free: Use vegan butter and your favorite plant-based milk (with lemon juice for “buttermilk”). The cake stays fluffy and the flavor’s still dreamy!
- Berry Switch-Up: Not a raspberry fan? Try pureed strawberries or blackberries for a different twist. Blueberries give a gorgeous lavender hue for a totally different ombre vibe.
- Different Frosting: Cream cheese frosting pairs fabulously with the tart berries if you want a richer taste. Or, add a layer of store-bought lemon curd between layers for extra zing.
- Personal Favorite: I sometimes add a thin layer of raspberry jam between the cakes for extra punch. My family raves about it!
- Cooking Method: No round pans? Bake as a sheet cake and use a cookie cutter to make mini ombre layer cakes. Super cute for parties!
- Allergen Alert: For nut allergies, double-check your food coloring and extracts—they sometimes sneak in almond oil.
Don’t be afraid to have fun with this recipe. I once made a lemon-lime version for a summer party, and it was just as big a hit!
Serving & Storage Suggestions
This raspberry lemonade ombre layer cake is best served at room temperature—let it sit out 30 minutes before slicing for the softest texture and boldest flavor. Arrange slices on a pretty cake stand, scatter extra fresh raspberries around, and maybe pour a round of sparkling lemonade or Prosecco for the adults.
If you have leftovers (rare, but it happens), store slices in an airtight container in the fridge for up to 4 days. The flavors deepen and the frosting gets even silkier by day two! For longer storage, wrap well and freeze individual cake slices—defrost overnight in the fridge, then let come to room temp for that just-baked taste. To refresh the frosting’s shine, give cold slices a quick pass with a warm spatula.
Pair with coffee, herbal tea, or even a scoop of lemon sorbet for a dreamy birthday dessert spread. Honestly, I love sneaking a slice for breakfast the next day—no judgment!
Nutritional Information & Benefits
Per slice (based on 12 servings): Approximately 430 calories, 20g fat, 59g carbs, 4g protein. This dreamy raspberry lemonade ombre layer cake isn’t exactly health food, but it does have a few redeeming qualities—fresh raspberries bring antioxidants and vitamin C, while lemon juice provides a zesty dose of flavor with minimal extra sugar. This cake is naturally nut-free if you check your extracts and food dyes.
For gluten-free or dairy-free diets, simple swaps make this a celebration cake everyone can enjoy. Most of all, I love that you get big flavor from real fruit, not just extracts or artificial colors. And hey, a little joy is good for you, too—especially on your birthday!
Conclusion
If you’re looking for a birthday dessert that’s as stunning as it is scrumptious, this raspberry lemonade ombre layer cake is the answer. It’s got eye-popping layers, fresh and tangy flavor, and just the right touch of homemade magic. Plus, you can tweak the colors, swap the berries, or go wild with decorations—make it your own every time.
I keep coming back to this recipe because it never fails to put a smile on everyone’s face (including mine). Whether you’re baking for a big party or just want to treat yourself, give this cake a try—and don’t forget to snap a pic for Pinterest!
If you make this raspberry lemonade ombre layer cake, I’d love to hear how it goes. Drop your questions, swaps, or birthday stories in the comments—let’s keep the cake love going. Happy baking, friends!
Frequently Asked Questions
Can I make the cake layers ahead of time?
Absolutely! Bake the layers up to two days in advance, wrap tightly in plastic, and store at room temperature. You can also freeze them for up to a month—just thaw before assembling.
Do I have to use food coloring for the ombre effect?
Nope! The raspberry puree alone gives a lovely blush, but food coloring boosts the contrast. If you prefer natural dyes, try beet powder or extra raspberry puree for deeper pinks.
What’s the best way to get even cake layers?
Weigh your batter before dividing it between pans or use a measuring cup to eyeball it. If the layers bake up uneven, just trim the tops with a serrated knife before stacking.
Can I use bottled lemon juice instead of fresh?
Fresh lemon juice brings the brightest, freshest flavor, but bottled works in a pinch. Just avoid anything labeled “lemon juice from concentrate” for the best taste.
How do I fix buttercream that’s too stiff or too runny?
If your buttercream is stiff, add milk or cream a tablespoon at a time until spreadable. If it’s runny, beat in more powdered sugar or chill it for 10–15 minutes to firm up before using.
Pin This Recipe!
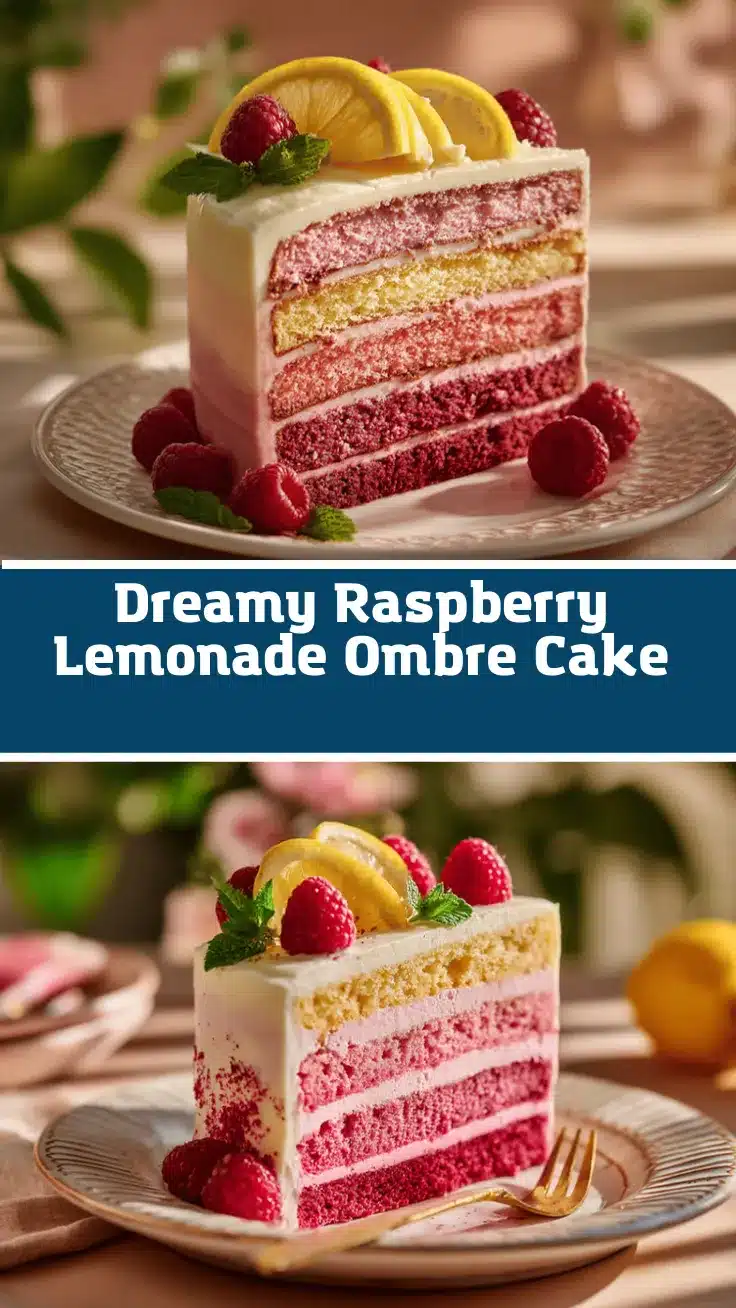
Raspberry Lemonade Ombre Layer Cake

This stunning raspberry lemonade ombre layer cake features fluffy, moist lemon cake layers tinted with real raspberry puree for a gorgeous pink gradient, all wrapped in a silky lemon-raspberry buttercream. It’s the ultimate showstopper for birthdays and celebrations, bursting with fresh, tangy-sweet flavor.
- Prep Time: 40 minutes
- Cook Time: 26 minutes
- Total Time: 1 hour 30 minutes
- Yield: 12 servings 1x
- Category: Dessert
- Cuisine: American
Ingredients
- 2 1/2 cups (310g) all-purpose flour, sifted
- 2 teaspoons baking powder
- 1/2 teaspoon baking soda
- 1/2 teaspoon salt
- 1 cup (225g) unsalted butter, softened
- 1 3/4 cups (350g) granulated sugar
- 4 large eggs, room temperature
- 1 tablespoon lemon zest (from about 2 large lemons)
- 1/3 cup (80ml) fresh lemon juice
- 1 cup (240ml) buttermilk, room temperature
- 1/2 cup (120g) raspberry puree (about 1 cup fresh or frozen raspberries, pureed and strained)
- Pink and/or red food coloring (gel preferred)
- 1 1/2 cups (340g) unsalted butter, softened (for buttercream)
- 5 cups (600g) powdered sugar, sifted (for buttercream)
- 2 tablespoons lemon juice (for buttercream)
- 2–3 tablespoons raspberry puree (for buttercream)
- 1 teaspoon vanilla extract (for buttercream)
- Pinch salt (for buttercream)
- 1–2 tablespoons milk or cream, as needed (for buttercream)
- Optional: Extra lemon zest or freeze-dried raspberry powder for garnish
- Fresh raspberries (for decoration)
- Lemon slices or zest curls (for garnish)
Instructions
- Preheat oven to 350°F (175°C). Grease 3 or 4 8-inch cake pans and line bottoms with parchment paper.
- In a medium bowl, whisk together flour, baking powder, baking soda, and salt. Set aside.
- In a large bowl or stand mixer, beat softened butter and sugar until light and fluffy.
- Beat in eggs one at a time, then add lemon zest and lemon juice. The mixture may look curdled.
- With mixer on low, add flour mixture in three batches, alternating with buttermilk. Start and end with flour. Mix just until combined.
- Divide batter evenly into 3 or 4 bowls. Stir in raspberry puree to each bowl, adding more to each subsequent bowl for a deeper pink. Add food coloring as desired for ombre effect.
- Pour each batter into prepared pans. Bake for 22–26 minutes, rotating halfway through. Cakes are done when a toothpick comes out clean.
- Cool cakes in pans for 10 minutes, then turn out onto a wire rack, remove parchment, and cool completely.
- For buttercream: In a clean bowl, beat butter until creamy. Gradually add powdered sugar, lemon juice, raspberry puree, vanilla, and salt. Beat until fluffy, adding milk as needed for spreadable consistency.
- To assemble: Place darkest cake layer on a plate. Spread a thin layer of frosting, then top with next-lightest cake. Repeat, ending with lightest layer on top.
- Crumb coat the cake with a thin layer of frosting and chill for 15 minutes. Finish with a final thick layer of buttercream, creating an ombre effect if desired.
- Decorate with fresh raspberries, lemon slices, zest, or freeze-dried raspberry powder. Chill cake for 30 minutes before slicing for clean cuts.
Notes
For best results, use room temperature ingredients and sift your flour and powdered sugar. Weigh batter for even layers. Chill cake before slicing for clean cuts. For gluten-free or dairy-free adaptations, use a 1:1 gluten-free flour blend and plant-based milk with lemon juice. Store leftovers in an airtight container in the fridge for up to 4 days or freeze slices for longer storage.
Nutrition
- Serving Size: 1 slice (1/12 of cake)
- Calories: 430
- Sugar: 40
- Sodium: 210
- Fat: 20
- Saturated Fat: 12
- Carbohydrates: 59
- Fiber: 1
- Protein: 4
Keywords: raspberry lemonade cake, ombre layer cake, birthday cake, lemon raspberry dessert, pink cake, celebration cake, buttercream, easy layer cake, summer dessert, fruity cake