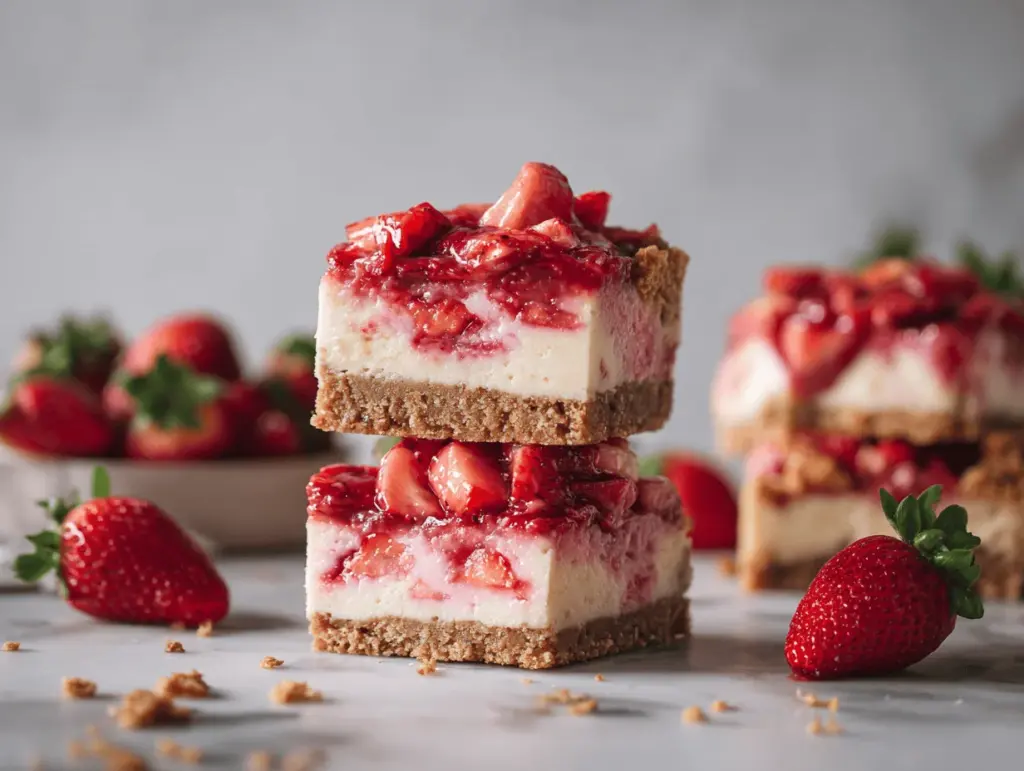
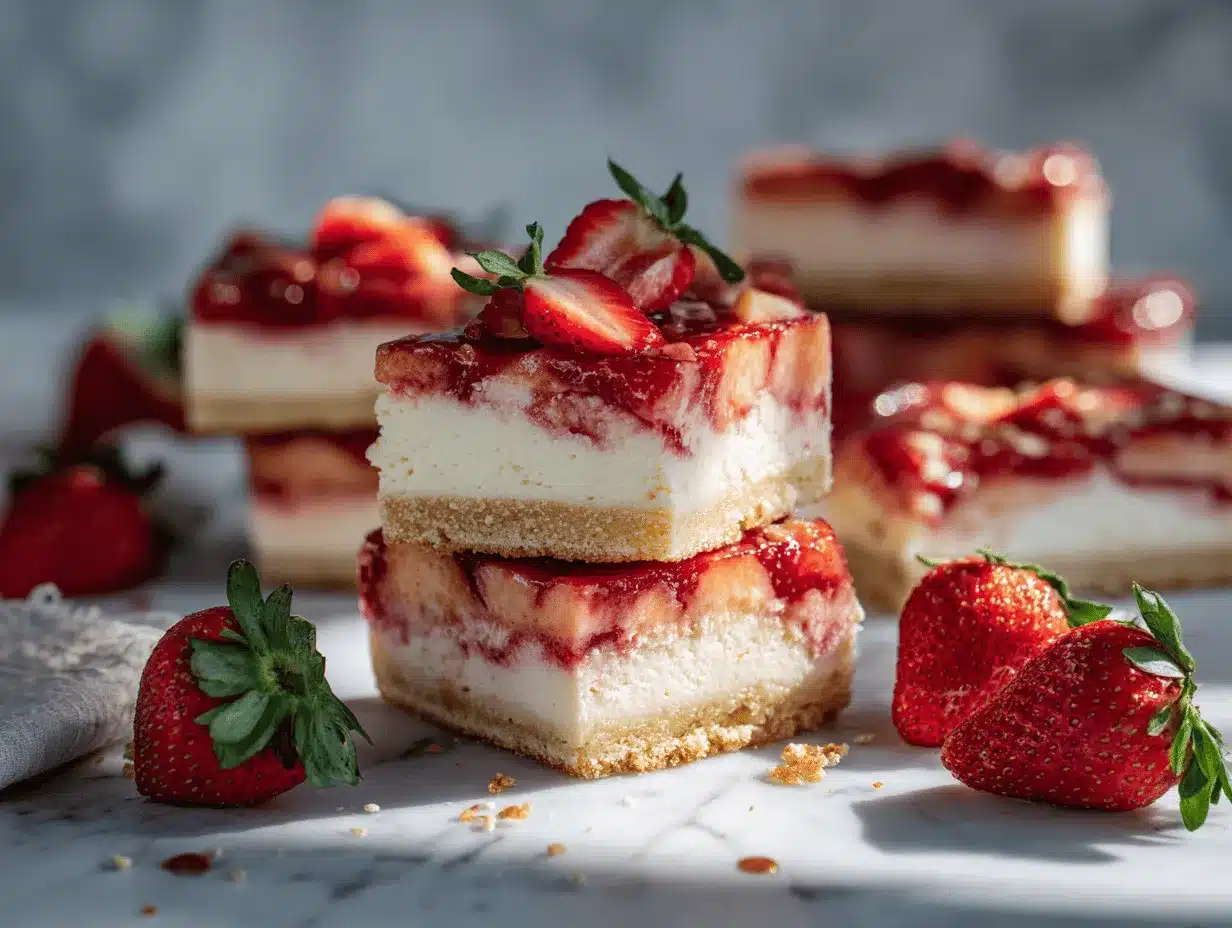
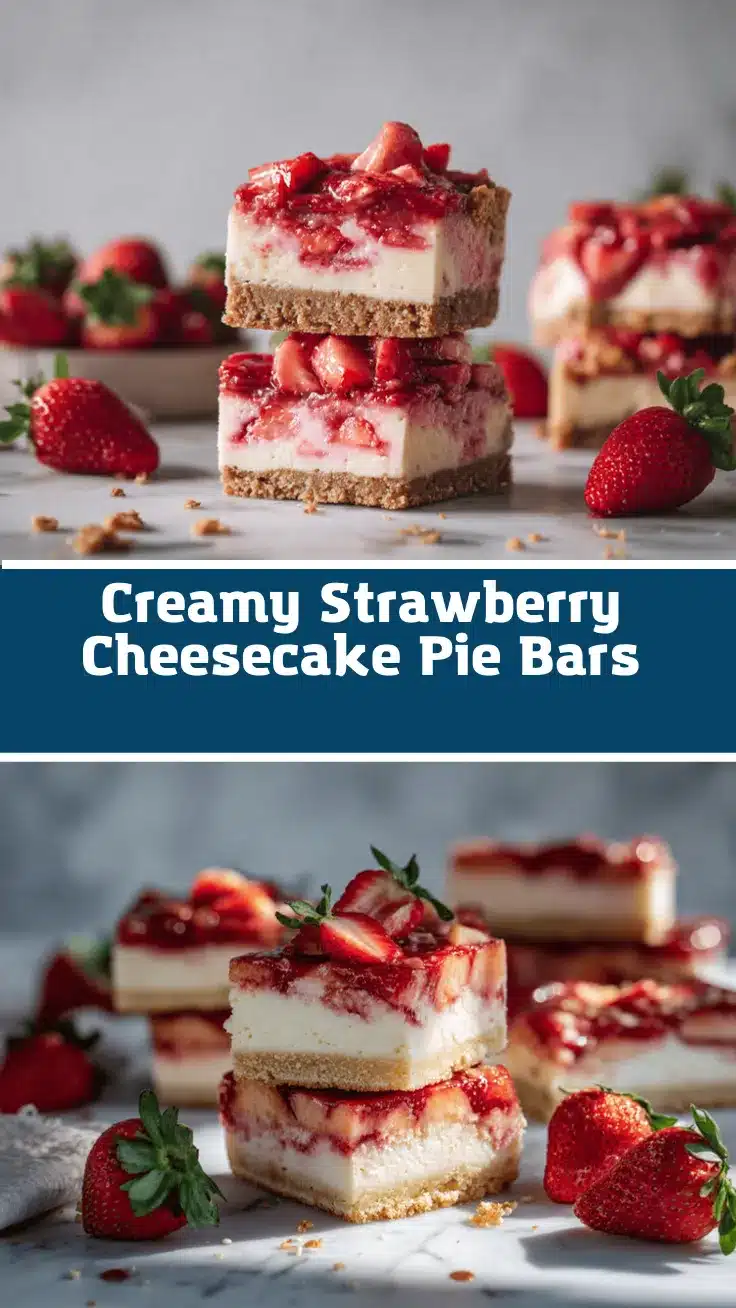
The very first bite of these strawberry cheesecake pie bars is pure joy—creamy, tangy filling, buttery crust, and juicy strawberries all dancing together. That unforgettable aroma of sweet berries and vanilla? It takes me straight back to sunny summer afternoons, when my grandma would set out a pan of her famous pie bars for the whole neighborhood. She’d always say, “Nothing says summer like strawberries!” and honestly, I couldn’t agree more.
I stumbled onto my version of strawberry cheesecake pie bars during a mad dash to use up a fridge full of berries before vacation. I wanted something fuss-free but impressive, a dessert that could wow everyone without hours in the kitchen. After a few tweaks (trust me, lots of taste-testing happened), these bars became a staple for every picnic, potluck, or “just because” day. If you’ve ever craved a slice of cheesecake but didn’t want to deal with springform pans or water baths, this is your answer.
This recipe is a lifesaver for busy parents, beginner bakers, or anyone looking to enjoy a fruity treat that feels special but comes together in a snap. It’s loaded with real strawberries, a creamy cheesecake layer, and a crisp, buttery base—each bite balancing sweet, tart, and creamy flavors. After baking these a dozen times, I can honestly say: strawberry cheesecake pie bars are the dessert I reach for when I need a little sunshine (and a lot of smiles) at the table.
Why You’ll Love This Recipe
- Quick & Easy: These strawberry cheesecake pie bars come together in under an hour, making them perfect for impromptu gatherings or last-minute dessert cravings.
- Simple Ingredients: No wild goose chase for fancy stuff—you probably have most things already in your pantry and fridge.
- Perfect for Summer: Fresh strawberries are the star here, but you can use frozen too. It’s the ultimate picnic, BBQ, or potluck treat.
- Crowd-Pleaser: Kids, grandparents, friends—they all love these. I’ve yet to meet someone who could resist going back for seconds (or thirds—no judgment!).
- Unbelievably Delicious: The creamy cheesecake balances perfectly with the tart, juicy strawberries and that buttery, slightly crisp crust. It’s comfort food, but lighter and brighter.
What really sets these strawberry cheesecake pie bars apart? It’s the layering technique. Instead of swirling the berry topping, I gently fold macerated strawberries into the cheesecake layer in uneven clusters. This means every bite is a little bit different—some more berry, some more cream cheese, but all dreamy. I also use a touch of lemon zest for freshness, and a hidden trick: a pinch of salt in the crust to make the sweetness pop.
These bars always remind me of family reunions and lazy Saturdays. They’re the kind of dessert that brings people together, no matter the occasion. And don’t be surprised if they vanish from the table before you get a second helping! This recipe is my go-to for those “I want something sweet, but not fussy” days, and I hope it becomes yours too.
What Ingredients You Will Need
This recipe uses simple, wholesome ingredients to deliver bold flavor and a satisfying texture—no fussy specialty items required. Most of these are pantry and fridge staples, and you can easily swap things out to fit your needs or what you have on hand.
- For the Crust:
- 1 1/2 cups (180g) graham cracker crumbs (about 12 full sheets)
- 1/4 cup (50g) granulated sugar
- 6 tbsp (85g) unsalted butter, melted
- Pinch of salt (brings out the flavor—don’t skip!)
- For the Cheesecake Layer:
- 16 oz (450g) cream cheese, softened (full-fat recommended for best texture)
- 2/3 cup (130g) granulated sugar
- 2 large eggs, room temperature
- 1 tsp pure vanilla extract
- 1 tsp lemon zest (optional, but it adds brightness!)
- For the Strawberry Topping:
- 2 cups (300g) fresh strawberries, hulled and diced (frozen works in a pinch—just thaw and drain first)
- 2 tbsp (25g) granulated sugar
- 1 tsp cornstarch (helps the berries set—especially important if using frozen berries)
- 1 tsp fresh lemon juice (brightens the flavor)
Ingredient Tips & Substitutions:
- Graham Crackers: Swap for digestive biscuits or vanilla wafers if you’re outside the US.
- Butter: Use plant-based butter for a dairy-free version.
- Cream Cheese: For a lighter option, try neufchâtel cheese, but avoid low-fat or whipped varieties—they get runny.
- Sugar: Coconut sugar or light brown sugar can be swapped for a more caramel-like flavor.
- Eggs: I haven’t tried flax eggs or egg replacers in this recipe, but if you do, let me know how it goes!
- Strawberries: Blackberries, blueberries, or raspberries also work beautifully—just adjust the sugar slightly if they’re tart.
Honestly, I love that this recipe isn’t picky—use what’s ripe, what’s in season, and what you’ve got. That’s how these bars became a family favorite!
Equipment Needed
- 8×8-inch (20x20cm) baking pan: I use a metal pan for crisp edges, but glass works too.
- Mixing bowls: At least two—one for the crust, one for the filling. If you use a stand mixer, even easier.
- Hand mixer or stand mixer: For smooth, lump-free cheesecake filling. You can use a sturdy whisk and some elbow grease in a pinch.
- Measuring cups and spoons: Accurate measurements matter for baking—my digital scale is my secret weapon for perfect bars.
- Parchment paper: Makes lifting the bars out (and cleanup) way easier. If you don’t have any, just grease the pan really well.
- Rubber spatula: For scraping down the bowl and spreading layers evenly.
- Sharp knife: For slicing neat, clean bars once cooled.
If you’re just getting started with baking, don’t stress about fancy gadgets. I’ve made these with a wooden spoon and a glass casserole dish before—still turned out great. Just be sure your tools are clean, and if you use a glass pan, lower the oven temp by 25°F (about 15°C) to avoid over-browning.
Pro tip: I line my pan with parchment, letting the edges hang over for easy lifting. It’s saved many a batch from sticking! And if you’re using a hand mixer, go slow and steady—no one wants cheesecake on the ceiling (yep, learned that one the hard way).
Preparation Method
- Preheat and Prep: Preheat your oven to 350°F (175°C). Line an 8×8-inch (20x20cm) pan with parchment, leaving a bit of overhang on the sides for easy lifting later. Lightly spray or butter the parchment.
- Make the Crust: In a medium bowl, mix 1 1/2 cups (180g) graham cracker crumbs, 1/4 cup (50g) sugar, and a pinch of salt. Pour in 6 tbsp (85g) melted butter. Stir with a fork until the crumbs are evenly moistened and look like wet sand. Press the mixture firmly into the bottom of the prepared pan—you can use the bottom of a measuring cup for even packing.
Bake for 10 minutes. The edges should look just barely golden. Set aside to cool briefly while you make the filling. - Prepare Strawberry Topping: In a small bowl, toss 2 cups (300g) diced strawberries with 2 tbsp (25g) sugar, 1 tsp cornstarch, and 1 tsp lemon juice. Let them sit while you make the cheesecake layer—this helps draw out the juices and softens the berries. If using frozen berries, drain any excess liquid after macerating.
- Mix Cheesecake Filling: In a large bowl, beat 16 oz (450g) cream cheese until smooth and creamy, about 2 minutes. Add 2/3 cup (130g) sugar and beat again for 1 minute. Add 2 eggs, one at a time, beating after each. Stir in 1 tsp vanilla extract and 1 tsp lemon zest (if using). Scrape down the sides and bottom of the bowl to avoid lumps.
The batter should be silky and pourable, with no visible streaks of cheese. - Assemble the Bars: Pour the cheesecake filling over the baked crust. Use a spatula to spread it evenly. Spoon the strawberry mixture on top in small clusters, gently swirling some berries into the filling while leaving visible pockets for a “bursting berry” effect. Don’t overmix—uneven bits look beautiful and taste even better.
- Bake: Bake for 30–35 minutes, or until the cheesecake edges look set but the center still jiggles slightly when you gently shake the pan. If you see a few golden spots on top, that’s perfect.
If using a glass pan, check for doneness at the 32-minute mark—glass insulates differently and can overbake quickly. - Cool: Remove the pan from the oven and let cool at room temperature for 1 hour. Then refrigerate (uncovered) for at least 3 hours, or until fully chilled and firm. This is the hardest part—waiting! Chilling is what sets the bars for clean slicing.
- Slice and Serve: Lift the bars out using the parchment overhang. Transfer to a cutting board and use a sharp knife (dipped in hot water and wiped dry between cuts) to slice into squares. Serve cold or at cool room temperature for best flavor and texture.
Troubleshooting Tips:
- If your crust is crumbly, pack it down harder next time or add 1–2 tbsp (15–30g) extra melted butter.
- For lumpy cheesecake, make sure cream cheese is truly soft before mixing (let it sit out for 2 hours if you can).
- If the top cracks, don’t sweat it—just cover with extra berries or a dusting of powdered sugar.
My favorite trick? Chill the bars overnight for the creamiest texture and deepest flavor. The waiting is tough, but so worth it!
Cooking Tips & Techniques
Getting perfect strawberry cheesecake pie bars isn’t hard, but a few pro tricks can make all the difference. Here’s what I’ve learned (sometimes the hard way):
- Room Temp Ingredients: Make sure your cream cheese and eggs are at room temperature. Cold cream cheese makes lumpy filling—trust me, you don’t want to chase down those lumps!
- Don’t Overbake: The center should wobble slightly when you shake the pan. It will finish setting as it cools. Overbaking leads to dense, dry bars (been there, not fun).
- Layering for Looks: Instead of mixing berries throughout, cluster them for that gorgeous “pocket” effect. It’s more striking, and you get little bursts of strawberry in every bite.
- Sharp Knife, Hot Water: For clean cuts, dip your knife in hot water, wipe it, then slice. Repeat between each cut. It’s a small thing, but it keeps the bars looking bakery-fresh.
- Cool Completely: Patience is key. If you try to slice while warm, you’ll get a gooey mess. Let the bars chill for at least 3 hours (overnight is best for flavor and texture).
- Multitasking: While the crust bakes, prep your filling and berries. That way, you’re ready to assemble as soon as the crust cools a bit.
- Pan Lining: Don’t skip the parchment! It’s a lifesaver for getting the bars out in one piece—especially if you’re bringing these to a party.
Honestly, I learned the hard way not to rush the chilling time. Once, I tried to serve them after just an hour and ended up with cheesecake “pudding” instead of bars. Lesson learned! Give them time and you’ll be rewarded with perfect, sliceable treats every time.
Variations & Adaptations
One of the best things about this recipe is how easy it is to change things up. Here are my favorite ways to make these strawberry cheesecake pie bars your own:
- Gluten-Free: Use gluten-free graham crackers or almond flour (about 1 1/2 cups or 150g) for the crust. I’ve done this for friends with celiac, and it works beautifully—just add a pinch more butter if it seems dry.
- Mixed Berry Medley: Swap some (or all) of the strawberries for raspberries, blueberries, or blackberries. This turns the bars into a summer berry explosion—great for when you can’t decide on just one fruit.
- Lemon Cheesecake Bars: Double the lemon zest in the filling and add a tablespoon of lemon juice for a tangy, citrusy twist. Top with thin lemon slices or candied lemon peel for extra zing.
- Dairy-Free: Use plant-based cream cheese (like Violife or Kite Hill) and dairy-free butter. I’ve tested this for a lactose-intolerant cousin and the bars still set up nicely—just a touch softer.
- Chocolate Crust: Swap regular graham crackers for chocolate ones (or try chocolate wafer cookies). It’s decadent and pairs so well with the strawberries!
- Nutty Crunch: Fold in 1/2 cup (60g) finely chopped toasted nuts (almonds, pecans) into the crust for a little extra texture and flavor.
Personally, my favorite version uses half strawberries, half blueberries—especially when berries are overflowing at the farmer’s market. Don’t be afraid to experiment—these bars are super forgiving!
Serving & Storage Suggestions
These strawberry cheesecake pie bars are best served chilled, straight from the fridge. The filling is creamy and cool, the crust crisp, and the berry topping bright and fresh. For a little extra flair, dust with powdered sugar or add a dollop of whipped cream just before serving.
If you’re serving a crowd, cut the bars into small squares and arrange them on a pretty platter. They pair beautifully with a glass of sparkling lemonade, sweet tea, or even a cup of strong coffee. I’ve brought them to summer potlucks, Mother’s Day brunch, and even holiday dessert spreads—they fit in everywhere!
Storage Tips:
- Refrigerator: Store bars in an airtight container for up to 5 days. The flavors deepen as they sit, and the crust stays crisp as long as they’re well-covered.
- Freezer: For longer storage, wrap individual bars tightly in plastic wrap and freeze in a zip-top bag for up to 2 months. Thaw overnight in the fridge before serving.
- Reheating: These bars are best cold, but if you prefer room temp, set them out for 30 minutes before serving. Avoid microwaving—they’ll lose their texture.
Fun fact: The strawberry flavor gets even more intense after a day or two. If you’re making these ahead for a party, they’ll taste even better!
Nutritional Information & Benefits
Each strawberry cheesecake pie bar (assuming 16 bars per batch) contains approximately:
- Calories: 190
- Fat: 10g
- Carbs: 24g
- Protein: 3g
- Sugar: 14g
These bars offer a little indulgence with a pop of nutrition from fresh strawberries. Strawberries are packed with vitamin C, antioxidants, and fiber, making these a slightly better-for-you treat compared to traditional cheesecake. You can lighten things up further by using reduced-fat cream cheese or swapping some sugar for a natural sweetener.
For those with allergies, this recipe contains gluten, dairy, and eggs. With a few substitutions (noted above) you can adapt it for gluten-free and dairy-free diets. Personally, I love knowing exactly what’s in my dessert—no hidden additives, just real fruit and simple ingredients.
Conclusion
Strawberry cheesecake pie bars are my ultimate summer dessert—easy, bright, and guaranteed to bring smiles. They blend the best parts of creamy cheesecake, golden crust, and juicy berries into one irresistible bite. Whether you’re new to baking or a seasoned pro, you’ll find these bars simple to prepare and impossible to resist.
Feel free to play around with fruit, crust, or even the filling to suit your tastes. That’s what makes this recipe so fun and versatile! Personally, I can’t get enough of the berry-cheesecake combo, and I hope your family loves it as much as mine does (seriously, they disappear fast every single time).
Ready to try these strawberry cheesecake pie bars? Let me know in the comments how yours turned out, or share your favorite twists on the classic! Don’t forget to pin this recipe for later and share with friends who need a little berry goodness in their lives. Happy baking and enjoy every bite!
FAQs
Can I use frozen strawberries instead of fresh?
Absolutely! Just thaw and drain them well before using, and consider adding an extra teaspoon of cornstarch to help set the topping.
Can I make these strawberry cheesecake pie bars ahead of time?
Yes! They actually taste even better after chilling overnight. Just store them in the fridge until ready to serve.
What if I don’t have graham crackers?
You can use digestive biscuits, vanilla wafers, or even a shortbread cookie base. Just keep the crumb and butter ratio similar.
How do I cut clean, neat bars?
Chill the bars completely, then use a sharp knife dipped in hot water and wiped dry between cuts. This helps get perfect slices every time.
Can I make this recipe gluten-free?
Yes, just use gluten-free graham crackers or substitute almond flour for the crust. The rest of the recipe is naturally gluten-free!
Pin This Recipe!
Strawberry Cheesecake Pie Bars
These strawberry cheesecake pie bars feature a creamy, tangy cheesecake layer, buttery graham cracker crust, and juicy strawberries. They’re easy to make, perfect for summer gatherings, and deliver all the flavor of classic cheesecake in a fuss-free, sliceable bar.
- Prep Time: 20 minutes
- Cook Time: 35 minutes
- Total Time: 4 hours (includes chilling time)
- Yield: 16 bars 1x
- Category: Dessert
- Cuisine: American
Ingredients
- 1 1/2 cups (180g) graham cracker crumbs (about 12 full sheets)
- 1/4 cup (50g) granulated sugar
- 6 tbsp (85g) unsalted butter, melted
- Pinch of salt
- 16 oz (450g) cream cheese, softened (full-fat recommended)
- 2/3 cup (130g) granulated sugar
- 2 large eggs, room temperature
- 1 tsp pure vanilla extract
- 1 tsp lemon zest (optional)
- 2 cups (300g) fresh strawberries, hulled and diced (or frozen, thawed and drained)
- 2 tbsp (25g) granulated sugar
- 1 tsp cornstarch
- 1 tsp fresh lemon juice
Instructions
- Preheat your oven to 350°F (175°C). Line an 8×8-inch (20x20cm) pan with parchment paper, leaving overhang for easy lifting. Lightly spray or butter the parchment.
- In a medium bowl, mix graham cracker crumbs, 1/4 cup sugar, and a pinch of salt. Add melted butter and stir until evenly moistened. Press firmly into the bottom of the prepared pan. Bake for 10 minutes until edges are just golden. Set aside to cool briefly.
- In a small bowl, toss diced strawberries with 2 tbsp sugar, cornstarch, and lemon juice. Let sit while preparing the cheesecake layer. If using frozen berries, drain excess liquid after macerating.
- In a large bowl, beat cream cheese until smooth and creamy, about 2 minutes. Add 2/3 cup sugar and beat for 1 minute. Add eggs one at a time, beating after each. Stir in vanilla extract and lemon zest (if using). Scrape down the bowl to avoid lumps.
- Pour cheesecake filling over the baked crust and spread evenly. Spoon strawberry mixture on top in small clusters, gently swirling some berries into the filling while leaving visible pockets.
- Bake for 30–35 minutes, or until cheesecake edges look set but the center still jiggles slightly. If using a glass pan, check for doneness at 32 minutes.
- Remove from oven and cool at room temperature for 1 hour. Refrigerate (uncovered) for at least 3 hours, or until fully chilled and firm.
- Lift bars out using parchment overhang. Transfer to a cutting board and use a sharp knife (dipped in hot water and wiped dry between cuts) to slice into squares. Serve cold or at cool room temperature.
Notes
For best results, use room temperature cream cheese and eggs to avoid lumps. Don’t overbake—the center should jiggle slightly. Chill bars thoroughly before slicing for clean cuts. You can substitute other berries or make gluten-free and dairy-free adaptations as needed. Bars taste even better after chilling overnight.
Nutrition
- Serving Size: 1 bar (1/16 of recipe)
- Calories: 190
- Sugar: 14
- Sodium: 120
- Fat: 10
- Saturated Fat: 6
- Carbohydrates: 24
- Fiber: 1
- Protein: 3
Keywords: strawberry cheesecake bars, summer dessert, easy cheesecake bars, fruit dessert, picnic dessert, potluck dessert, strawberry bars, cheesecake squares