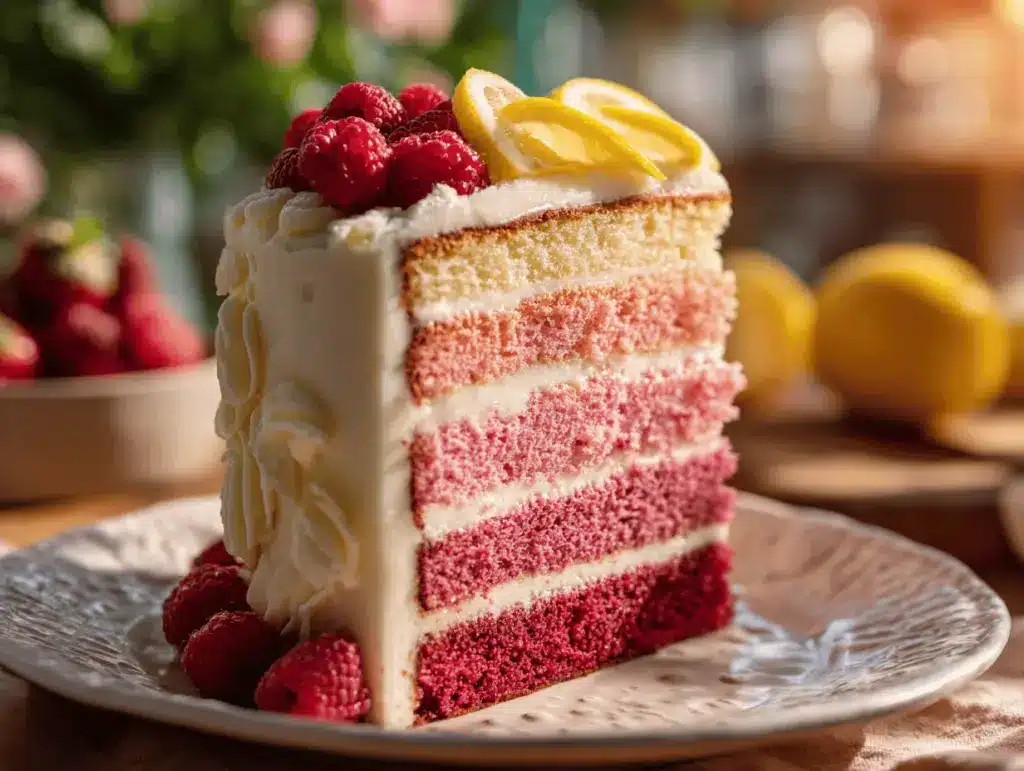
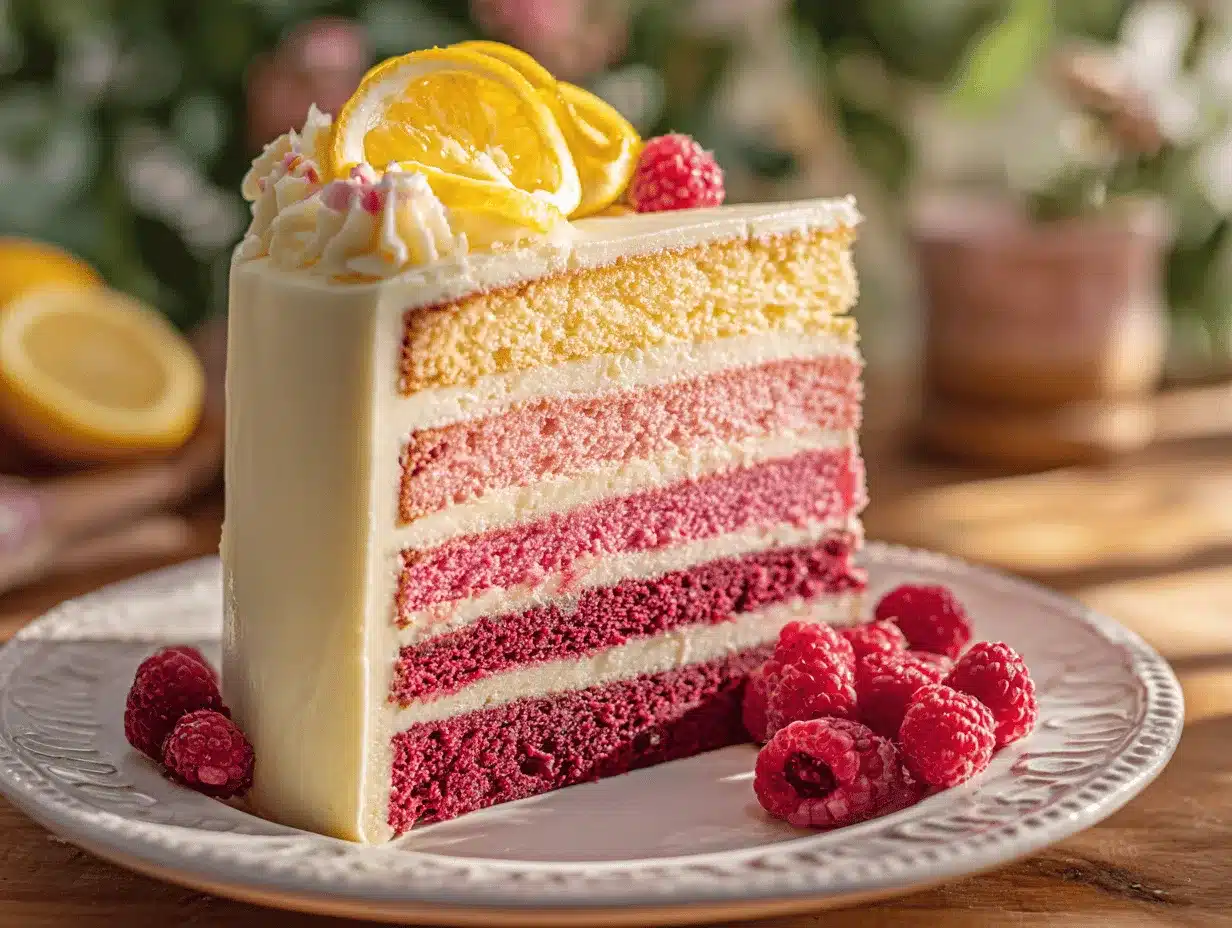
The first time I sliced into a Raspberry Lemonade Ombre Layer Cake, I actually gasped—no kidding. Those soft, sunset-pink layers, swirling from pale lemon to deep raspberry, looked almost too pretty to eat. And yet, one forkful in, I was hooked for life. Tart raspberries mingle with bright lemon, all hugged by a tangy cream cheese frosting that’s so dreamy, it might just steal the show. There’s something almost magical about how this cake turns any gathering into a celebration.
I stumbled on this raspberry lemonade ombre layer cake recipe during a summer birthday marathon—my kitchen looked like a flour bomb went off, and I was down to my last couple lemons and a bag of frozen raspberries. It was one of those accidental masterpieces, honestly. My friends raved, asking for the recipe before their plates were clean, and now it’s my signature for showers, birthdays, or when I just need a little edible sunshine. If you’re looking for a show-stopping dessert that’s bursting with real fruit flavor and playful color, this is it.
The beauty of this cake isn’t just its looks (though, let’s face it, it’s Instagram gold). It’s surprisingly easy to pull together, even if ombre layers sound intimidating. The recipe has your back with step-by-step tips—even if you’re not a pro baker, you’ll get gorgeous results. It’s a hit with kids and adults, and honestly, the cream cheese frosting alone is reason enough to make it. Whether you’re celebrating a birthday, hosting brunch, or want to turn an ordinary Saturday into something special, this raspberry lemonade ombre layer cake has you covered. I’ve tested it, tweaked it, and trust me: it’s a keeper.
Why You’ll Love This Raspberry Lemonade Ombre Layer Cake
- Eye-Catching Ombre Layers: Each slice looks like a summer sunset on a plate. The gentle fade from lemon yellow to raspberry pink is guaranteed to impress everyone—even your pickiest cake critics.
- Fresh, Real Fruit Flavor: This isn’t your average boxed-mix cake. You get the zing of real lemon and the juicy tang of raspberries in every bite. The flavors pop, and they’re balanced—never too sweet or too tart.
- Cream Cheese Frosting Heaven: The frosting is cloud-light, tangy, and just sweet enough. It’s the kind of frosting people sneak spoonfuls of from the bowl (I’m guilty!).
- Easy Enough for Beginners, Gorgeous Enough for Pinterest: Don’t let those ombre layers scare you. With my tested step-by-step method, you’ll get clean, pretty color transitions—no fancy equipment or cake-decorating background needed.
- Perfect for Any Occasion: This cake shines at birthdays, showers, brunches, or whenever you want to brighten someone’s day. It’s a crowd-pleaser, and kids absolutely love the colors (and sneaking extra frosting, too).
- Make-Ahead Friendly: You can bake the layers and even frost the cake a day ahead. The flavors meld and get even better after a night in the fridge.
What sets this raspberry lemonade ombre layer cake apart is how the recipe layers the fruit flavor—literally! The cake isn’t just pretty; each tier brings a hint more berry, balanced with that sunny lemon. I blend the raspberries right into the batter for the deepest pink, so you get that natural color and tartness without artificial dyes. The method is friendly for all skill levels, and trust me, if you can stir and pour, you can nail this.
And honestly, there’s nothing like serving this cake and watching people’s faces light up. It’s the kind of treat you want to photograph before you eat (but once you taste it, all bets are off). Whether you’re a seasoned baker or just want to try something new, this raspberry lemonade ombre layer cake is bound to become a favorite in your kitchen, too. It’s fun, festive, and totally irresistible.
What Ingredients You Will Need
This raspberry lemonade ombre layer cake uses a mix of pantry staples and a few fresh, zippy ingredients to create layers that taste as wonderful as they look. It’s all about that perfect balance: bright, tart, and just sweet enough. Most of these you probably have on hand, and there’s wiggle room to swap a few things if needed.
- For the Cake Layers:
- All-purpose flour (2 3/4 cups / 345g) – Gives the cake sturdy, soft texture
- Granulated sugar (1 3/4 cups / 350g) – Sweetens and tenderizes
- Baking powder (2 1/2 tsp) – For lift
- Baking soda (1/2 tsp) – Balances the acidity and helps rise
- Kosher salt (1/2 tsp) – Rounds out the flavors
- Unsalted butter, softened (1 cup / 226g) – Adds richness and moisture
- Egg whites (5 large) – For a fluffier, lighter crumb (save yolks for another recipe!)
- Lemon zest (2 tbsp, from 2 large lemons) – Fresh, zippy aroma
- Lemon juice (1/4 cup / 60ml) – Bright, tart flavor boost
- Buttermilk (1 cup / 240ml, room temp) – Tenderizes and adds a subtle tang; sub with milk + 1 tbsp lemon juice if needed
- Pure vanilla extract (2 tsp) – Just enough for warmth
- Fresh or frozen raspberries (1 1/4 cups / 160g, plus more for garnish) – For that real fruit flavor and color; I prefer frozen for price and consistency, but fresh works too
- Red or pink gel food coloring (optional, 1-2 drops per layer) – Only if you want a bolder ombre, but I usually skip it
- For the Cream Cheese Frosting:
- Cream cheese, block style, softened (16 oz / 450g) – Use full-fat for best texture
- Unsalted butter, softened (1/2 cup / 113g) – Makes it fluffy
- Powdered sugar (3 1/2–4 cups / 420–480g) – Adjust for sweet/tart balance
- Pure vanilla extract (1 1/2 tsp) – For depth
- Pinch of salt – Cuts the sweetness, trust me
- Lemon zest (1 tsp, optional) – Adds extra zing
- For Garnish (Optional but Fun):
- Fresh raspberries
- Lemon slices or twists
- Edible flowers (like pansies or violas)
- Sprinkles or colored sanding sugar
Ingredient Tips: For the best raspberry lemonade flavor, use real lemon juice and zest—don’t skimp! If you want gluten-free, swap with a 1:1 all-purpose gluten-free flour blend. Dairy-free? Use vegan butter and a coconut-based cream cheese. For the brightest color, frozen raspberries give the deepest pink (just thaw and drain first). And if you’re short on buttermilk, the milk + lemon juice trick works in a pinch—just let it sit for 5 minutes to curdle. I love using King Arthur flour and Philadelphia cream cheese for the most reliable results, but use what you love and have on hand.
Equipment Needed
- Three 8-inch (20cm) round cake pans (or two 9-inch, but layers will be thinner)
- Stand mixer or hand mixer – Makes creaming and whipping easy, but you can do it by hand with elbow grease
- Mixing bowls – At least two, for batching the batter and frosting
- Offset spatula – For smooth, swoopy frosting
- Bench scraper or long knife – To even out the sides (not required, but handy for neat edges)
- Parchment paper – Lining the pans makes layers pop out with zero sticking
- Cooling racks
- Fine mesh sieve – For sifting powdered sugar and straining raspberry puree if needed
- Zester or microplane – Makes zesting lemons way easier
If you don’t have three pans, bake in batches—just wash and re-grease the pans between rounds. I’ve used heavy-duty aluminum pans and simple nonstick ones; both work, but aluminum gives slightly more even browning. If you’re short on a mixer, whisking by hand is totally doable (I’ve been there after a kitchen move!). Just make sure your butter and cream cheese are really soft. Budget-friendly tools work perfectly—don’t stress about fancy gear. And always double-check your pan sizes to avoid overflow (learned that the messy way).
How to Make Raspberry Lemonade Ombre Layer Cake
- Prep Your Pans and Raspberries (10 minutes): Preheat the oven to 350°F (175°C). Grease three 8-inch (20cm) round cake pans and line the bottoms with parchment paper. Lightly flour the sides.
If using frozen raspberries, thaw and drain them; then mash with a fork or puree with a stick blender. Set aside. - Mix Dry Ingredients (5 minutes): In a large bowl, whisk together the flour, baking powder, baking soda, and salt. Set aside.
- Cream Butter and Sugar (4 minutes): In a stand mixer (or using a hand mixer), beat the softened butter and sugar on medium-high speed until pale and fluffy—about 3–4 minutes. Scrape down the bowl as needed.
- Add Egg Whites & Flavorings (3 minutes): Beat in the egg whites, one at a time, mixing well after each. Add lemon zest, lemon juice, and vanilla extract. Don’t worry if it looks a little curdled—once the flour goes in, it smooths out.
- Combine Wet & Dry (3 minutes): With the mixer on low, alternate adding the flour mixture and buttermilk. Start and end with flour (three additions flour, two of buttermilk). Mix just until combined—don’t overmix or the cake gets tough.
- Color and Flavor the Batter (10 minutes): Divide the batter evenly into three bowls (about 1 1/2 cups / 350g each).
- Bowl 1 (Lemon): Leave as-is for the pale yellow base.
- Bowl 2 (Light Raspberry): Add 1/3 of the mashed raspberry to this bowl. Mix gently for a soft pink hue.
- Bowl 3 (Deep Raspberry): Add the remaining raspberry puree to this bowl. Mix for a deeper pink. For a more dramatic ombre, add a drop or two of gel food coloring—totally optional.
- Bake the Layers (25–28 minutes): Spread each batter into its prepared pan and smooth the tops. Bake for 25–28 minutes, rotating halfway, until a toothpick inserted in the center comes out clean.
Tip: If your oven bakes unevenly, switch the pans’ positions at the halfway mark. - Cool Completely (1–1.5 hours): Let cakes cool in pans for 10 minutes, then run a knife around the edges and turn onto racks. Peel off parchment and let cool fully before frosting—otherwise, the frosting melts and slides.
- Make the Cream Cheese Frosting (10 minutes): Beat softened cream cheese and butter together until creamy and smooth, about 2–3 minutes. Sift in powdered sugar, add vanilla, lemon zest (if using), and a pinch of salt. Beat until fluffy and thick, scraping down as needed.
- Assemble the Cake (20 minutes): Place the pale lemon layer on your cake stand. Spread a generous layer of frosting on top. Add the light raspberry layer, more frosting, then the deep raspberry layer on top.
Frost the sides and top with the remaining frosting. Use an offset spatula for swoops and swirls.
Efficiency tip: Chill layers in the fridge for 10 minutes before stacking for less crumb fallout. - Decorate (5–10 minutes): Top with fresh raspberries, lemon slices, edible flowers, or sprinkles. Get creative—there’s no wrong way!
Troubleshooting: If layers dome, trim with a serrated knife to even them out. If the frosting’s too soft, chill it for 10–15 minutes and beat again. And if you get crumbs in your frosting, do a “crumb coat”—a thin layer to seal crumbs, then chill, then finish with a pretty outer layer.
Pro Tips & Techniques for the Perfect Ombre Cake
- Room Temperature Ingredients: Always use room temp butter, eggs, and buttermilk. Cold ingredients won’t blend smoothly, and you’ll get lumps in your batter or frosting—a rookie mistake I’ve made more than once.
- Don’t Overmix: Just mix until the flour disappears. Overmixing makes cakes dense and tough. When in doubt, stop and gently fold by hand.
- Sift Your Sugar: For ultra-smooth frosting, sift your powdered sugar. I tried skipping this once, and the frosting was a bit gritty—lesson learned!
- Chill for Clean Slices: If you want those picture-perfect ombre layers, chill the whole frosted cake for at least an hour before slicing. It makes a world of difference.
- Prevent Sticking: Lining pans with parchment is a must. I’ve lost a layer to a sticky pan before, and it’s heartbreaking (but easily fixable with extra frosting if disaster strikes).
- Even Layers: Use a kitchen scale to divide batter evenly. If you don’t have one, use a measuring cup and eyeball it. Uneven layers still taste great, but the ombre effect pops more when they’re uniform.
- Multitasking: While layers bake, make your frosting and prep garnishes. It saves time and makes the assembly smoother.
- Fixing Dry Cake: If your cake bakes a little too long and gets dry, brush each layer with a simple syrup (equal parts sugar and water, boiled and cooled) before frosting.
And if your ombre doesn’t turn out “perfect,” don’t sweat it. The homemade look is charming, and the flavors shine through no matter what. After a few tries, you’ll get a feel for your favorite color fades and flavor balance—it’s part of the fun!
Variations & Adaptations
- Gluten-Free Ombre Cake: Substitute a good 1:1 gluten-free flour blend for all-purpose. I love Bob’s Red Mill for reliable texture. The cake turns out just as fluffy and tender.
- Dairy-Free Version: Use vegan butter and a coconut-based cream cheese for the frosting. Swap buttermilk for unsweetened almond milk with a tablespoon of lemon juice. The result is still zippy and delicious—just a tad different in richness.
- Flavor Twists: Try swapping raspberries for strawberries or blackberries for a different fruity pop. In winter, use frozen fruit for the best flavor and color. Not a fan of lemon? Use orange zest and juice instead for a “creamsicle” vibe.
- Single-Layer or Cupcake Version: Bake all the batter in a 9×13-inch pan for a sheet cake, or scoop into lined muffin tins for ombre cupcakes (bake 16–20 minutes). They’re adorable and easy to serve at parties.
- Allergen Adaptations: If eggs are an issue, use a commercial egg replacer or try 1/4 cup applesauce per egg white. The cake will be a bit denser, but still moist and flavorful.
One of my favorite tweaks: I once added a layer of raspberry jam between the cakes for extra tartness. It was a hit! Don’t be afraid to play around with extracts, fillings, or even a hint of almond flavor for a bakery-style twist. The colors and flavors are yours to customize—make it your own!
Serving & Storage Suggestions
This raspberry lemonade ombre layer cake is best served slightly chilled or at cool room temperature. The frosting firms up in the fridge, giving those layers that sharp, pretty definition when you slice. For a showy presentation, pile on fresh raspberries, scatter lemon zest curls, and maybe throw on a few edible flowers—your cake will look straight out of a bakery window.
Pair slices with iced tea, lemonade, or a crisp glass of sparkling wine for a true summer treat. For brunch, I’ll sometimes serve it with a dollop of whipped cream and a handful of berries on the side.
- Refrigerate: Store the frosted cake in an airtight container in the fridge for up to 4 days. The flavors actually get more pronounced overnight (I think day two is the best!).
- Freezer-Friendly: You can freeze unfrosted cake layers, well wrapped, for up to 2 months. Thaw at room temp before assembling.
- Reheating: No need to reheat, but if you want a softer texture, let a slice come to room temp for 15–20 minutes before serving.
Flavor Note: The lemon and raspberry flavors deepen as the cake sits. Sometimes I sneak a slice for breakfast the next day—no regrets. And if you’re bringing it to a party, assemble and decorate the day before. It travels well and always gets rave reviews!
Nutritional Information & Benefits
This raspberry lemonade ombre layer cake, sliced into 12 pieces, clocks in at roughly 420 calories per serving. Each slice offers about 5g protein, 18g fat, and 60g carbs. You get a boost of vitamin C from the fresh raspberries and lemons, plus a little calcium from the cream cheese.
The recipe is nut-free as written (check your flour brand), and you can make it gluten- or dairy-free with the swaps above. The frosting does contain dairy and the cake uses eggs, so keep that in mind for allergies.
From a wellness perspective, I love how this cake delivers real fruit flavor without loads of artificial stuff. Raspberries bring antioxidants, and the brightness of lemon is a real mood-booster. It’s a treat, for sure, but it feels like a celebration of summer (and sometimes, that’s good for the soul).
Conclusion
This raspberry lemonade ombre layer cake with cream cheese frosting isn’t just a recipe—it’s an experience. From the first burst of lemon to the last swipe of tangy frosting, it’s pure happiness on a plate. The ombre effect is surprisingly doable, the flavors are bold, and the whole cake just screams “celebration.”
Don’t be afraid to riff on this recipe—swap berries, play with fillings, or add your own twist. I’ve lost count of how many times I’ve baked it for friends, and it never fails to bring joy (and the occasional happy tear). If you try this cake, I’d love to hear how it turns out—leave a comment, share your photos, or tell me about your creative spin. Here’s to baking something beautiful and delicious—no special occasion required!
Frequently Asked Questions
How do I achieve the perfect ombre effect in my cake layers?
Divide your batter evenly, then gradually add more raspberry puree (and a touch of food coloring, if you want) to each bowl for progressively deeper hues. Mixing gently prevents overmixing and keeps the layers light. Even if it’s not “perfect,” the homemade look is always beautiful!
Can I use frozen raspberries instead of fresh for this recipe?
Absolutely! Thaw and drain frozen raspberries before pureeing or mashing. They actually give a bolder pink color and tangier flavor, which is great for the ombre effect.
How far in advance can I make this raspberry lemonade ombre layer cake?
You can bake the cake layers up to two days ahead (wrap tightly and refrigerate), and frost the cake the day before serving. The flavors meld and the cake slices even cleaner after chilling overnight.
What’s the best way to store leftover cake?
Keep the cake in an airtight container in the fridge for up to four days. You can also freeze unfrosted layers for up to two months. Let slices come to room temp before serving for best flavor.
Is there a way to make this cake gluten-free or dairy-free?
Yes! Use a 1:1 gluten-free flour blend instead of all-purpose, vegan butter and cream cheese, and plant-based milk with lemon juice for the buttermilk. The cake will still be moist, zippy, and absolutely delicious.
PrintRaspberry Lemonade Ombre Layer Cake
This show-stopping ombre layer cake features soft, sunset-pink layers that fade from lemon yellow to deep raspberry, all wrapped in a dreamy cream cheese frosting. Bursting with real fruit flavor and playful color, it’s perfect for birthdays, brunches, or any celebration.
- Prep Time: 40 minutes
- Cook Time: 28 minutes
- Total Time: 2 hours 30 minutes
- Yield: 12 servings 1x
- Category: Dessert
- Cuisine: American
Ingredients
- 2 3/4 cups (345g) all-purpose flour
- 1 3/4 cups (350g) granulated sugar
- 2 1/2 teaspoons baking powder
- 1/2 teaspoon baking soda
- 1/2 teaspoon kosher salt
- 1 cup (226g) unsalted butter, softened
- 5 large egg whites
- 2 tablespoons lemon zest (from 2 large lemons)
- 1/4 cup (60ml) lemon juice
- 1 cup (240ml) buttermilk, room temperature (or milk + 1 tablespoon lemon juice)
- 2 teaspoons pure vanilla extract
- 1 1/4 cups (160g) fresh or frozen raspberries, plus more for garnish
- Red or pink gel food coloring (optional, 1-2 drops per layer)
- 16 ounces (450g) cream cheese, block style, softened
- 1/2 cup (113g) unsalted butter, softened
- 3 1/2–4 cups (420–480g) powdered sugar
- 1 1/2 teaspoons pure vanilla extract
- Pinch of salt
- 1 teaspoon lemon zest (optional)
- Fresh raspberries (for garnish)
- Lemon slices or twists (for garnish)
- Edible flowers (like pansies or violas, for garnish)
- Sprinkles or colored sanding sugar (for garnish)
Instructions
- Preheat oven to 350°F (175°C). Grease three 8-inch round cake pans and line bottoms with parchment paper. Lightly flour the sides.
- If using frozen raspberries, thaw and drain them; mash with a fork or puree. Set aside.
- In a large bowl, whisk together flour, baking powder, baking soda, and salt. Set aside.
- In a stand mixer or with a hand mixer, beat softened butter and sugar on medium-high until pale and fluffy, about 3–4 minutes. Scrape down the bowl as needed.
- Beat in egg whites one at a time, mixing well after each. Add lemon zest, lemon juice, and vanilla extract. Mixture may look curdled.
- With mixer on low, alternate adding flour mixture and buttermilk, starting and ending with flour (three additions flour, two of buttermilk). Mix just until combined.
- Divide batter evenly into three bowls (about 1 1/2 cups each).
- Bowl 1: Leave as-is for pale yellow base.
- Bowl 2: Add 1/3 of the mashed raspberry to this bowl. Mix gently for a soft pink hue.
- Bowl 3: Add remaining raspberry puree to this bowl. Mix for a deeper pink. Add gel food coloring if desired.
- Spread each batter into prepared pans and smooth tops. Bake 25–28 minutes, rotating halfway, until a toothpick comes out clean.
- Let cakes cool in pans for 10 minutes, then run a knife around edges and turn onto racks. Peel off parchment and cool completely.
- For frosting: Beat softened cream cheese and butter together until creamy and smooth, about 2–3 minutes. Sift in powdered sugar, add vanilla, lemon zest (if using), and salt. Beat until fluffy and thick.
- To assemble: Place pale lemon layer on cake stand. Spread a generous layer of frosting. Add light raspberry layer, more frosting, then deep raspberry layer on top. Frost sides and top with remaining frosting.
- Decorate with fresh raspberries, lemon slices, edible flowers, or sprinkles as desired.
- Chill cake for at least 1 hour before slicing for clean layers.
Notes
For best results, use room temperature ingredients and real lemon juice/zest. Sift powdered sugar for smooth frosting. Chill cake before slicing for clean ombre layers. To make gluten-free, use a 1:1 gluten-free flour blend. For dairy-free, use vegan butter and coconut-based cream cheese. Cake layers can be baked ahead and frozen. If cake is dry, brush layers with simple syrup before frosting.
Nutrition
- Serving Size: 1 slice (1/12 of cake)
- Calories: 420
- Sugar: 38
- Sodium: 320
- Fat: 18
- Saturated Fat: 11
- Carbohydrates: 60
- Fiber: 2
- Protein: 5
Keywords: raspberry lemonade cake, ombre layer cake, cream cheese frosting, summer dessert, birthday cake, fruit cake, lemon raspberry cake, easy layer cake, party cake, pink cake