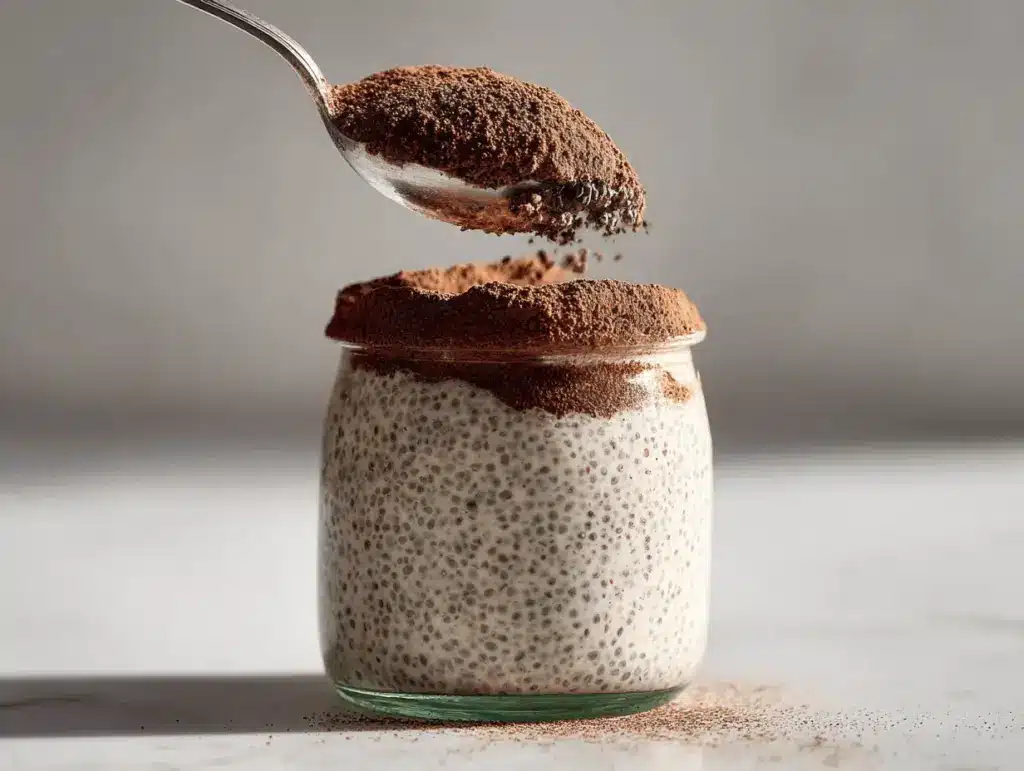
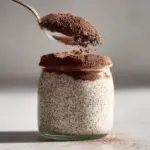
The first spoonful of this tiramisu chia pudding always surprises me—velvety, coffee-kissed, a hint of cocoa, all layered in a jar that looks almost too pretty to eat. It’s got that classic tiramisu flavor, but in a healthy, sugar-free package you can whip up for breakfast, dessert, or anytime those cravings hit (honestly, I’ve had it for lunch, too—no judgment!).
This recipe was born out of my late-night tiramisu cravings, but with zero patience for baking and a healthy kick to keep my energy up. Instead of ladyfingers and mascarpone, I reached for chia seeds and plant-based milk, and—wow—it was love at first bite. I’ve tinkered with this tiramisu chia pudding more times than I can count, testing every combination of sweeteners, layers, and toppings. The result? A creamy, dreamy treat that’s good for you but feels totally indulgent.
Whether you’re a meal-prep maven, a busy parent, or just looking to fix your sweet tooth without the sugar crash, this tiramisu chia pudding is about to become your new go-to. It’s easy to make ahead, perfect for breakfast-on-the-go, and—let’s face it—gorgeous enough for your prettiest Pinterest board. (Plus, it’s packed with fiber, healthy fats, and protein, so you can feel good about every bite.)
As someone who’s tried countless healthy desserts (with mixed results), I can confidently say this one is a winner. If you love the flavors of coffee, cocoa, and a rich, creamy texture, you’ll adore this easy tiramisu chia pudding. Ready to make your spoon (and your heart) happy?
Why You’ll Love This Tiramisu Chia Pudding
- Quick & Easy: You only need about 10 minutes of hands-on time, then let the fridge do the work. Perfect for meal preppers or last-minute dessert emergencies.
- Simple Ingredients: No fancy equipment or hard-to-find groceries here—just chia seeds, plant-based milk, coffee, and a few pantry staples.
- Healthy & Sugar-Free: Naturally sweetened with your choice of monk fruit, stevia, or maple syrup (if you’re not strictly sugar-free), this recipe is friendly for keto, low-carb, and gluten-free diets.
- Creamy, Dreamy Texture: Blending the chia pudding base gives you that mascarpone-style silkiness, while the coffee layer adds the authentic tiramisu vibe.
- Perfect for Any Occasion: Dress it up in jars for brunch, serve it in a trifle for parties, or stash it in the fridge for a healthy afternoon pick-me-up.
- Crowd-Pleaser: Even my skeptical friends and family (who usually side-eye anything “healthy”) ask for seconds. It’s kid-approved, too—just skip the coffee layer for little ones.
This isn’t just another chia pudding recipe—it’s my best version, with all the flavor of classic tiramisu but none of the fuss or refined sugar. My not-so-secret trick? Blending the pudding base until it’s ultra-smooth, then layering with a rich, coffee-infused “soak.” It’s comfort food, reimagined for real life—healthier, faster, but still 100% soul-soothing.
There’s something so satisfying about digging your spoon through those creamy layers and getting that hit of cocoa and coffee, all while knowing you’re fueling your body with something good. This tiramisu chia pudding is proof you don’t have to give up dessert to eat well. It’s the kind of treat that makes you close your eyes and savor every bite—no guilt, just pure joy.
What Ingredients You Will Need
This tiramisu chia pudding recipe uses easy, wholesome ingredients you probably already have at home. Nothing fancy, just pure flavor and creamy texture—plus, everything’s easy to swap if you’re dealing with allergies or special diets.
- Chia Seeds: The star! These tiny seeds magically thicken the pudding and add loads of fiber and omega-3s. I like using black chia seeds for the classic look, but white work, too.
- Milk of Choice: Almond, oat, coconut, or dairy—use whatever you love. For creaminess, I recommend canned coconut milk or a rich almond milk (homemade if you’re feeling fancy!).
- Greek Yogurt or Coconut Yogurt: This adds the “mascarpone” tang and creamy body. I love using unsweetened Greek yogurt for extra protein, but coconut yogurt keeps it dairy-free and vegan.
- Coffee or Espresso: Strongly brewed coffee or a shot of espresso gives that authentic tiramisu flavor. Decaf works if you’re caffeine-sensitive—or skip for a kid-friendly version.
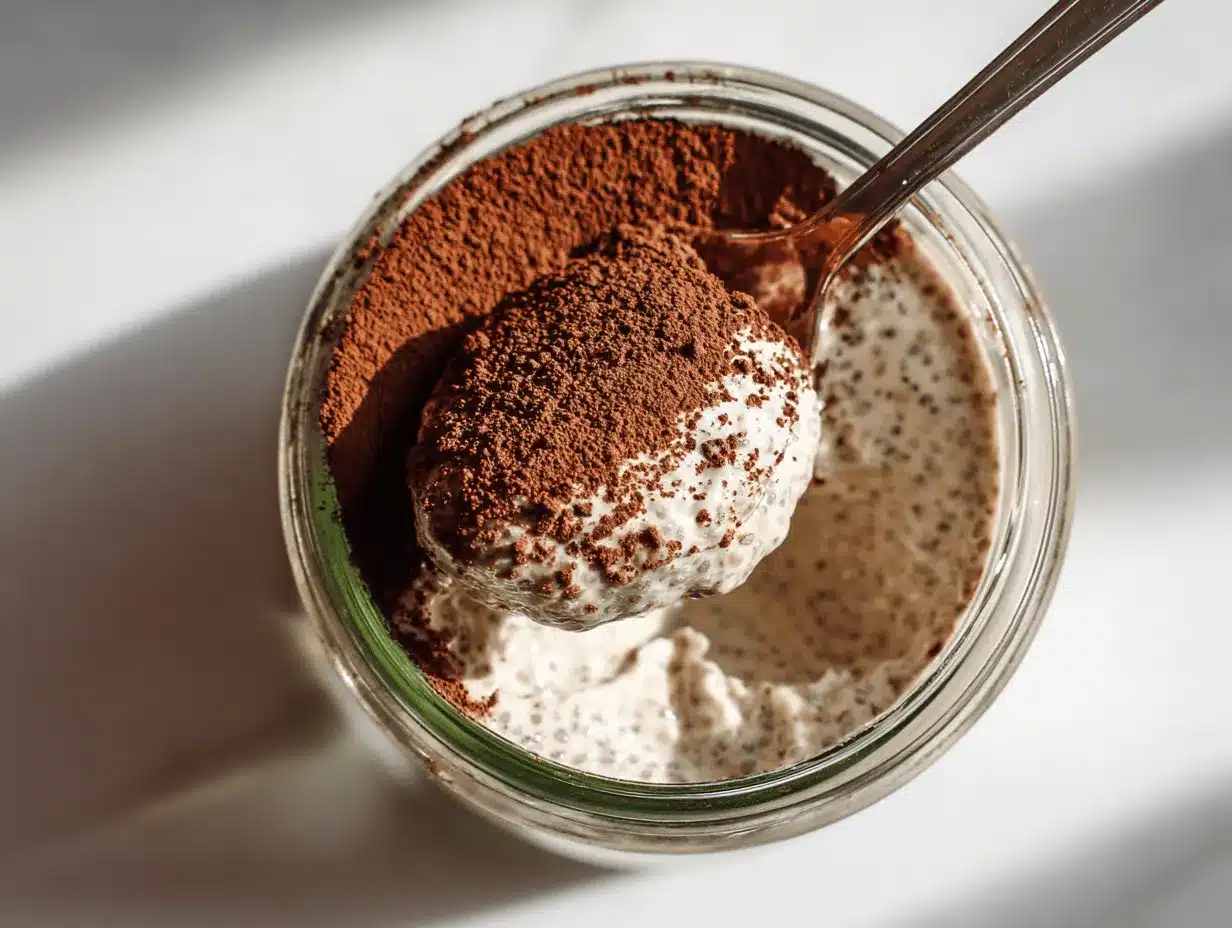
- Cocoa Powder: Dutch-processed or regular unsweetened cocoa works. Sift it over the top for that classic tiramisu finish!
- Sweetener: Monk fruit, stevia, erythritol, or maple syrup—all work here. Adjust to your sweetness preference. I usually use monk fruit for a sugar-free option.
- Vanilla Extract: Adds warmth and that dessert-like depth. Real vanilla is best, but imitation works in a pinch.
- Pinch of Salt: Don’t skip this! A tiny bit of salt brings all the flavors together (I learned this from messing up a batch once—never again!).
Optional Toppings and Mix-Ins:
- Mini Chocolate Chips or Shavings: For a pretty finish and extra chocolatey bite. Use sugar-free if you’re keeping it low-carb.
- Coconut Whipped Cream: Swirl a dollop on top for a bakery-worthy look.
- Fresh Berries: Not traditional, but a handful of raspberries or strawberries adds a lovely tang.
- Chopped Nuts: Pistachios or hazelnuts for crunch (I sometimes throw these in for extra texture).
Substitutions & Notes:
- Use oat milk for a nut-free version, or soy milk for more protein.
- If you’re avoiding dairy, stick to coconut or almond yogurt.
- For a chocolate twist, add a tablespoon of cocoa to the chia pudding base.
- Make it extra-rich by stirring in a bit of cashew butter (just trust me!).
Whether you want to keep it classic or play with flavors, these ingredients make this tiramisu chia pudding endlessly adaptable. Don’t be afraid to swap and experiment—half the fun is making it your own!
Equipment Needed
- Mixing Bowl: For stirring together the chia pudding base. Any medium-sized bowl will do; I sometimes use a big measuring cup for easy pouring.
- Whisk or Spoon: A whisk helps break up the chia clumps (trust me, it’s worth the extra 30 seconds). A fork or spoon works in a pinch.
- Blender or Food Processor (Optional): For super-smooth pudding, blend the base after chilling—game changer if you want that classic tiramisu creaminess.
- Measuring Cups & Spoons: For accuracy. I’ve definitely eyeballed it before, but measuring gives the best texture.
- Serving Jars or Glasses: Mason jars, cocktail glasses, or even little ramekins—anything clear shows off those pretty layers.
- Fine Mesh Sieve (Optional): To dust cocoa powder evenly over the top. If you don’t have one, use a small tea strainer or just sprinkle with your fingers.
No fancy equipment required—just the basics. If you’re on a budget, skip the blender and leave the pudding a little textured. For travel or meal-prep, I love using small glass jars with lids (they’re reusable and look cute in the fridge). My only real tip here is to wash your tools right away—chia can stick if you let it dry!
How to Make Tiramisu Chia Pudding
-
Mix the Chia Pudding Base:
- In a medium bowl, combine 1/3 cup (50g) chia seeds, 1 1/2 cups (360ml) milk of choice, 1/2 cup (120g) Greek or coconut yogurt, 1–2 tablespoons (15–30ml) sweetener, 1 teaspoon (5ml) vanilla extract, and a pinch of salt.
- Whisk well for 30–60 seconds, making sure all seeds are evenly distributed. The mixture should look loose—don’t worry, it thickens as it sits.
Tip: If you see clumps forming, use the back of your spoon to break them up. I once made the mistake of skipping the whisk—ended up with a lumpy mess!
-
Chill and Thicken:
- Cover and refrigerate for 2–3 hours (or overnight). The chia seeds will absorb the liquid and turn pudding-like.
- After 30 minutes, give the mixture another good stir to prevent clumping.
Sensory cue: It should look glossy and jiggle a little when set.
-
Blend for Creaminess (Optional but Recommended):
- For that signature tiramisu smoothness, transfer the chilled pudding to a blender or food processor. Blend for 30–45 seconds until silky.
Note: You can skip this step for a more traditional chia texture—up to you!
-
Prepare the Coffee Soak:
- Brew 1/2 cup (120ml) strong coffee or espresso. Let it cool completely.
- Stir in a teaspoon of sweetener and a dash of vanilla if you like it sweet.
Warning: Hot coffee will melt the pudding. Cool it first!
-
Layer the Pudding:
- Spoon half the chia pudding into serving jars.
- Drizzle a tablespoon (15ml) of coffee soak over each layer.
- Add the remaining pudding on top. Repeat with another drizzle of coffee, then finish with a dusting of cocoa powder (use a sieve for a light, even layer).
Personal tip: I love making mini trifles with three or four alternating layers for extra drama!
-
Chill (Again) and Serve:
- Let the assembled jars chill for at least 30 minutes more—this helps the flavors meld and the layers set.
- Just before serving, add toppings: chocolate shavings, coconut whip, berries, or nuts.
Final check: The pudding should look creamy, with distinct coffee and cocoa layers.
Troubleshooting: If your pudding is too runny, add 1–2 more tablespoons of chia seeds, then chill for another hour. Too thick? Stir in a splash more milk. You’ll get the hang of it after your first batch—promise!
Cooking Tips & Techniques
- Blend for the Best Texture: Blending after chilling takes this tiramisu chia pudding from “good” to “can’t-stop-eating.” I learned this after years of eating chunky chia—now I always blend for that classic tiramisu mouthfeel.
- Don’t Rush the Chilling: Chia seeds need time to work their magic. If you’re impatient like me, a quick stir at the 30-minute mark helps, but overnight is best for full creaminess and flavor.
- Layer With Care: For those Insta-worthy layers, spoon pudding carefully against the glass, then drizzle coffee on top. Tilt the jar a little for dramatic stripes!
- Experiment With Sweeteners: Not all sugar substitutes are created equal. Taste as you go, since some (like stevia) can be more potent or have aftertastes.
- Prep Ahead: This dessert keeps well for up to 4 days, so double the batch for easy breakfasts or snacks. I’ve even packed it for road trips (it travels like a champ in screw-top jars).
- Skip the Cocoa Until Serving: If you add cocoa powder too early, it can get soggy—dust it on right before eating for the best look and flavor.
Watch out for watery pudding (usually from not enough chia or too much liquid) and adjust as needed. If you’re multitasking, set a timer for the chill—otherwise, you’ll forget it in the fridge (guilty as charged). The more you make this recipe, the more you’ll perfect your own method. Don’t be afraid to play around!
Variations & Adaptations
- Vegan Tiramisu Chia Pudding: Use coconut or almond yogurt and plant-based milk. Make sure your sweetener and chocolate are vegan, too.
- High-Protein Version: Add a scoop of vanilla or unflavored protein powder to the pudding base. You may need to add a bit more milk to keep the texture right.
- Mocha Chia Pudding: Stir a tablespoon of cocoa powder into the base for a rich mocha flavor—perfect for chocolate lovers.
- Nut-Free Option: Choose oat or coconut milk and avoid nut toppings. Sunflower seed butter adds creaminess if you want that extra richness.
- Kid-Friendly: Skip the coffee layer and replace it with extra cocoa or a berry compote for a caffeine-free, sweet treat.
Personal twist: I sometimes swirl a spoonful of cashew butter into the base before layering—adds a subtle nutty note that’s just heavenly.
This recipe is so forgiving, you can customize it for almost any dietary need or flavor craving. Swap, mix, and match until you find your perfect combo. That’s half the fun!
Serving & Storage Suggestions
Serving: This tiramisu chia pudding is best served chilled, straight from the fridge. I love layering it in small glass jars or dessert cups—show off those beautiful stripes! Dust with cocoa powder, then add a swirl of coconut whip or a sprinkle of chocolate shavings for a real “wow” factor.
Pairings: Serve with hot espresso, a frothy cappuccino, or a glass of almond milk. For a brunch spread, pair with fresh berries and a light frittata.
Storage: Store covered in the fridge for up to 4 days. The flavors deepen over time, and the pudding gets creamier by day two. If you’re making ahead, add cocoa powder and toppings just before serving so they stay fresh.
Freezing: This pudding can be frozen, but the texture may change slightly when thawed. Freeze in airtight containers and thaw overnight in the fridge for best results.
Reheating: No need! Enjoy it cold. If it thickens too much in the fridge, stir in a splash more milk before serving.
Honestly, it’s hard to let these sit—they tend to disappear fast in my house. But if you manage to save some, the leftovers make a perfect grab-and-go breakfast or snack.
Nutritional Information & Benefits
This tiramisu chia pudding isn’t just delicious—it’s packed with nutrition that’ll keep you feeling good.
- Estimated Nutrition (per serving, with almond milk & monk fruit): 220 kcal, 8g protein, 10g fiber, 7g net carbs, 10g healthy fats
- Key Benefits: Chia seeds are loaded with fiber and omega-3s for heart and brain health; Greek yogurt (or non-dairy equivalent) adds protein and probiotics; unsweetened cocoa is rich in antioxidants.
- Dietary Notes: Gluten-free, sugar-free, vegan- and keto-adaptable
- Potential Allergens: Nuts (if using nut milks or toppings), dairy (if using Greek yogurt—swap for coconut or almond yogurt to avoid)
Speaking as someone who’s always looking for desserts that actually fit my wellness goals, this pudding delivers. It satisfies my sweet tooth and keeps me full for hours—no sugar crash, just pure comfort.
Conclusion
If you love tiramisu but want something lighter, healthier, and way easier, this tiramisu chia pudding is calling your name. It’s creamy, coffee-infused, and utterly crave-worthy—yet it fits into almost any diet or routine. I keep coming back to this recipe because it checks every box: fast, foolproof, and full of flavor.
Don’t hesitate to tweak the layers, swap ingredients, or add your own personal spin. The beauty of chia pudding is how forgiving (and fun) it is. Trust me, once you try it, you’ll want to make it again and again.
Give this irresistible tiramisu chia pudding a shot and let me know how it goes! Comment below with your favorite variation, share the recipe with your friends, or tag me in your Pinterest creations. Here’s to eating dessert whenever you want—no guilt, just joy.
FAQs About Tiramisu Chia Pudding
Can I make tiramisu chia pudding ahead of time?
Absolutely! It actually gets creamier as it sits in the fridge. Make it 1–2 days ahead for best results—just add toppings before serving.
Is this recipe really sugar-free?
Yes, if you use monk fruit, stevia, or erythritol as your sweetener. If you prefer, you can use maple syrup or honey, but it won’t be sugar-free.
Can I skip the coffee layer?
Of course! For a caffeine-free or kid-friendly version, skip the coffee and use extra cocoa powder or a berry puree for layering.
Why is my chia pudding runny?
This usually means not enough chia or not enough chilling time. Add another tablespoon of chia seeds and chill for another hour—it should thicken right up.
Can I freeze tiramisu chia pudding?
Yes—you can freeze it in airtight jars. Thaw overnight in the fridge. The texture may change a bit, but it’ll still taste delicious!
PrintTiramisu Chia Pudding
This easy, healthy, and sugar-free tiramisu chia pudding delivers all the classic flavors of tiramisu in a creamy, no-bake, make-ahead treat. Perfect for breakfast, dessert, or a snack, it’s packed with fiber, protein, and healthy fats.
- Prep Time: 10 minutes
- Cook Time: 0 minutes
- Total Time: 3 hours 10 minutes
- Yield: 2–3 servings 1x
- Category: Dessert
- Cuisine: Italian-inspired
Ingredients
- 1/3 cup (50g) chia seeds
- 1 1/2 cups (360ml) milk of choice (almond, oat, coconut, or dairy)
- 1/2 cup (120g) Greek yogurt or coconut yogurt
- 1–2 tablespoons (15–30ml) sweetener (monk fruit, stevia, erythritol, or maple syrup)
- 1 teaspoon (5ml) vanilla extract
- Pinch of salt
- 1/2 cup (120ml) strong brewed coffee or espresso, cooled
- 1 teaspoon sweetener (for coffee soak, optional)
- Dash of vanilla extract (for coffee soak, optional)
- Unsweetened cocoa powder, for dusting
- Optional toppings: mini chocolate chips or shavings, coconut whipped cream, fresh berries, chopped nuts
Instructions
- In a medium bowl, combine chia seeds, milk of choice, Greek or coconut yogurt, sweetener, vanilla extract, and a pinch of salt.
- Whisk well for 30–60 seconds to evenly distribute the chia seeds. The mixture will look loose.
- Cover and refrigerate for 2–3 hours (or overnight) until thickened, stirring again after 30 minutes to prevent clumping.
- For a creamier texture, blend the chilled pudding in a blender or food processor for 30–45 seconds until silky (optional).
- Brew the coffee or espresso and let it cool completely. Stir in a teaspoon of sweetener and a dash of vanilla if desired.
- To assemble, spoon half the chia pudding into serving jars. Drizzle a tablespoon of coffee soak over each layer.
- Add the remaining pudding on top. Repeat with another drizzle of coffee, then dust with cocoa powder using a sieve.
- Chill the assembled jars for at least 30 minutes more to set the layers.
- Just before serving, add desired toppings such as chocolate shavings, coconut whip, berries, or nuts.
Notes
For best texture, blend the pudding after chilling. Adjust sweetness to taste and use your preferred milk and yogurt for dietary needs. The pudding thickens as it chills; if too runny, add more chia seeds and chill longer. Add cocoa powder and toppings just before serving for best results. Keeps well in the fridge for up to 4 days.
Nutrition
- Serving Size: About 1 cup
- Calories: 220
- Sugar: 2
- Sodium: 120
- Fat: 10
- Saturated Fat: 3
- Carbohydrates: 17
- Fiber: 10
- Protein: 8
Keywords: tiramisu chia pudding, healthy tiramisu, sugar-free dessert, chia pudding, vegan tiramisu, keto tiramisu, gluten-free dessert, meal prep breakfast, no-bake dessert, high protein pudding