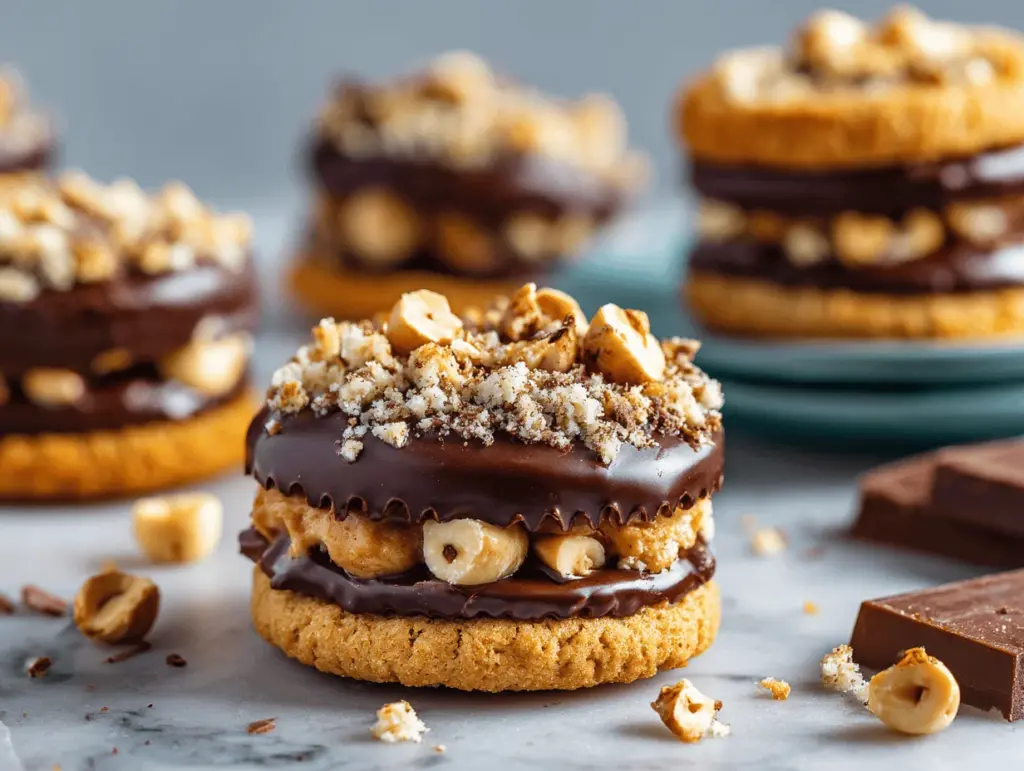
You know that moment when you bite into a cookie and you’re instantly transported to dessert heaven? That’s exactly what happened the first time I made these Chocolate Hazelnut Crunch Stuffed Cookie Sandwiches. The aroma alone—rich chocolate mingling with toasted hazelnuts—filled my kitchen and had my kids circling like hungry little sharks. Honestly, I created this recipe out of pure craving for something that combined gooey chocolate, nutty crunch, and a little hint of nostalgia (think Ferrero Rocher meets bakery-style cookies).
Let’s face it: regular cookies are great, but when you stuff them with creamy chocolate hazelnut spread and crunchy bits, well, they become legendary. I’ve baked these Chocolate Hazelnut Crunch Cookies more times than I care to admit—once for a bake sale, another time for a birthday party, and more than a few times just because the mood struck. Each time, they vanished in minutes. My family now refers to them as “those sandwich cookies,” and they’re constantly requested for special occasions (and random Tuesday nights).
This recipe is perfect for anyone who loves a little extra indulgence. Whether you’re baking for picky kids, chocolate fanatics, or just want to treat yourself, these cookie sandwiches deliver. They’re made with simple ingredients, but the final result looks and tastes like something straight out of a fancy bakery. Plus, they’re surprisingly easy to assemble. As someone who’s tested dozens of cookie recipes, I promise these are worth every bite. If you’re searching for a chocolate hazelnut dessert that’s both easy and impressive, Chocolate Hazelnut Crunch Cookies are your answer.
Why You’ll Love This Recipe
- Quick & Easy: These Chocolate Hazelnut Crunch Cookies come together in about 40 minutes, making them ideal for busy evenings or spontaneous dessert cravings.
- Simple Ingredients: No need to hunt down fancy stuff—everything you need is likely in your pantry or just a quick store run away.
- Perfect for Special Occasions: These cookie sandwiches shine at birthday parties, holiday gatherings, and cozy weekends. They look impressive yet are totally doable for home bakers.
- Crowd-Pleaser: I’ve made these for adults and kids alike, and there’s always that magical silence as everyone takes their first bite (followed by the inevitable “Can I have another?”).
- Unbelievably Delicious: The combo of chewy chocolate cookies, creamy hazelnut filling, and crunchy bits is just—well, next level.
What truly sets this recipe apart is the stuffed sandwich technique. Instead of just spreading hazelnut cream on top, you get a gooey center that oozes with every bite. Plus, the crunch from toasted hazelnuts tucked inside gives a texture that’s simply addictive. I’ve experimented with different brands of chocolate hazelnut spread (Nutella works great, but some store brands hold up equally well), and even tried swapping in chopped pretzels for extra crunch—each variation has its own charm.
If you’re anything like me, you crave desserts that make you feel a little nostalgic but also a bit spoiled. These cookies are exactly that—they’re comfort food with a playful twist. They bring people together, spark conversations, and honestly, they’re just plain fun to eat. Whether you want to wow your friends or just treat yourself, these Chocolate Hazelnut Crunch Cookies are the recipe you’ll come back to again and again.
What Ingredients You Will Need
This recipe uses straightforward, delicious ingredients that work together to create gorgeous and irresistible Chocolate Hazelnut Crunch Cookies. Most are pantry staples, but I’ll include my favorite tips for getting the best flavor and texture.
- For the Cookie Dough:
- 1 cup (225g) unsalted butter, softened (adds rich flavor and chew)
- 1 cup (200g) brown sugar, packed (for moisture and depth)
- 1/2 cup (100g) granulated sugar
- 2 large eggs, room temperature
- 2 teaspoons vanilla extract (I love Nielsen-Massey for this)
- 2 1/2 cups (310g) all-purpose flour (King Arthur is my go-to for cookies)
- 1/2 cup (45g) unsweetened cocoa powder (Dutch-process if you want deeper chocolate flavor)
- 1 teaspoon baking soda
- 1/2 teaspoon salt
- For the Crunchy Filling:
- 1 cup (170g) chocolate hazelnut spread (Nutella or your favorite brand)
- 1/2 cup (60g) toasted hazelnuts, roughly chopped (adds the perfect crunch)
- 1/3 cup (50g) mini chocolate chips (optional, for extra gooeyness inside)
- For Assembly & Garnish:
- Sea salt flakes (optional, for sprinkling on top)
- Extra chopped hazelnuts (for rolling the edges—looks pretty and adds crunch)
If you’re gluten-free, swap the all-purpose flour for a 1:1 gluten-free blend (like Bob’s Red Mill). Dairy-free? Use a vegan butter substitute, and check your chocolate hazelnut spread for hidden dairy. Toasting hazelnuts is key—just pop them in the oven at 350°F (175°C) for 8 minutes, then rub off the skins with a clean towel. You can substitute almonds or pecans if hazelnuts aren’t your thing, but honestly, hazelnuts make these cookies sing.
Equipment Needed
- Electric Mixer: Stand or hand mixer for creaming butter and sugars (a wooden spoon can work, but it’s a workout!)
- Mixing Bowls: At least two—one for wet ingredients, one for dry. I use glass because it’s easy to clean.
- Baking Sheets: Heavy-duty, rimmed sheets prevent warping and allow for even baking.
- Parchment Paper: For no-stick cookies and easy cleanup (silicone mats work too).
- Cookie Scoop: Medium (1.5 tablespoon) scoop for uniform cookies—totally worth it if you bake often.
- Spatula: Flexible silicone is best for scraping bowls and spreading filling.
- Cooling Rack: Lets cookies cool evenly and prevents soggy bottoms (learned that the hard way!).
- Small Spoon or Offset Spatula: For adding and spreading the chocolate hazelnut filling.
If you don’t have a cookie scoop, just use a tablespoon and shape the dough with your hands—it works! For baking sheets, I started with budget-friendly ones from IKEA and upgraded to USA Pan for better heat distribution. If your equipment is new, hand-wash it gently to keep it lasting longer. Trust me, a good cooling rack is worth the tiny investment for perfect cookie texture.
Preparation Method

- Prep Your Ingredients: Measure out all ingredients before you start (makes the process way smoother!). Toast and chop your hazelnuts if you haven’t already. Preheat your oven to 350°F (175°C).
- Cream Butter & Sugars: In a large bowl, beat 1 cup (225g) softened butter, 1 cup (200g) brown sugar, and 1/2 cup (100g) granulated sugar together on medium speed for about 2-3 minutes until light and fluffy. The color should lighten and the mixture should look creamy.
- Add Eggs & Vanilla: Beat in 2 large eggs, one at a time, mixing well after each. Add 2 teaspoons vanilla extract and scrape down the sides of the bowl. The dough will look slightly glossy.
- Mix Dry Ingredients: In a separate bowl, whisk together 2 1/2 cups (310g) all-purpose flour, 1/2 cup (45g) cocoa powder, 1 teaspoon baking soda, and 1/2 teaspoon salt. Gradually add dry mixture to wet ingredients, mixing on low until just combined. Don’t overmix—the dough should be thick and fudgy.
- Shape Cookies: Using a medium cookie scoop (about 1.5 tablespoons, or 22g), scoop out balls of dough onto parchment-lined baking sheets, spacing them about 2 inches (5cm) apart. Flatten each ball gently with your palm.
- Add Filling: Make a small indent in the center of half the cookies. Fill each indent with 1 teaspoon (5g) chocolate hazelnut spread and a pinch of chopped hazelnuts (plus a few mini chocolate chips if desired).
- Sandwich and Seal: Place a second cookie dough disc on top of the filled one. Pinch the edges gently to seal. If the dough feels sticky, chill it for 10 minutes before handling.
- Bake: Bake in preheated oven for 10-12 minutes, until edges look set but centers are still soft. They’ll firm up as they cool. When you smell that rich chocolate aroma, you know they’re ready!
- Cool & Garnish: Let cookies cool on the baking sheet for 5 minutes, then transfer to a cooling rack. While still slightly warm, roll edges in extra chopped hazelnuts and sprinkle a little sea salt on top if you like.
- Serve: Enjoy warm for maximum gooeyness, or let cool completely for a firmer, crunchy bite.
If you find the dough too sticky, chill it for 20 minutes before shaping. For extra crunch, mix hazelnuts into the dough itself. Don’t worry if the cookies look a little rustic—those imperfect edges are part of their charm. I’ve found baking one sheet at a time keeps things consistent (especially if your oven runs hot). And if your filling leaks a bit, just call it “artsy”—it’s still delicious!
Cooking Tips & Techniques
After making these Chocolate Hazelnut Crunch Cookies countless times, here’s what I’ve learned (sometimes the hard way):
- Don’t Overbake: The secret is pulling the cookies out when the edges are set but the centers look a bit underdone. They’ll firm up out of the oven—trust me, this keeps them chewy and gooey.
- Keep Ingredients at Room Temperature: Soft butter and eggs mix better, resulting in smoother dough and even baking.
- Seal Edges Well: If you don’t press the edges together, the filling can ooze out. Use your fingers to pinch and smooth the seams—imperfect is fine, just make sure they’re closed.
- Toast Your Nuts: Raw hazelnuts taste flat. Toasting brings out their flavor and crunch. Watch closely, though—I’ve burned a batch before and it’s not fun.
- Chill Dough If Sticky: If the dough is too soft to handle, pop it in the fridge for 10-20 minutes. It’s easier to work with and helps prevent spreading.
- Multitasking: While one batch is baking, shape the next batch. This saves time and ensures you’re not waiting around.
- Uniform Size: Scooping equal portions means every sandwich matches—and bakes evenly.
Common mistakes include overmixing the dough (leads to tough cookies) and adding too much filling (can leak out). If that happens, just embrace the gooeyness. I once forgot to toast the hazelnuts—never again! The difference in flavor is massive. And don’t be afraid to tweak the filling amount to fit your own taste. These cookies are forgiving, and there’s nothing wrong with a little mess when chocolate is involved!
Variations & Adaptations
One of the best things about Chocolate Hazelnut Crunch Cookies is how customizable they are. Here are a few fun twists you can try:
- Gluten-Free: Swap the flour for a 1:1 gluten-free blend. I’ve tried Bob’s Red Mill and it works beautifully—no gritty texture.
- Nut-Free: Sub out hazelnuts for toasted sunflower seeds or omit them altogether. Use a chocolate spread without nuts (like Enjoy Life chocolate spread).
- Seasonal Flavors: In winter, add a pinch of cinnamon to the dough. In summer, mix in dried cherries or orange zest for a fruity twist.
- Different Spreads: Try almond butter, peanut butter, or even cookie butter in the filling for new flavor profiles.
- Bake as Bars: Press half the dough into a pan, add the filling, top with remaining dough, and bake as cookie bars. Great for parties!
- Personal Favorite: Once, I used crunchy peanut butter and salted pretzels in the filling—salty, sweet, and seriously addictive.
Allergen swaps are easy—just check your spreads for dairy or nut traces. For texture, add shredded coconut or mini marshmallows to the filling. These cookies are a blank canvas, so don’t be shy about experimenting. If you try a new combo, let me know in the comments—I love hearing about your creative spins!
Serving & Storage Suggestions
Chocolate Hazelnut Crunch Cookies are best enjoyed slightly warm, when the center is still melty and gooey. If you’re serving for a party, stack them on a pretty platter and sprinkle with extra hazelnuts or a dusting of powdered sugar. They pair perfectly with cold milk, hot coffee, or even a scoop of vanilla ice cream on the side.
For storage, let the cookies cool completely, then layer them between sheets of parchment in an airtight container. They’ll stay fresh at room temperature for up to 4 days. For longer storage, freeze the cookies (wrapped individually) for up to 2 months. Thaw at room temp or microwave for 10 seconds to bring back that soft filling.
Reheating is simple: pop a cookie in the microwave for 8-10 seconds for instant gooeyness. The flavors actually deepen after a day—hazelnut and chocolate meld together, making leftovers (if you have any!) even more delicious. These cookies travel well, so they’re great for lunchboxes or gifts. I always tuck a few away for late-night treats.
Nutritional Information & Benefits
| Serving Size | Calories | Protein | Fat | Carbs |
|---|---|---|---|---|
| 1 Cookie Sandwich | ~320 kcal | 5g | 18g | 36g |
Hazelnuts bring healthy fats, vitamin E, and a dose of plant protein. Chocolate hazelnut spread adds a little indulgence, but paired with fiber-rich nuts and eggs, these cookies are more satisfying than your average treat. You can reduce sugar by using a lower-sugar spread or cut the chocolate chips if needed.
For those watching allergens, these cookies contain nuts, eggs, and gluten (unless you use substitutions). I always feel good sharing these because the nuts and cocoa offer antioxidants and energy—plus, one cookie goes a long way in curbing cravings. Balance and enjoyment, that’s my motto!
Conclusion
If you’re searching for the ultimate cookie experience, Chocolate Hazelnut Crunch Cookies are a must-try. They bring together everything you could want—chocolate, crunch, creamy centers, and a little touch of homemade magic. Whether you’re a seasoned baker or just getting started, these are simple enough for anyone but impressive enough to make you look like a pro.
I absolutely love how versatile and fun these are. You can swap ingredients, adjust the filling, and make them your own. They’re the kind of treat that makes people smile, and I hope they become a go-to in your kitchen too.
Give them a whirl, and don’t forget to share your results in the comments below. Did you add something new? Did your kids help out? I’d love to hear your stories and see your photos. Happy baking—and enjoy every crunchy, gooey bite!
Frequently Asked Questions
Can I make Chocolate Hazelnut Crunch Cookies ahead of time?
Absolutely! You can prepare the dough and filling in advance, store them separately in the fridge, and assemble/bake when ready. They also freeze well after baking.
What’s the best way to toast hazelnuts for this recipe?
Spread hazelnuts on a baking sheet and bake at 350°F (175°C) for 8-10 minutes. Cool slightly, then rub the skins off with a kitchen towel for the best flavor and crunch.
Can I use other spreads besides chocolate hazelnut?
Yes, you can substitute almond butter, peanut butter, or cookie butter for a different flavor. Just make sure it’s creamy so the filling stays gooey.
How do I keep the cookies from spreading too much?
Chill the dough before baking, use parchment paper, and make sure your butter isn’t melted. A little chilling goes a long way for thicker cookies!
Are these cookies allergy-friendly?
You can make them nut-free by omitting hazelnuts and using a nut-free chocolate spread. For gluten-free, swap in a 1:1 gluten-free flour blend. Always check ingredient labels for hidden allergens.
Pin This Recipe!

Chocolate Hazelnut Crunch Cookies – Easy Stuffed Sandwich Recipe

These Chocolate Hazelnut Crunch Cookies are decadent sandwich cookies stuffed with creamy chocolate hazelnut spread and crunchy toasted hazelnuts. Easy to make and irresistibly gooey, they’re perfect for special occasions or whenever you crave a bakery-style treat at home.
- Prep Time: 20 minutes
- Cook Time: 12 minutes
- Total Time: 40 minutes
- Yield: 14-16 cookie sandwiches 1x
- Category: Dessert
- Cuisine: American
Ingredients
- 1 cup (225g) unsalted butter, softened
- 1 cup (200g) brown sugar, packed
- 1/2 cup (100g) granulated sugar
- 2 large eggs, room temperature
- 2 teaspoons vanilla extract
- 2 1/2 cups (310g) all-purpose flour
- 1/2 cup (45g) unsweetened cocoa powder (Dutch-process preferred)
- 1 teaspoon baking soda
- 1/2 teaspoon salt
- 1 cup (170g) chocolate hazelnut spread (Nutella or similar)
- 1/2 cup (60g) toasted hazelnuts, roughly chopped
- 1/3 cup (50g) mini chocolate chips (optional)
- Sea salt flakes (optional, for sprinkling on top)
- Extra chopped hazelnuts (for rolling the edges)
Instructions
- Measure out all ingredients. Toast and chop hazelnuts if not already done. Preheat oven to 350°F (175°C).
- In a large bowl, beat softened butter, brown sugar, and granulated sugar together on medium speed for 2-3 minutes until light and fluffy.
- Beat in eggs, one at a time, mixing well after each. Add vanilla extract and scrape down the bowl.
- In a separate bowl, whisk together flour, cocoa powder, baking soda, and salt. Gradually add dry mixture to wet ingredients, mixing on low until just combined.
- Using a medium cookie scoop (about 1.5 tablespoons), scoop dough onto parchment-lined baking sheets, spacing 2 inches apart. Flatten each ball gently.
- Make a small indent in the center of half the cookies. Fill each indent with 1 teaspoon chocolate hazelnut spread and a pinch of chopped hazelnuts (plus mini chocolate chips if desired).
- Place a second cookie dough disc on top of the filled one. Pinch edges gently to seal. If dough is sticky, chill for 10 minutes before handling.
- Bake in preheated oven for 10-12 minutes, until edges are set but centers are still soft.
- Let cookies cool on the baking sheet for 5 minutes, then transfer to a cooling rack. While still warm, roll edges in extra chopped hazelnuts and sprinkle with sea salt if desired.
- Serve warm for gooey centers or let cool completely for a firmer, crunchy bite.
Notes
For best results, toast hazelnuts before using. Chill dough if sticky for easier handling. Don’t overbake—cookies should look slightly underdone in the center. For gluten-free, use a 1:1 gluten-free flour blend. Cookies can be frozen after baking for up to 2 months.
Nutrition
- Serving Size: 1 cookie sandwich
- Calories: 320
- Sugar: 20
- Sodium: 160
- Fat: 18
- Saturated Fat: 8
- Carbohydrates: 36
- Fiber: 2
- Protein: 5
Keywords: chocolate hazelnut cookies, stuffed cookies, sandwich cookies, Nutella cookies, crunchy cookies, easy dessert, bakery-style cookies, hazelnut dessert, chocolate cookies, party cookies


