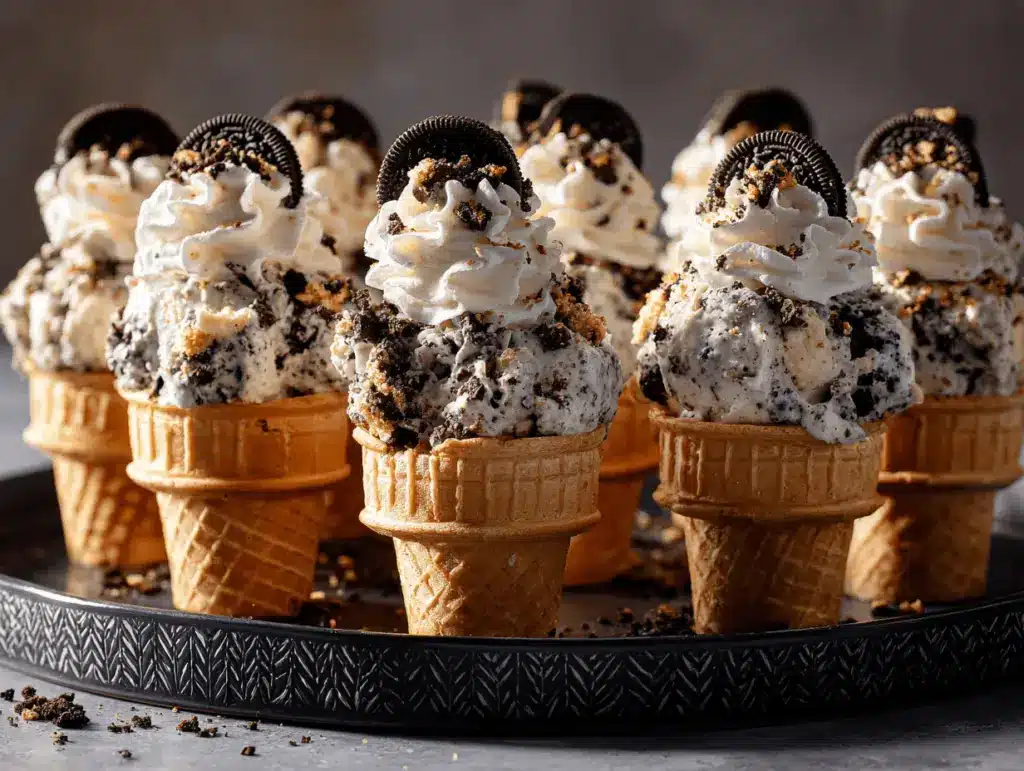
The first time I bit into a cookies and cream cheesecake cone, I swear the world stood still for a second. Creamy, tangy cheesecake filling swirled with crunchy cookie bits, all tucked inside a crisp waffle cone—honestly, it’s the kind of treat that makes you grin like a kid at an ice cream truck. There’s no baking, no fuss, and no way you’ll stop at just one. If you’re looking for a show-stopping dessert that’s as easy as it is delicious, you’re in the right place.
I stumbled on the idea for these cookies and cream cheesecake cones during a summer BBQ when the oven was off-limits (way too hot out!). Everyone was melting, but dessert was non-negotiable. So I grabbed some cones, whipped up a quick no-bake cheesecake base, crumbled in everyone’s favorite sandwich cookies, and voilà—instant crowd-pleaser! Since then, these cones have become my go-to for parties, picnics, and lazy weekend treats. Kids adore them (and, let’s be real, adults can’t resist either).
What I love most about this cookies and cream cheesecake cone recipe is how simple and versatile it is. You don’t need fancy ingredients or special skills—just a big bowl, a mixer, and a craving for something sweet and creamy. Plus, you can prep them ahead or let everyone build their own (DIY dessert bars, anyone?). If you’re after a Pinterest-worthy treat that actually tastes as good as it looks, these cones are your ticket. Trust me, after testing this recipe more times than I can count (my family’s not complaining!), it’s as foolproof as it gets. So, let’s get a little messy and make some dessert magic!
Why You’ll Love This Recipe
- Quick & Easy: These cookies and cream cheesecake cones come together in under 20 minutes—no oven, no chilling, no drama. Perfect for last-minute gatherings or a spontaneous sweet tooth attack.
- Simple Ingredients: Everything you need is probably already in your pantry or fridge. No wild-goose chases to specialty stores—just grab some cream cheese, cookies, and cones!
- Perfect for Any Occasion: Whether it’s a birthday bash, picnic in the park, or just a Tuesday night, these cones fit right in. They’re especially fun for summer parties when nobody wants to fire up the oven.
- Crowd-Pleaser: Seriously, I’ve never seen one left behind at a party. Kids love the cones, adults sneak seconds, and everyone asks for the recipe.
- Unbelievably Delicious: The creaminess of cheesecake, the crunch of cookies, and the snap of the cone—it’s a texture-lover’s dream. Every bite tastes like nostalgia and comfort rolled into one.
What sets this cookies and cream cheesecake cone recipe apart is the way the filling comes together: blending the cream cheese until it’s ultra-smooth, then gently folding in crushed cookies for that perfect balance of creamy and crunchy. No soggy cookies here! It’s not just about the flavor (which, let’s face it, is incredible)—it’s about the experience. You get the classic cookies and cream vibe, but with a fun twist that makes dessert feel like an event.
I’ve tried dozens of no-bake desserts, but this one always jumps to the top of the list. Why? It’s customizable, practically foolproof, and makes everyone feel like a kid again. If you want a dessert that wows without the work, you’ll fall head-over-heels for these cookies and cream cheesecake cones. They’re the kind of thing you crave on a hot day or when you just need something sweet and a little bit special.
What Ingredients You Will Need
This cookies and cream cheesecake cone recipe is all about simple, wholesome ingredients coming together for maximum flavor and texture. Here’s what you’ll need to make your own batch of no-bake perfection:
- For the Cheesecake Filling:
- Cream cheese (8 oz/225 g, full-fat, softened) – The base of our no-bake cheesecake; I love using Philadelphia for creaminess.
- Powdered sugar (1/2 cup/60 g) – Sweetens and helps the filling set up nicely.
- Heavy whipping cream (1 cup/240 ml, cold) – Whipped into the cream cheese for a light, fluffy texture.
- Vanilla extract (1 tsp/5 ml) – For that classic cheesecake flavor boost.
- Salt (a pinch) – Balances the sweetness and heightens the flavors.
- For the Cookies and Cream Mix-In:
- Chocolate sandwich cookies (10-12 cookies, such as Oreos, roughly crushed) – Adds that iconic cookies and cream crunch. I sometimes use the store brand, but honestly, nothing beats the real thing for flavor.
- For the Cones:
- Waffle cones (8-10, standard size) – The perfect vessel for your cheesecake filling. Sugar cones work too, but I love the bigger opening on waffle cones for more filling.
- Optional Toppings:
- Extra crushed cookies – For sprinkling on top.
- Mini chocolate chips – Adds a little more chocolate love.
- Whipped cream – For that bakery-style finish.
- Melted chocolate – Drizzle inside the cones or over the top for extra decadence.
Ingredient notes:
If you want to make these gluten-free, swap in gluten-free sandwich cookies and cones. For a lighter version, you can use reduced-fat cream cheese and swap half the cream for Greek yogurt (though the texture will be a bit tangier and less rich). I’ve tried both options, and while the classic combo is my favorite, the lighter version is still delicious. And, if you’re feeling creative, you can swap chocolate sandwich cookies for golden ones or even peanut butter cookies for a fun twist!
No matter how you spin it, these cookies and cream cheesecake cones are all about using what you have on hand and making dessert magic out of simple ingredients. Just be sure to use full-fat cream cheese if you want that classic, ultra-creamy texture—trust me, it makes a difference!
Equipment Needed
- Electric mixer – A hand mixer or stand mixer works best for whipping the cream cheese and heavy cream together. If you don’t have one, a good old-fashioned whisk and some elbow grease will do the trick, but it’s a workout!
- Mixing bowls – At least two: one for whipping the cream and one for the cream cheese mixture.
- Spatula – For scraping down the sides and folding in the cookie bits gently.
- Large spoon or cookie scoop – Makes it much easier to fill the cones evenly without making a total mess (though a little mess is part of the fun!).
- Plastic bag or piping bag (optional) – If you want perfectly swirled fillings, snip the corner of a zip-top bag or use a piping bag with a large round tip.
- Rolling pin or heavy cup – For crushing cookies. I usually toss mine in a zip-top bag and give them a few good whacks. It’s oddly satisfying.
Honestly, you don’t need anything fancy. I’ve even made these with just a bowl, fork, and my hands. The key is making sure your cream cheese is soft enough to blend smoothly. If you use a piping bag, clean it right after—cream cheese can get sticky if it sits. If budget’s a concern, dollar-store mixing bowls and handheld beaters work just fine for this recipe!
How to Make Cookies and Cream Cheesecake Cones

-
Soften the cream cheese.
Set 8 oz (225 g) of cream cheese out at room temperature for 30-40 minutes. It should be soft to the touch—this prevents lumps in your filling. (If you’re in a rush, microwave for 10-15 seconds, but don’t let it melt!) -
Prep the cookies.
Place 10-12 chocolate sandwich cookies in a zip-top bag. Crush with a rolling pin or heavy glass until you have a mix of small chunks and finer crumbs. Don’t pulverize—you want some bigger bits for texture. -
Whip the cream.
In a clean bowl, pour in 1 cup (240 ml) of cold heavy cream. Using an electric mixer, beat on medium-high until stiff peaks form (about 2-3 minutes). You’ll know it’s ready when the cream holds its shape and doesn’t slide off the whisk. -
Mix the cheesecake base.
In a separate bowl, beat the softened cream cheese with 1/2 cup (60 g) powdered sugar, 1 tsp (5 ml) vanilla extract, and a pinch of salt until smooth and creamy. This usually takes about 1-2 minutes with a mixer. Scrape down the bowl as needed. -
Fold in the whipped cream.
Add the whipped cream to the cream cheese mixture. Gently fold—with a spatula—until just combined. Don’t overmix, or the filling will deflate. -
Add the cookies.
Sprinkle in the crushed cookies and gently fold until evenly distributed. (Reserve a tablespoon or two for topping, if you like.) You want to see cookie swirls! -
Fill the cones.
Line up 8-10 waffle cones. Either use a spoon, cookie scoop, or piping bag to fill each cone with the cheesecake mixture. Pack gently, but don’t ram it in—you want a fluffy texture. Fill to the top and add a little swirl if you’re feeling fancy. -
Add toppings.
Sprinkle extra crushed cookies, mini chocolate chips, or a dollop of whipped cream over each cone. For a wow factor, drizzle with melted chocolate or even dip the cone rims before filling. -
Serve or chill.
You can serve these immediately for a soft, mousse-like texture, or pop them in the fridge for 30-60 minutes to let them firm up a bit. (I usually can’t wait that long!) If you’re prepping ahead, store the filling separately and assemble just before serving to keep cones crisp.
Troubleshooting tips: If your filling is runny, the cream wasn’t whipped enough, or the cream cheese was too warm. If it’s too stiff, add 1-2 tbsp milk to loosen. And if the cones get soggy, assemble them right before serving next time. I’ve learned the hard way—crisp cones are non-negotiable!
Cookies and Cream Cheesecake Cone Tips & Techniques
- Use cold cream. The colder your heavy cream, the better it whips. Sometimes I even chill the bowl and beaters for 10 minutes first—makes a big difference!
- Don’t overbeat the filling. Once the whipped cream is folded in, mix gently. Overmixing can deflate your filling and make it dense.
- Fold, don’t stir. When adding cookies, use a folding motion to keep the mixture airy. Stirring too hard breaks down the cookies and squashes the fluffiness.
- Assemble last minute for crisp cones. If you fill the cones too early, they can get soggy—especially in humid weather. I always keep the filling in the fridge and fill the cones right before serving.
- Try different cookies. If you want to switch things up, swap chocolate sandwich cookies for golden Oreos, mint, or even peanut butter cookies. Each one offers a fun flavor twist.
- Watch your measurements. Too much cream will make the filling runny, while too little will make it overly thick. Stick to the recipe for the best balance.
I’ve definitely had my fair share of mishaps—like the time I used room-temp cream and ended up with a soupy mess, or when I overfilled the cones and the filling oozed out the bottom (messy, but still tasty!). Honestly, it’s all part of the fun. Once you nail the steps, this recipe is a breeze. And if you’re multitasking for a party, you can make the filling a day ahead and let guests fill their own cones for a DIY dessert bar. It’s a hit every time!
Variations & Adaptations
- Gluten-Free Version: Use gluten-free chocolate sandwich cookies and gluten-free waffle cones. Everything else stays the same—you’d never know the difference.
- Vegan/Dairy-Free: Swap in dairy-free cream cheese (like Kite Hill), coconut whipped cream, and plant-based cookies. The filling will be a bit softer, but still dreamy.
- Flavor Twists: Try using golden sandwich cookies for a vanilla spin, or mint-flavored cookies for a cool, refreshing take. Adding a tablespoon of peanut butter to the cheesecake base is another fun route (my kids are obsessed with this version!).
- Different Cones: Sugar cones, chocolate-dipped cones, or even mini cones for bite-sized treats. If you can’t find cones, spoon the filling into mini dessert cups with a cookie on top—just as tasty, a little less messy.
- Allergen Swap: For nut allergies, avoid peanut butter additions and check your cookie labels. For egg allergies, most cookies and cones are egg-free, but it’s always worth double-checking.
My personal favorite adaptation? Swapping half the cookies for mini chocolate-covered pretzels—adds a salty crunch that’s totally addictive! Don’t be afraid to experiment. This base is super forgiving and just waiting for your creative spin.
Serving & Storage Suggestions
Cookies and cream cheesecake cones are a true treat served chilled or at cool room temperature—just enough so the filling is creamy but the cones stay crisp. They look gorgeous standing upright in a tall glass or cone holder (a trick I picked up from a friend’s party—so Pinterest-worthy!).
Pair them with a cold glass of milk, iced coffee, or a fun milkshake. For parties, set up a platter with extra toppings so everyone can customize their own cone. If you’re serving outside, keep the filled cones in a cooler until ready to eat—the filling can soften quickly in the sun.
To store, keep the cheesecake filling in an airtight container in the fridge for up to 3 days. Only fill the cones right before serving, or they’ll lose their crunch. If you have leftover filled cones (rare in my house!), wrap them in foil and refrigerate—just know the cones may soften a bit. To freshen, pop in the freezer for 10 minutes before serving. The flavors actually deepen overnight, so the filling tastes even better the next day!
Nutritional Information & Benefits
Each cookies and cream cheesecake cone (filled as described) contains approximately:
- Calories: 330
- Fat: 18g
- Carbohydrates: 36g
- Protein: 4g
- Sugar: 21g
Key benefits: The cream cheese brings a dose of calcium and protein, and using real whipped cream means fewer additives than store-bought desserts. You can tweak the recipe for lower sugar (use sugar-free cookies or less powdered sugar) or higher protein (fold in a scoop of vanilla protein powder). Contains gluten and dairy; see above for allergy-friendly swaps. Honestly, while this isn’t a health food, it’s a joyful treat—balance is everything!
Conclusion
If you’re searching for a no-bake dessert that’s equal parts fun, delicious, and absolutely unforgettable, these cookies and cream cheesecake cones are it. They’re ridiculously easy, endlessly customizable, and guaranteed to be the star of any dessert table. I love how they bring out the kid in everyone—messy fingers, big smiles, and all.
Don’t be afraid to put your own spin on this recipe. Try new cookies, add fresh fruit, or set up a DIY cone bar for your next get-together. I hope they bring as much happiness to your kitchen as they have to mine—there’s just something magical about dessert in a cone!
Give these a try, snap a pic, and share your creations in the comments or on Pinterest. I’d love to hear your favorite twists or see how you serve them up. Happy no-bake baking, friends!
FAQs
Can I make cookies and cream cheesecake cones ahead of time?
Yes! You can prepare the cheesecake filling up to 3 days in advance and store it in the fridge. Just fill the cones right before serving to keep them crisp.
Can I freeze the filled cones?
It’s best not to freeze the filled cones—they can turn soggy. However, you can freeze the cheesecake filling separately and thaw before assembling.
What if I don’t have an electric mixer?
No worries! You can whip the cream and blend the filling with a sturdy whisk and some effort. Just make sure the cream cheese is super soft.
Are there gluten-free options for this recipe?
Absolutely. Use gluten-free sandwich cookies and gluten-free cones to make these safe for gluten-free eaters. The taste and texture are still fantastic.
Can I use low-fat cream cheese or whipped topping?
You can use low-fat cream cheese, but the filling will be tangier and slightly less creamy. Whipped topping works in a pinch, but real cream makes the filling richer and fluffier.
Pin This Recipe!

Cookies and Cream Cheesecake Cones

These no-bake cookies and cream cheesecake cones feature a creamy, tangy cheesecake filling swirled with crunchy cookie bits, all tucked inside crisp waffle cones. They’re quick, easy, and perfect for parties, picnics, or whenever you need a fun, crowd-pleasing dessert.
- Prep Time: 15 minutes
- Cook Time: 0 minutes
- Total Time: 15 minutes
- Yield: 8-10 cones 1x
- Category: Dessert
- Cuisine: American
Ingredients
- 8 oz (225 g) full-fat cream cheese, softened
- 1/2 cup (60 g) powdered sugar
- 1 cup (240 ml) cold heavy whipping cream
- 1 tsp (5 ml) vanilla extract
- Pinch of salt
- 10–12 chocolate sandwich cookies (such as Oreos), roughly crushed
- 8–10 waffle cones (standard size)
- Optional: extra crushed cookies for topping
- Optional: mini chocolate chips
- Optional: whipped cream
- Optional: melted chocolate for drizzling
Instructions
- Set the cream cheese out at room temperature for 30-40 minutes to soften. (Or microwave for 10-15 seconds if short on time, but do not melt.)
- Place the chocolate sandwich cookies in a zip-top bag and crush with a rolling pin or heavy glass until you have a mix of small chunks and finer crumbs.
- In a clean bowl, whip the cold heavy cream with an electric mixer on medium-high until stiff peaks form (about 2-3 minutes).
- In a separate bowl, beat the softened cream cheese with powdered sugar, vanilla extract, and a pinch of salt until smooth and creamy (1-2 minutes). Scrape down the bowl as needed.
- Gently fold the whipped cream into the cream cheese mixture with a spatula until just combined. Do not overmix.
- Fold in the crushed cookies until evenly distributed, reserving a tablespoon or two for topping if desired.
- Line up the waffle cones and fill each with the cheesecake mixture using a spoon, cookie scoop, or piping bag. Fill to the top and add a swirl if desired.
- Top each cone with extra crushed cookies, mini chocolate chips, whipped cream, or a drizzle of melted chocolate as desired.
- Serve immediately for a soft, mousse-like texture, or chill in the fridge for 30-60 minutes to firm up. For best results, fill cones just before serving to keep them crisp.
Notes
For gluten-free, use gluten-free cookies and cones. For a lighter version, use reduced-fat cream cheese and swap half the cream for Greek yogurt. Assemble cones just before serving to keep them crisp. The filling can be made up to 3 days ahead and stored in the fridge. Try different cookies or add-ins for fun variations.
Nutrition
- Serving Size: 1 filled cone
- Calories: 330
- Sugar: 21
- Sodium: 180
- Fat: 18
- Saturated Fat: 10
- Carbohydrates: 36
- Fiber: 1
- Protein: 4
Keywords: cookies and cream, cheesecake cones, no-bake dessert, summer dessert, party dessert, easy cheesecake, Oreo cones, kid-friendly dessert


