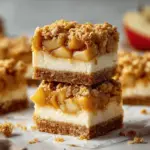
The aroma of warm cinnamon and baked apples drifting from my oven always reminds me of chilly autumn afternoons—socks on, tea in hand, and a craving for something sweet. Cinnamon Apple Crisp Cheesecake Bars are my answer to those moments when you want both a cozy dessert and a little indulgence (without too much fuss). I first whipped up these bars on a rainy October Sunday, when I was determined to merge my favorite fall flavors into one irresistible treat. Believe me, these bars are a delicious mash-up: buttery cinnamon crisp topping, creamy cheesecake filling, and tender baked apples all sandwiched together. It’s like apple crisp and cheesecake had a dessert baby (and you get all the best parts).
As someone who’s baked apple crisps and cheesecakes for years, I can say this recipe brings together the best of both worlds. You get the comforting nostalgia of apple crisp—the cinnamon, the brown sugar, the oaty topping—plus the creamy tang of cheesecake that makes every bite feel a little extra special. And let’s face it, cinnamon apple crisp cheesecake bars are exactly the kind of dessert people are looking for when autumn rolls in. They’re perfect for sharing, packing up for potlucks, or just keeping in the fridge for sneaky late-night snacks. If you love classic cheesecake and crave all things apple and cinnamon, you’ll want to save this recipe. After testing (and tasting) more versions than I’d care to admit, I’m confident this is the one you’ll want to make again and again.
These cinnamon apple crisp cheesecake bars are truly a crowd-pleaser. They’re easy enough for beginner bakers but satisfying for anyone chasing the ultimate fall dessert. Whether you’re baking for a family gathering, a Friendsgiving, or just treating yourself, this recipe is your ticket to autumn bliss. So grab your apples, cinnamon, and cream cheese—let’s make some magic!
Why You’ll Love This Recipe
- Quick & Easy: These bars come together in under 30 minutes of prep, and the oven does the rest. You don’t need to fuss over fancy techniques or complicated steps.
- Simple Ingredients: Most of what you need is probably already hanging out in your pantry or fridge—apples, cream cheese, oats, cinnamon, and a handful of baking basics.
- Perfect for Autumn Gatherings: Whether you’re hosting a cozy dinner, heading to a potluck, or just want a treat for a chilly evening at home, these cinnamon apple crisp cheesecake bars totally fit the mood.
- Crowd-Pleaser: I’ve served these bars to kids, adults, and even picky eaters. They get rave reviews every single time—no leftovers!
- Unbelievably Delicious: The combo of creamy cheesecake, sweet-tart apples, and buttery oatmeal topping is next-level comfort food. You know that feeling when you close your eyes after the first bite? That’s these bars.
What sets this recipe apart from the usual apple crisp or basic cheesecake bars is the layering technique. By baking the apples until just tender and whipping the cream cheese filling until ultra-smooth, you get distinct flavors in every bite—the tang of cream cheese, the warmth of cinnamon, and the crunch from the crisp topping. I always blend the apple layer with a touch of lemon juice for brightness (learned that from a chef friend years ago), and mixing old-fashioned oats with melted butter gives the topping that classic, golden crunch. Honestly, it’s the kind of dessert you reach for seconds and don’t regret it.
Emotionally, these bars bring a little autumn sunshine inside—even if the weather outside is gloomy. They’re easy enough for weeknight cravings, yet fancy enough for company. And if you want to impress someone without spending all day in the kitchen, this is your secret weapon. It’s comfort food at its best: sweet, creamy, crunchy, and loaded with cinnamon-spiced apples.
What Ingredients You Will Need
This recipe uses wholesome, easy-to-find ingredients that come together for maximum flavor and texture. I’m all about pantry staples and seasonal produce—plus a couple of tips and swaps if you need them!
- For the Crust:
- 1 cup (120g) all-purpose flour (or gluten-free flour blend for GF option)
- 1/4 cup (50g) brown sugar (adds richness; light or dark both work)
- 1/2 cup (115g) unsalted butter, melted (for that buttery base)
- 1/4 tsp salt (balances sweetness)
- For the Cheesecake Filling:
- 8 oz (225g) cream cheese, softened (I recommend Philadelphia for texture)
- 1/3 cup (65g) granulated sugar
- 1 large egg, room temperature
- 1/2 tsp vanilla extract (pure is best for flavor)
- For the Apple Layer:
- 2 cups (about 2 medium) apples, peeled and diced (Granny Smith for tartness or Honeycrisp for sweetness)
- 1 tbsp lemon juice (keeps apples bright)
- 1/4 cup (30g) granulated sugar
- 1 tsp ground cinnamon
- For the Crisp Topping:
- 1/2 cup (45g) old-fashioned oats (not quick oats; gives best crunch)
- 1/4 cup (30g) flour
- 1/4 cup (50g) brown sugar
- 1/4 cup (55g) unsalted butter, melted
- 1/2 tsp ground cinnamon
- Pinch salt
- Optional: 1/4 cup (30g) chopped pecans or walnuts (for extra crunch)
If you want to switch things up, you can use coconut oil instead of butter for a dairy-free version, or add a tablespoon of maple syrup to the apple layer for a deeper fall flavor. For nut allergies, just skip the pecans or walnuts—they’re totally optional. I’ve made these bars with gluten-free flour blends, vegan cream cheese, and even a dash of cardamom in the topping. They turn out yummy every time! The apples are the star here, so use the freshest you can find.
Equipment Needed
- 8×8 inch (20x20cm) baking pan (lined with parchment for easy lifting)
- Mixing bowls – at least two (one for crust/topping, one for cheesecake filling)
- Whisk and spatula (for mixing and scraping every last bit)
- Hand mixer or stand mixer (makes the cheesecake layer creamy and lump-free; you can use a sturdy whisk if you’re up for a workout)
- Measuring cups and spoons (accuracy counts for baking!)
- Vegetable peeler and sharp knife (for prepping apples)
- Small saucepan (if you want to melt butter or brown it for extra flavor)
If you don’t own a hand mixer, don’t worry—you can soften the cream cheese and beat it well with a rubber spatula (it just takes a little muscle). I’ve used glass, metal, and silicone baking pans for this recipe. Metal pans give a crispier edge, but glass works fine, too. If you want budget-friendly tools, look for basic stainless steel whisks and affordable nonstick pans at most grocery stores—they hold up well and are easy to clean. Pro tip: parchment paper not only helps with lifting the bars out but also keeps your pan cleaner for quick washing.
Preparation Method

- Prep the Pan & Ingredients (5 min):
- Line your 8×8 inch (20x20cm) pan with parchment paper, leaving a little overhang for easy lifting.
- Preheat oven to 350°F (175°C).
- Peel, core, and dice apples into 1/2-inch (1.25cm) cubes.
- Make the Crust (10 min):
- In a medium bowl, mix 1 cup (120g) flour, 1/4 cup (50g) brown sugar, 1/2 cup (115g) melted butter, and 1/4 tsp salt until crumbly.
- Press the mixture firmly into the bottom of the prepared pan. Use the bottom of a glass to flatten it evenly.
- Bake crust for 10 minutes. Let cool slightly.
- Prepare Apple Layer (5 min):
- In a bowl, toss diced apples with 1 tbsp lemon juice, 1/4 cup (30g) sugar, and 1 tsp cinnamon.
- Spread evenly over the baked crust.
- Whip the Cheesecake Filling (5 min):
- In another bowl, beat 8 oz (225g) cream cheese until smooth.
- Add 1/3 cup (65g) sugar, 1 egg, and 1/2 tsp vanilla. Beat until silky and lump-free (about 2 minutes on medium).
- Pour the cheesecake filling over the apples and spread gently to cover.
- Make Crisp Topping (5 min):
- Mix 1/2 cup (45g) oats, 1/4 cup (30g) flour, 1/4 cup (50g) brown sugar, 1/4 cup (55g) melted butter, 1/2 tsp cinnamon, and a pinch of salt. Stir until crumbly.
- Add nuts if using.
- Sprinkle evenly over cheesecake layer.
- Bake (35-40 min):
- Bake at 350°F (175°C) for 35-40 minutes, until the topping is golden and the edges are set.
- If the top browns too quickly, tent loosely with foil at the 25-minute mark.
- Cool & Chill (1-2 hours):
- Let bars cool completely in the pan on a wire rack.
- Chill in the refrigerator for at least 1 hour before slicing (overnight is perfect for firm bars).
- Slice & Serve:
- Use parchment tabs to lift bars out. Slice into 9 squares with a sharp knife.
- If the filling seems soft, chill a little longer; bars firm up as they cool.
Personal Tips: Don’t rush the chilling step—trust me, the bars slice so much cleaner and taste even better cold. If your apples release a bit of juice, it’ll settle into the crust for extra flavor. For a crunchier topping, toast the oats in a dry pan for 2 minutes before mixing. If you ever get cracks in the cheesecake layer, don’t stress—the crisp topping covers it nicely!
Cooking Tips & Techniques
After making these cinnamon apple crisp cheesecake bars more times than I can count, I’ve picked up a few tricks along the way. Here are my best tips (and lessons learned) for perfect bars every time:
- Room Temperature Cream Cheese: Softened cream cheese blends smoother and avoids lumps in your cheesecake layer. I forgot this once—never again!
- Don’t Overmix: Beat the cheesecake filling just until combined. Overbeating adds air, which can cause cracks. If you do get a crack, the topping hides it anyway.
- Even Layers: Press the crust firmly and spread the apple layer evenly. Uneven layers can cause soggy spots or uneven baking.
- Topping Placement: Sprinkle the crisp topping gently so it’s evenly distributed. If you pile it in the middle, the edges can burn while the center stays pale.
- Watch Your Bake Time: Ovens vary! Check at 35 minutes—the topping should be golden and the cheesecake set at the edges but slightly jiggly in the middle.
- Chill Completely: Bars need time to firm up. If you slice too soon, the layers slide. Patience pays off here.
- Multitasking: Prep the apples while the crust bakes. Start cleaning up during the final baking—less mess, more reward.
- Common Mistakes: Using too-soft apples leads to mushy filling. Granny Smith or Honeycrisp keep their texture. Also, don’t skip the parchment paper—trust me, cleanup is a breeze and bars lift out perfectly.
One time I tried adding extra apple slices and ended up with a soggy mess. Stick to the recipe amounts for best results. And if you love a really crunchy topping, try broiling for 1-2 minutes at the end—just watch closely to avoid burning!
Variations & Adaptations
Want to switch things up? Cinnamon apple crisp cheesecake bars are super flexible. Here are a few of my favorite twists:
- Gluten-Free: Swap all-purpose flour with a 1:1 gluten-free blend. Make sure your oats are certified gluten-free. The texture stays spot-on.
- Dairy-Free: Use plant-based cream cheese (like Kite Hill) and coconut oil instead of butter. The flavor is still rich and satisfying.
- Flavor Variations: Mix in chopped pears or use a blend of apples for a different twist. Add a pinch of cardamom or nutmeg for extra warmth.
- Nut-Free: Omit pecans/walnuts and add pumpkin seeds or sunflower seeds for crunch (or just stick with oats).
- Seasonal Adaptations: In summer, swap apples for peaches or berries. In winter, add dried cranberries to the apple mixture for tartness.
I’ve tried adding caramel drizzle on top (so good!) or swirling a little apple butter into the cheesecake layer. For a lighter version, go easy on the crisp topping or use low-fat cream cheese. Honestly, you can let your imagination run wild—just keep the basic layering method and you’ll be set.
Serving & Storage Suggestions
For serving, I love these cinnamon apple crisp cheesecake bars slightly chilled—straight from the fridge, they’re firm and slice cleanly. If you want to get fancy, add a dollop of whipped cream, a scoop of vanilla ice cream, or a drizzle of warm caramel sauce. They look beautiful on a rustic platter, especially with a sprinkle of cinnamon over top.
Pair with a mug of hot cider, chai latte, or coffee for the ultimate fall treat. For brunch, you can serve them alongside scrambled eggs and bacon for a sweet-savory combo. These bars are also perfect for dessert buffets, lunchboxes, or midnight snacks (guilty as charged).
To store, place bars in an airtight container in the fridge for up to 5 days. They freeze well, too—wrap individually in plastic wrap and store in a freezer bag for up to 2 months. Thaw overnight in the fridge or gently warm in the microwave for 15 seconds. The flavors actually deepen after a day or two, so don’t hesitate to make ahead.
Nutritional Information & Benefits
Each cinnamon apple crisp cheesecake bar (1/9th recipe) is about 250-300 calories, with 16g fat, 30g carbs, and 4g protein. The apples provide vitamin C and fiber, and oats offer heart-healthy whole grains. Cream cheese gives a boost of calcium and creamy texture.
This recipe can be easily adapted for gluten-free or dairy-free diets. If you have nut allergies, just skip the optional nuts in the topping. While it’s a sweet treat, you can lighten it up with reduced sugar, low-fat cream cheese, or extra apples for more fiber. I love knowing I’m sneaking a little fruit and oats into my dessert!
Conclusion
If you’re searching for the perfect autumn dessert, these cinnamon apple crisp cheesecake bars are calling your name. They combine everything you love about fall baking—warm spices, creamy cheesecake, and crisp apples—in one easy-to-make treat. Customize them to your taste, serve them at gatherings, or just savor a square with coffee on a quiet morning.
Personally, I love how these bars bring a little bit of coziness to any day. They’re comforting, satisfying, and totally irresistible. Don’t be afraid to make them your own—swap ingredients, add toppings, or get creative with flavors. I’d love to hear how you make them!
Ready to bake? Leave a comment with your favorite apple or your own twist, share with friends who need a little autumn cheer, and tag me if you post on Pinterest or Instagram. Happy baking—and enjoy every delicious bite!
FAQs
Can I use different apples for cinnamon apple crisp cheesecake bars?
Absolutely! Granny Smith gives a tart bite, while Honeycrisp or Fuji are sweeter. Use what you have—just make sure they’re firm so they hold up during baking.
Do I need to peel the apples?
I recommend peeling for the best texture, but if you love a little extra fiber and rustic feel, you can leave the skins on. It’s totally up to you!
Can I make these bars ahead of time?
Yes! They taste even better after chilling overnight. Store covered in the fridge and slice just before serving for neat, clean edges.
How do I know when the bars are done baking?
The topping should be golden and the cheesecake layer set at the edges but a little jiggly in the center. If unsure, gently shake the pan—if the center wobbles slightly, it’s perfect.
Can I freeze cinnamon apple crisp cheesecake bars?
Definitely! Wrap individual bars tightly and store in the freezer for up to 2 months. Thaw overnight in the fridge or reheat gently in the microwave.
Pin This Recipe!
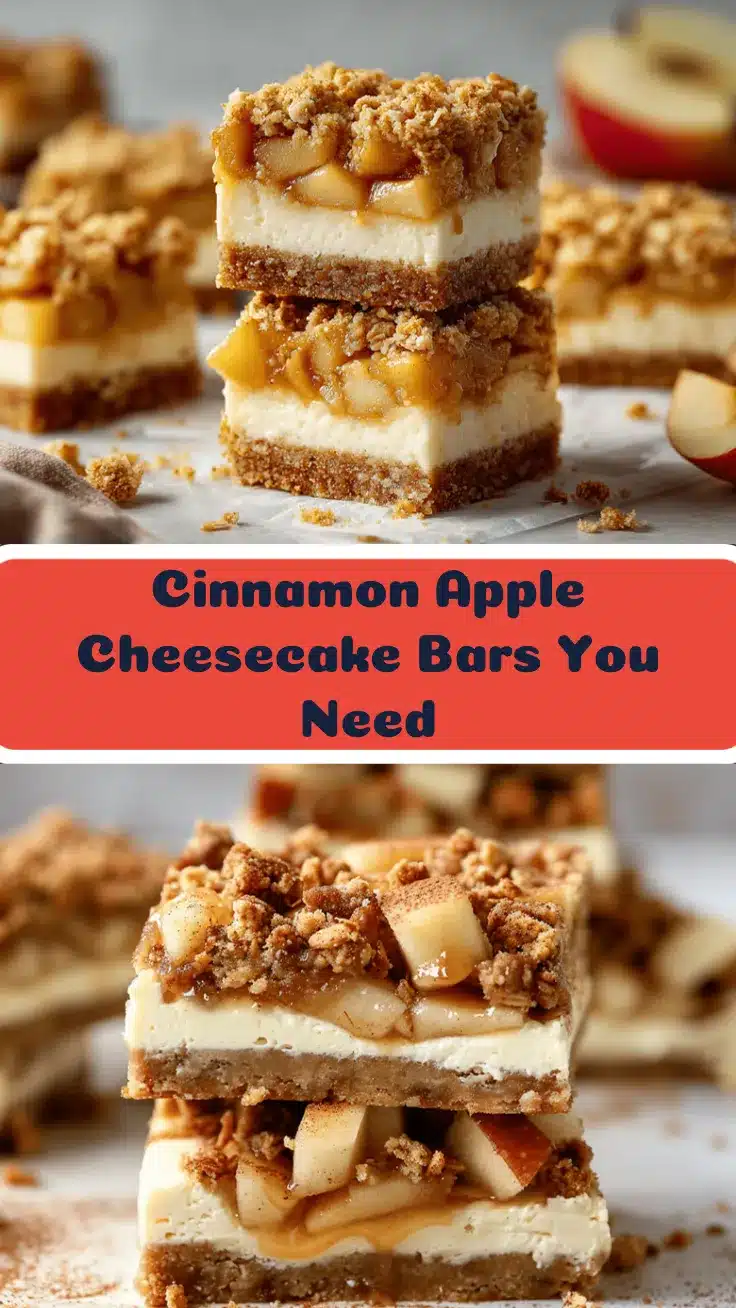
Cinnamon Apple Crisp Cheesecake Bars
These easy autumn dessert bars combine the best of apple crisp and creamy cheesecake, layered with cinnamon-spiced apples and a buttery oat topping. Perfect for cozy gatherings or a sweet treat any time.
- Prep Time: 25 minutes
- Cook Time: 40 minutes
- Total Time: 1 hour 5 minutes (plus chilling)
- Yield: 9 bars 1x
- Category: Dessert
- Cuisine: American
Ingredients
- 1 cup all-purpose flour (or gluten-free flour blend)
- 1/4 cup brown sugar
- 1/2 cup unsalted butter, melted
- 1/4 tsp salt
- 8 oz cream cheese, softened
- 1/3 cup granulated sugar
- 1 large egg, room temperature
- 1/2 tsp vanilla extract
- 2 cups apples, peeled and diced (about 2 medium apples)
- 1 tbsp lemon juice
- 1/4 cup granulated sugar
- 1 tsp ground cinnamon
- 1/2 cup old-fashioned oats
- 1/4 cup flour
- 1/4 cup brown sugar
- 1/4 cup unsalted butter, melted
- 1/2 tsp ground cinnamon
- Pinch salt
- Optional: 1/4 cup chopped pecans or walnuts
Instructions
- Line an 8×8 inch baking pan with parchment paper, leaving an overhang for easy lifting.
- Preheat oven to 350°F (175°C).
- Peel, core, and dice apples into 1/2-inch cubes.
- In a medium bowl, mix 1 cup flour, 1/4 cup brown sugar, 1/2 cup melted butter, and 1/4 tsp salt until crumbly.
- Press mixture firmly into the bottom of the prepared pan and flatten evenly.
- Bake crust for 10 minutes, then let cool slightly.
- In a bowl, toss diced apples with 1 tbsp lemon juice, 1/4 cup sugar, and 1 tsp cinnamon. Spread evenly over baked crust.
- In another bowl, beat cream cheese until smooth. Add 1/3 cup sugar, 1 egg, and 1/2 tsp vanilla; beat until silky and lump-free.
- Pour cheesecake filling over apples and spread gently to cover.
- Mix oats, 1/4 cup flour, 1/4 cup brown sugar, 1/4 cup melted butter, 1/2 tsp cinnamon, and a pinch of salt until crumbly. Add nuts if using.
- Sprinkle topping evenly over cheesecake layer.
- Bake at 350°F for 35-40 minutes, until topping is golden and edges are set. Tent with foil if browning too quickly.
- Let bars cool completely in pan on a wire rack.
- Chill in refrigerator for at least 1 hour before slicing (overnight for firmer bars).
- Lift bars out using parchment tabs and slice into 9 squares with a sharp knife.
- Serve chilled, optionally topped with whipped cream, ice cream, or caramel sauce.
Notes
For best results, chill bars thoroughly before slicing. Use firm apples like Granny Smith or Honeycrisp for best texture. Toast oats for extra crunch. Gluten-free and dairy-free adaptations are possible. Bars freeze well for up to 2 months.
Nutrition
- Serving Size: 1 bar (1/9th of recipe)
- Calories: 275
- Sugar: 18
- Sodium: 160
- Fat: 16
- Saturated Fat: 9
- Carbohydrates: 30
- Fiber: 2
- Protein: 4
Keywords: apple crisp, cheesecake bars, autumn dessert, cinnamon, easy dessert, fall baking, apple dessert, oat topping, cream cheese, potluck