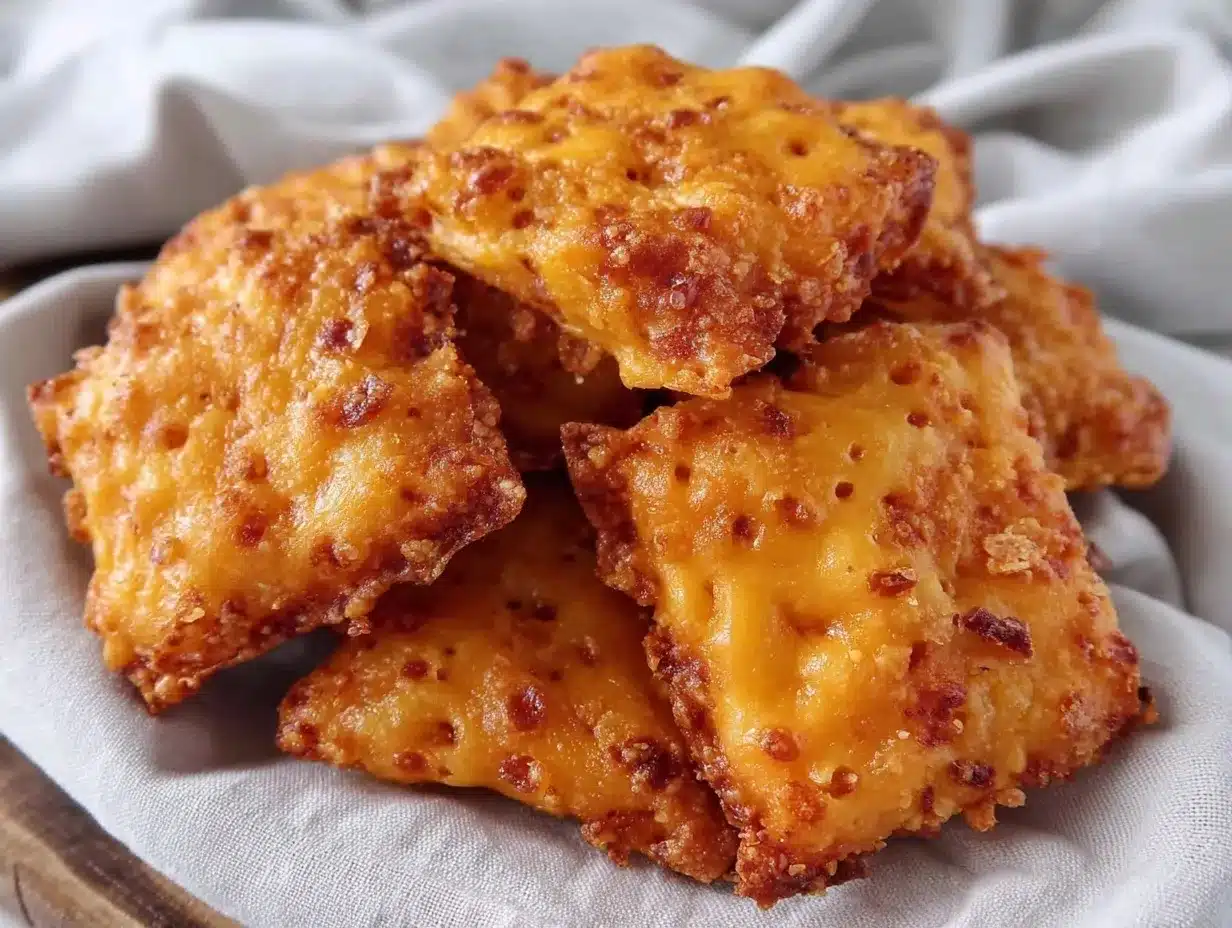
I figured making crispy homemade Cheez-It crackers would be a quick, borderline boring project. It took about two hours for that assumption to crumble—literally and figuratively. I expected some cheesy snack that might be ‘okay’ but honestly, these little golden squares turned out sharper, crunchier, and more addictive than the box versions I grew up sneaking from the pantry. The smell alone, buttery and cheesy, wafting from the oven was enough to make me pause and reconsider every processed snack aisle choice I ever made.
There I was, rolling out a dough that felt surprisingly simple—just a handful of ingredients and a bit of elbow grease. But the real kicker was how the baking transformed it: thin, perfectly crisp edges with those signature tiny holes and a nutty, toasted cheese flavor that lingered long after the last bite. I never thought homemade crackers could feel so satisfyingly substantial and fresh, like a snack that’s been waiting for me to discover it in my own kitchen all along.
What really stuck with me was how versatile and straightforward this recipe is. No fancy tools, no elusive cheeses, just honest ingredients and a little patience. Honestly, it’s the kind of recipe that turns you into a confident snack-maker, the one who brings something unexpected to gatherings or just makes an ordinary afternoon feel a bit more special. If you’re like me—someone who learns by doing and appreciates that crispy, cheesy goodness—this recipe might just become your new go-to. It’s not just better than store-bought; it’s homemade in the best way possible.
Why You’ll Love This Recipe
- Quick & Easy: The entire process takes less than 90 minutes from start to finish—perfect for when you want a crunchy snack without a fuss.
- Simple Ingredients: You likely have everything in your pantry already—sharp cheddar, flour, butter, and a few seasonings. No specialty cheese needed.
- Perfect for Snacking & Parties: These crackers shine on their own or paired with dips, cheese boards, or alongside an elegant bite like smoked salmon cucumber tea sandwiches.
- Crowd-Pleaser: Everyone, from kids to adults, loves the crunchy texture and punchy cheddar flavor. They vanish fast!
- Unbelievably Delicious: The toasty, buttery notes with a hint of nuttiness make these crackers feel like a grown-up upgrade on a childhood favorite.
- Unique Technique: Rolling the dough paper-thin and chilling it helps achieve that iconic crispiness and perfect snap you don’t always get with store-bought.
- This recipe isn’t just another cheddar cracker—it’s a little homemade joy with a crisp edge that makes you savor every bite.
What Ingredients You Will Need
This recipe uses simple, wholesome ingredients to deliver bold flavor and satisfying texture without the fuss. Most of these are pantry staples, and you can swap a few items without losing that signature Cheez-It vibe.
- Sharp Cheddar Cheese, finely shredded (I prefer a good aged cheddar for punchy flavor; Cabot works great)
- All-Purpose Flour, sifted (for structure and crispiness)
- Unsalted Butter, cold and cubed (adds richness and helps create that flaky texture)
- Water, ice-cold (just enough to bring dough together)
- Salt, fine sea salt (balances flavors)
- Onion Powder (optional, adds subtle savory depth)
- Smoked Paprika (optional, for a slight smoky kick)
Substitution notes: Use almond flour for a gluten-free version, but expect a slightly different texture. Coconut oil can replace butter for a dairy-free twist, though it changes the flavor profile a bit. If you want to tweak the cheese, a mix of cheddar and Parmesan can be interesting for a sharper bite.
Equipment Needed
- Rolling pin (a classic wooden one works perfectly; no fancy gadgets needed)
- Baking sheet(s) lined with parchment paper or a silicone baking mat to prevent sticking
- Box grater or food processor for shredding cheese finely
- Sharp knife or pizza cutter for slicing crackers evenly
- Fork or skewer to poke characteristic holes in each cracker
- Mixing bowl(s) for combining dough ingredients
If you don’t have a pizza cutter, a sharp chef’s knife works just as well — just be sure to press down firmly for clean edges. And don’t skip chilling the dough on a baking sheet to keep it manageable while rolling thin. I’ve found that a silicone mat really helps with cleanup and prevents tearing during transfer to the oven.
Preparation Method
- Grate the Cheese: Finely shred 1 ½ cups (170g) of sharp cheddar cheese. The finer, the better for a smooth dough. This step takes about 5 minutes.
- Mix Dry Ingredients: In a large bowl, whisk together 1 cup (125g) all-purpose flour, ½ teaspoon salt, ½ teaspoon onion powder, and ¼ teaspoon smoked paprika. Stir for even distribution.
- Cut in the Butter: Add 6 tablespoons (85g) cold, cubed unsalted butter to the flour mixture. Use your fingers or a pastry cutter to work the butter into the flour until it looks like coarse crumbs. This should take about 3-4 minutes.
- Add Cheese and Water: Stir in the shredded cheese until evenly mixed. Then, slowly add 3-4 tablespoons (45-60 ml) ice-cold water, one tablespoon at a time, mixing gently until dough just comes together. Avoid overworking.
- Chill Dough: Shape the dough into a flat disk, wrap it in plastic wrap, and chill for at least 30 minutes. This firms it up, making rolling easier and helps the crackers hold their shape.
- Roll Out Dough: On a lightly floured surface, roll the dough as thin as possible (about 1/16 inch or 1.5 mm). The thinner, the crispier. Transfer to a parchment-lined baking sheet.
- Cut and Dock: Using a sharp knife or pizza cutter, slice the dough into 1-inch (2.5 cm) squares. Use a fork or skewer to poke four tiny holes in each square, mimicking the classic Cheez-It look.
- Bake: Preheat oven to 350°F (175°C). Bake crackers for 15-18 minutes until golden and crisp. Watch carefully near the end to prevent burning.
- Cool and Store: Let crackers cool completely on a wire rack; they crisp up more as they cool. Store in an airtight container.
Note: If your dough feels sticky when rolling, dust lightly with flour but don’t overdo it—too much flour makes crackers tough. During baking, ovens vary, so start checking at 14 minutes. You want a deep golden color without dark spots.
Cooking Tips & Techniques
Rolling the dough thin is honestly the trickiest part but also the most rewarding. I learned that chilling the dough twice—once before rolling and again after cutting—really helps keep clean edges and crisp texture. If you skip this, the crackers puff unevenly or lose their iconic snap.
Also, finely shredding the cheese instead of cubing or chunking it makes the dough smoother and helps all that cheesy flavor spread evenly. It’s tempting to rush, but trust me, this step changes everything.
Watch your oven carefully because those last couple of minutes can flip the crackers from golden perfection to burnt bitterness in no time. I usually keep the oven light on and check frequently once I hit the 15-minute mark.
When storing, use a container with a tight seal. Moisture is the enemy here, and even a little steam can soften your crackers overnight. A little tip I picked up from baking crispy brioche French toast is to place a dry paper towel in the container to absorb any excess moisture.
Variations & Adaptations
- Spicy Kick: Add a pinch of cayenne pepper or crushed red pepper flakes to the dough for a subtle heat that pairs surprisingly well with the cheddar.
- Herb-Infused: Mix in dried herbs like rosemary or thyme for a savory herb twist perfect for serving alongside soups or salads.
- Gluten-Free: Swap all-purpose flour with a gluten-free blend or almond flour, but expect a slightly denser texture.
- Dairy-Free: Use vegan butter and a dairy-free cheddar alternative if you want to keep it plant-based.
- Cheese Combo: Try mixing sharp cheddar with Parmesan or aged Asiago for a complex, nutty flavor.
I once made a batch swapping out smoked paprika for a little garlic powder—ended up pairing beautifully with a creamy dip and made me think of those flavors in a smoked mac and cheese recipe I love. It’s fun to experiment once you’ve nailed the basics!
Serving & Storage Suggestions
Serve these crackers at room temperature for maximum crunch. They shine on a snack platter alongside cheeses, olives, or dips like hummus or a tangy mustard spread. They also work beautifully as an unexpected crunchy topping for creamy soups or salads.
For storage, keep crackers in an airtight container at room temperature for up to a week. If you want to keep them longer, freezing works well—just thaw fully before serving to regain crispness.
Reheating in a toaster oven or regular oven at 300°F (150°C) for 3-5 minutes can help revive any lost crunch if they soften. These crackers develop a deeper flavor the day after baking, so if you can resist, let them rest overnight for an even better snack experience.
Nutritional Information & Benefits
Each serving (about 10 crackers) contains roughly 150 calories, 10 grams of fat, 7 grams of carbohydrates, and 5 grams of protein. The sharp cheddar provides a good source of calcium and protein, making these crackers a satisfying snack option.
Using real cheese and butter means you’re avoiding the preservatives and artificial flavors found in many store-bought versions. Plus, this recipe can be customized for gluten-free or dairy-free diets, accommodating various dietary needs.
From a wellness standpoint, having a homemade snack like this means you control the ingredients, avoiding unnecessary additives. It’s a little luxury that feels indulgent without the guilt.
Conclusion
Making your own crispy homemade Cheez-It crackers might seem like a small thing, but it’s one of those kitchen wins that sticks with you. The way simple ingredients turn into a snack that’s so much better than the store-bought kind—both in flavor and texture—makes you wonder why you didn’t try it sooner.
Feel free to play with the seasonings or cheese blends to make it your own. I love how these crackers have become my secret weapon for snack cravings and entertaining alike. If you ever want to impress without stress, this recipe’s got your back.
Let me know how your batch turns out or if you put a twist on it! Sharing your homemade cracker stories makes the kitchen feel a little cozier.
FAQs
Can I use pre-shredded cheese for this recipe?
Pre-shredded cheese often has anti-caking agents that can affect the dough’s texture. For best results, shred your own sharp cheddar.
How thin should I roll the dough?
Around 1/16 inch (1.5 mm) thin is ideal. Thinner dough bakes crispier but can be fragile, so handle carefully.
Why do the crackers need little holes poked in them?
The holes (called docking) prevent the crackers from puffing up and help them bake evenly with that classic look and crisp texture.
Can I make these crackers ahead of time?
Yes! Store them in an airtight container at room temperature for up to a week. You can also freeze them for longer storage.
What can I serve these crackers with?
They’re great on their own or with cheese boards, dips, or alongside light finger foods like spinach and feta croissant bake.
Pin This Recipe!

Crispy Homemade Cheez-It Crackers

These crispy homemade Cheez-It crackers are sharper, crunchier, and more addictive than store-bought versions, made with simple pantry ingredients and a unique rolling and chilling technique for perfect snap and flavor.
- Prep Time: 40 minutes
- Cook Time: 15-18 minutes
- Total Time: 55-58 minutes
- Yield: About 40 crackers (4 servings, 10 crackers per serving) 1x
- Category: Snack
- Cuisine: American
Ingredients
- 1 ½ cups (170g) sharp cheddar cheese, finely shredded
- 1 cup (125g) all-purpose flour, sifted
- 6 tablespoons (85g) unsalted butter, cold and cubed
- 3–4 tablespoons (45–60 ml) ice-cold water
- ½ teaspoon fine sea salt
- ½ teaspoon onion powder (optional)
- ¼ teaspoon smoked paprika (optional)
Instructions
- Finely shred 1 ½ cups (170g) of sharp cheddar cheese. This takes about 5 minutes.
- In a large bowl, whisk together 1 cup (125g) all-purpose flour, ½ teaspoon salt, ½ teaspoon onion powder, and ¼ teaspoon smoked paprika for even distribution.
- Add 6 tablespoons (85g) cold, cubed unsalted butter to the flour mixture. Use fingers or a pastry cutter to work the butter into the flour until it looks like coarse crumbs, about 3-4 minutes.
- Stir in the shredded cheese until evenly mixed. Slowly add 3-4 tablespoons (45-60 ml) ice-cold water, one tablespoon at a time, mixing gently until dough just comes together. Avoid overworking.
- Shape the dough into a flat disk, wrap in plastic wrap, and chill for at least 30 minutes.
- On a lightly floured surface, roll the dough as thin as possible (about 1/16 inch or 1.5 mm). Transfer to a parchment-lined baking sheet.
- Using a sharp knife or pizza cutter, slice the dough into 1-inch (2.5 cm) squares. Use a fork or skewer to poke four tiny holes in each square.
- Preheat oven to 350°F (175°C). Bake crackers for 15-18 minutes until golden and crisp, watching carefully near the end to prevent burning.
- Let crackers cool completely on a wire rack; they will crisp up more as they cool. Store in an airtight container.
Notes
Roll dough as thin as possible (1/16 inch) for maximum crispiness. Chill dough before rolling and again after cutting to maintain shape and texture. Watch oven carefully near end of baking to avoid burning. Store crackers in airtight container with a dry paper towel to absorb moisture. Reheat in oven or toaster oven at 300°F for 3-5 minutes to revive crunch.
Nutrition
- Serving Size: 10 crackers
- Calories: 150
- Sugar: 0.3
- Sodium: 200
- Fat: 10
- Saturated Fat: 6
- Carbohydrates: 7
- Fiber: 0.3
- Protein: 5
Keywords: Cheez-It crackers, homemade crackers, crispy snack, cheddar crackers, easy snack recipe, party snack, cheesy crackers