Introduction
For a while, I just accepted that no-bake cheesecakes weren’t going to taste like the real deal—especially when it came to capturing that perfect Oreo crunch combined with a creamy texture that melts in your mouth. The ones I tried were either too sweet or too soft, lacking that satisfying balance. I remember sitting in the kitchen one evening, the hum of the fridge barely audible, poking at a sad, floppy cheesecake that promised much but delivered little. I wasn’t frustrated, just quietly persistent in wanting a dessert that felt indulgent but wasn’t a laborious project.
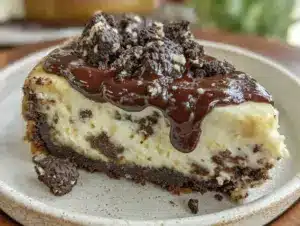
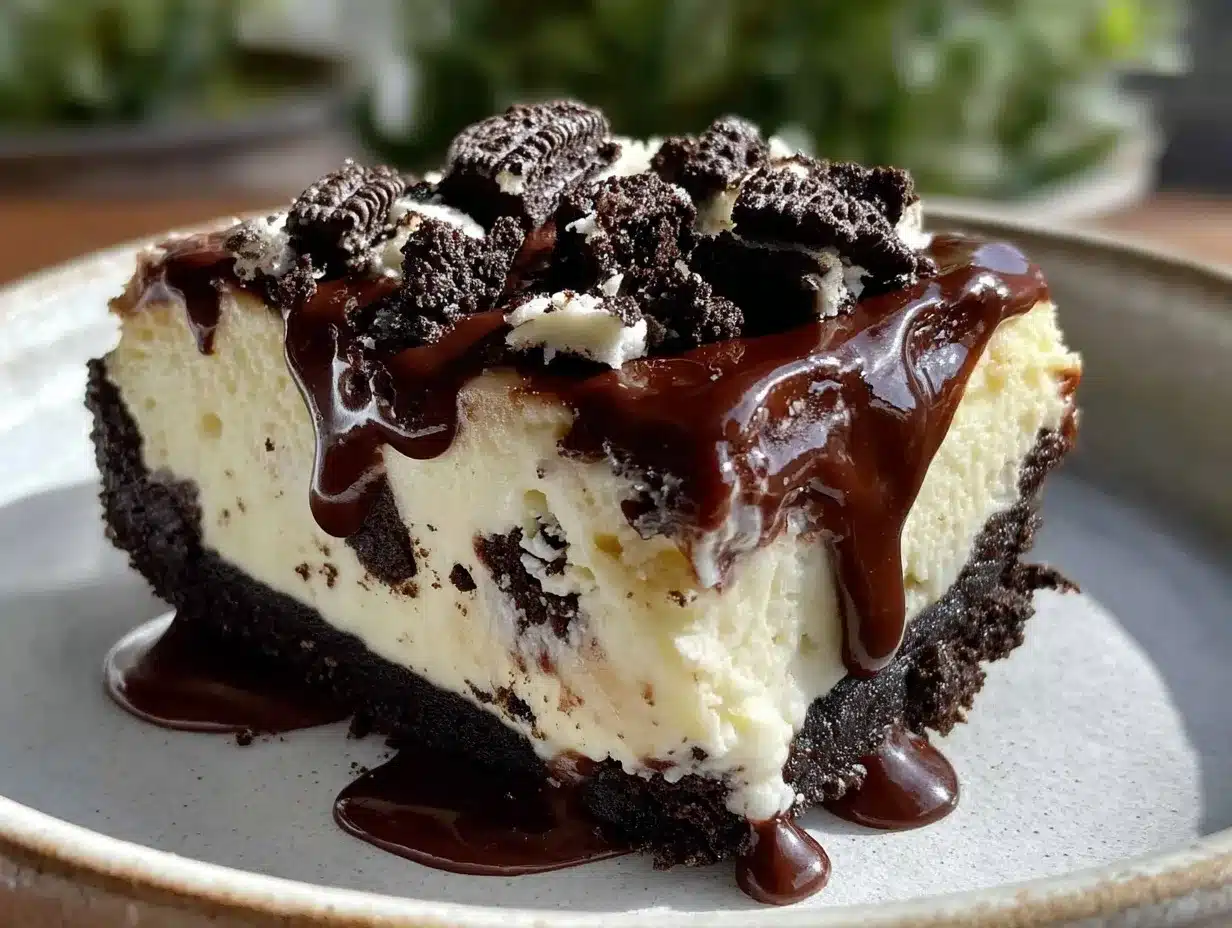
It wasn’t about reinventing the wheel. It was about filling that missing spot in the dessert lineup with something reliably creamy, rich, and textured, that didn’t involve heating up the oven or waiting hours for chilling. The Oreo crust had to be crunchy yet hold together, the filling velvety but not overly dense, and the chocolate ganache topping needed to be a glossy, decadent finish that was as easy to make as it was to eat.
After a few tries—tweaking the cream cheese ratios, testing different brands of Oreos, adjusting the chill time—this recipe settled into something quietly satisfying. It’s not flashy or complicated, but it delivers that comfort-food vibe with a touch of elegance. Honestly, it’s the kind of dessert that makes you pause for a moment, savoring the bite, knowing you don’t have to fuss to get here. That’s why this creamy no-bake Oreo cheesecake with decadent chocolate ganache stuck with me—because it’s the answer to a craving I didn’t quite know how to voice until it arrived.
Why You’ll Love This Recipe
Having tested this creamy no-bake Oreo cheesecake recipe multiple times, I can say with a bit of quiet confidence that it’s a dependable crowd-pleaser. Whether you’re pulling it together for a casual weekend treat or a last-minute gathering, it comes together with minimal fuss but maximum flavor.
- Quick & Easy: Ready in under 30 minutes, with no oven required. Perfect for those evenings when you want dessert without the wait.
- Simple Ingredients: Just a handful of pantry staples and Oreos, nothing exotic or hard to find.
- Perfect for Any Occasion: Great for potlucks, birthdays, or even a quiet weekend indulgence.
- Crowd-Pleaser: Kids and adults alike always go back for seconds—there’s something about that Oreo crunch paired with creamy filling that wins over everyone.
- Unbelievably Delicious: The silky cheesecake filling is balanced by the crisp Oreo crust and finished with a glossy chocolate ganache that’s just the right touch of richness.
What sets this recipe apart is the way it uses a no-bake base but still feels fully satisfying—thanks to a thoughtful balance of cream cheese, whipped cream, and crushed Oreos. The chocolate ganache isn’t just a drizzle; it’s a luscious layer that seals the deal. And honestly, the technique is straightforward enough that even if you’re new to cheesecakes, this will feel manageable and rewarding.
It’s the kind of dessert you don’t just serve—you share a moment with it. And if you’re curious how it compares to other creamy desserts, you might enjoy trying the creamy passion fruit mousse cups for another no-bake delight with a fruity twist.
What Ingredients You Will Need
This recipe uses simple, wholesome ingredients to deliver bold flavor and satisfying texture without the fuss. Most of these are pantry staples, and you can find Oreos just about anywhere. The ingredients are grouped by function for easy prep.
- For the Oreo crust:
- 24 Oreo cookies (regular or double-stuffed for extra creaminess)
- 6 tablespoons unsalted butter, melted (I prefer Plugrá for a clean, rich flavor)
- For the cheesecake filling:
- 16 oz (450 g) cream cheese, softened (full-fat for best texture)
- 1 cup (240 ml) heavy whipping cream, cold
- ½ cup (60 g) powdered sugar, sifted
- 1 teaspoon vanilla extract
- 10 crushed Oreo cookies (stirred in for texture and flavor)
- For the chocolate ganache:
- 4 oz (115 g) semi-sweet chocolate chips or chopped chocolate
- ⅓ cup (80 ml) heavy cream
- 1 teaspoon unsalted butter (optional, for shine)
If you want to swap dairy, almond milk whipped cream alternatives can work, but the texture will differ. For a gluten-free crust, you can try gluten-free chocolate sandwich cookies instead of Oreos. When it comes to cream cheese, brands like Philadelphia give a nice balance of tang and creaminess.
For a seasonal twist, crushed peppermint Oreos in winter or birthday cake Oreos for celebrations can add a fun flavor note. I once tried adding a little espresso powder to the ganache and it brought a subtle mocha touch that was delightful without overpowering the Oreo flavor.
Equipment Needed
- 9-inch (23 cm) springform pan (makes removing the cheesecake so much easier)
- Mixing bowls – one large for the filling, one medium for the crust
- Electric mixer or stand mixer with whisk attachment (whipping cream by hand is possible but takes a bit longer)
- Food processor or a resealable bag with a rolling pin (for crushing Oreos)
- Spatula for folding and spreading the filling evenly
- Small saucepan (for heating cream to make ganache)
If you don’t have a springform pan, a regular pie dish can work, but be gentle when serving. I’ve used both metal and silicone pans; silicone can be handy for easy release but sometimes less sharp edges on the crust. For whipping cream, a chilled metal bowl helps speed things up.
Preparation Method
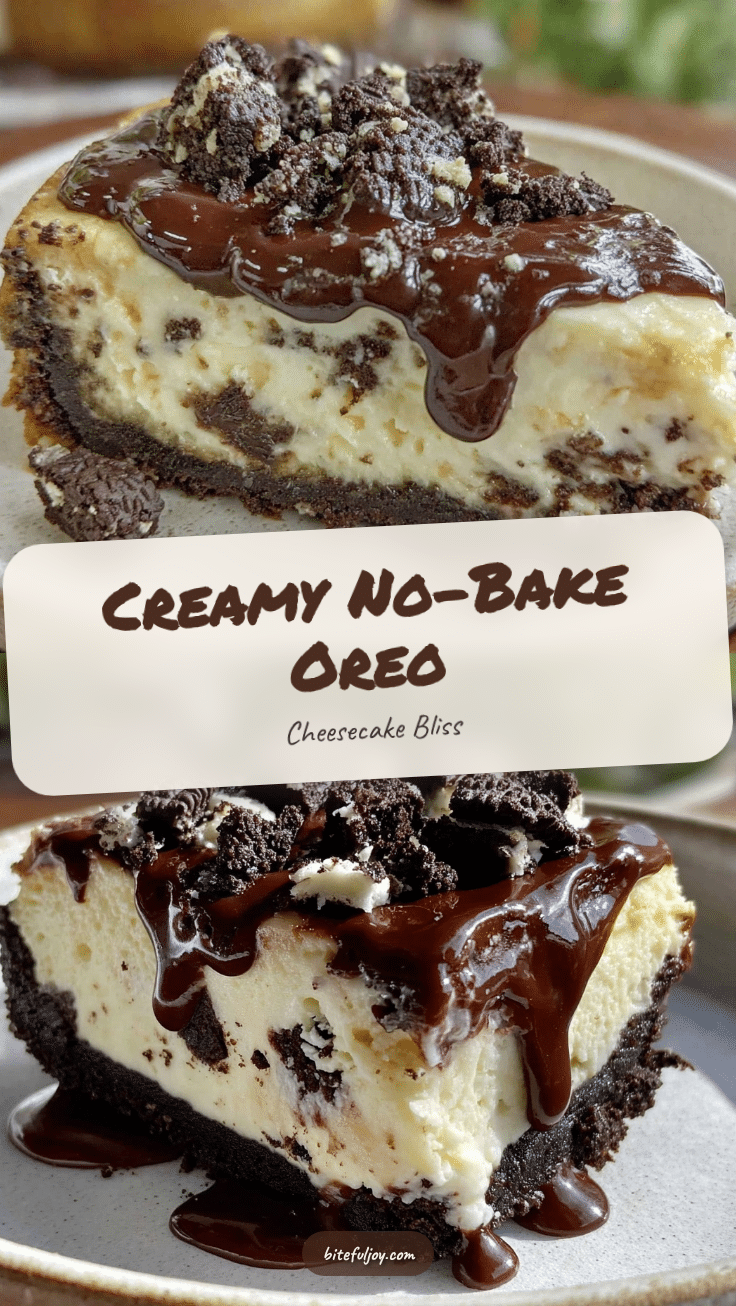
- Prepare the crust (10 minutes): Crush 24 Oreos in a food processor until fine crumbs form. If you don’t have one, put them in a resealable bag and crush with a rolling pin. Transfer crumbs to a bowl and pour in 6 tablespoons of melted butter. Stir until well combined and the mixture holds together when pressed.
- Press crust into pan: Firmly press the crumb mixture into the bottom of your springform pan, making an even layer. Use the bottom of a glass or measuring cup to compact it well. Place in the fridge to chill while you prepare the filling.
- Make the filling (15 minutes): In a large bowl, beat the softened cream cheese until smooth and creamy. Add powdered sugar and vanilla extract, mixing until just combined. In a separate chilled bowl, whip the heavy cream until stiff peaks form. Gently fold the whipped cream into the cream cheese mixture. Finally, fold in 10 crushed Oreos, keeping some larger chunks for texture.
- Assemble the cheesecake: Pour the filling over the chilled crust, smoothing the top with a spatula. Cover with plastic wrap and refrigerate for at least 4 hours, ideally overnight, to allow it to set properly.
- Prepare the ganache (10 minutes): Heat the heavy cream in a small saucepan over medium heat until just simmering. Pour over the chopped chocolate in a heatproof bowl. Let sit for 2-3 minutes, then stir gently until smooth and glossy. Stir in 1 teaspoon of butter for extra shine.
- Top the cheesecake: Once the cheesecake is set, pour the ganache over the top, spreading to the edges. Return to the fridge for 30 minutes to firm up the ganache.
- Serve: Carefully remove the cheesecake from the springform pan. Slice with a warm knife (dip in hot water and dry between cuts) for clean edges. Enjoy immediately or keep refrigerated.
If you notice your filling is too soft, a bit more chilling usually fixes it. Sometimes I’ve had the ganache seize if the cream was too hot; letting it cool for a minute before pouring helps. The smell of melting chocolate and the sweet Oreo scent in the kitchen is honestly half the joy here.
Cooking Tips & Techniques
Whipping the cream to the right consistency is key. You want stiff peaks so the filling holds its shape but remains light. If you overwhip, it can get grainy and break, so stop when it just holds.
When mixing cream cheese, make sure it’s room temperature to avoid lumps. I sometimes beat it a little longer to get extra smoothness. The folding technique is gentle—overmixing will deflate the whipped cream, making the cheesecake dense.
For the crust, pressing firmly into the pan is important to avoid crumbling later. I use a flat-bottomed cup for even pressure. If the crust feels too crumbly, a touch more melted butter helps.
The ganache should be poured warm but not hot, so it spreads nicely without melting the cheesecake. If it’s too thick, warm cream helps loosen it; if too thin, chill a little.
Timing-wise, making this cheesecake in the afternoon means it’s perfectly chilled by evening, which is ideal if you’re hosting. I like to multitask by prepping the crust and filling while dinner cooks, so dessert is ready without extra stress.
Variations & Adaptations
- Peanut Butter Oreo Cheesecake: Stir ½ cup creamy peanut butter into the filling for a nutty twist that pairs beautifully with chocolate ganache.
- Mint Oreo Version: Use mint-flavored Oreos and add a few drops of peppermint extract to the filling for a refreshing, festive dessert.
- Vegan Adaptation: Use dairy-free cream cheese and coconut cream whipped for the filling, and dairy-free chocolate for the ganache. The texture changes slightly but still very satisfying.
- Seasonal Fruit Topping: Add fresh raspberries or sliced strawberries on top of the ganache for a bright, fruity contrast. This reminds me a bit of the white chocolate raspberry cheesecake bars I tried last summer.
I once swapped the Oreo crust for crushed graham crackers mixed with spices like cinnamon and nutmeg, which gave the cheesecake a warm, cozy flavor for fall. It was a nice surprise and worth trying if you like those notes.
Serving & Storage Suggestions
This cheesecake is best served chilled, straight from the fridge, so the filling holds its shape and the ganache is firm. For a clean slice, run your knife under hot water and wipe it before each cut.
It pairs wonderfully with a cup of strong coffee or even a lightly brewed Earl Grey tea—reminding me of the subtle flavors in the Earl Grey tea cake recipe I adore for teatime.
Leftovers keep well in the refrigerator, tightly wrapped or covered, for up to 4 days. The flavors tend to meld and deepen, which I actually prefer after a day or two. You can freeze slices individually wrapped in plastic wrap and foil for up to 2 months; thaw overnight in the fridge before serving.
Reheating is not recommended, but bringing the cheesecake out of the fridge about 15 minutes before serving softens it slightly for the best texture.
Nutritional Information & Benefits
Per slice (based on 12 servings), this creamy no-bake Oreo cheesecake has approximately:
| Calories | 320 kcal |
|---|---|
| Fat | 22 g |
| Carbohydrates | 28 g |
| Protein | 4 g |
| Sugar | 20 g |
The cream cheese provides a good amount of calcium and protein, while the Oreos add sweetness and texture. Using real cream cheese and heavy cream means this recipe is rich, so it’s best enjoyed as an occasional treat. For those who are gluten-sensitive, swapping Oreos for gluten-free cookies works nicely.
From a wellness perspective, I like that this cheesecake doesn’t require baking, meaning the ingredients keep their natural flavors and textures intact. Plus, it’s satisfying enough that a small slice feels indulgent without needing to eat half the pan.
Conclusion
This creamy no-bake Oreo cheesecake with decadent chocolate ganache is one of those recipes that quietly earns its place in your dessert rotation. It’s reliable, delicious, and surprisingly easy to pull together without a lot of fuss. You can make it your own with simple tweaks, whether adding a bit of peppermint, swapping crusts, or topping with fresh fruit.
Personally, I keep coming back to this recipe because it hits that perfect note between creamy and crunchy, sweet and rich, without requiring the oven or hours of effort. It’s a dessert that feels like a little treat you made just for yourself — and that’s a kind of comfort food all its own.
If you try it, I’d love to hear how you customize your cheesecake or what moments you enjoy it in. Sharing these little kitchen stories always makes the recipe feel like it’s part of something bigger.
Frequently Asked Questions
Can I use a different cookie for the crust?
Yes! While Oreos give that classic flavor, graham crackers or gluten-free chocolate cookies work well too. Just make sure to adjust butter amounts if needed.
Do I have to chill the cheesecake overnight?
Overnight chilling is best for firm texture and flavor melding, but a minimum of 4 hours will usually suffice if you’re short on time.
How long does the ganache stay glossy?
Properly made ganache will stay shiny for about 24 hours in the fridge. Adding a teaspoon of butter helps maintain that glossy finish.
Can I make this cheesecake in advance for a party?
Absolutely. It keeps well in the fridge for up to 3 days, making it a great make-ahead dessert for gatherings.
Is it possible to freeze this cheesecake?
Yes, wrap slices individually in plastic wrap and foil, then freeze for up to 2 months. Thaw in the fridge before serving.
Pin This Recipe!
Creamy No-Bake Oreo Cheesecake Recipe with Easy Chocolate Ganache

A quick and easy no-bake Oreo cheesecake featuring a crunchy Oreo crust, creamy filling, and a glossy chocolate ganache topping. Perfect for any occasion and ready in under 30 minutes plus chilling time.
- Prep Time: 25 minutes
- Cook Time: 10 minutes
- Total Time: 4 hours 35 minutes
- Yield: 12 servings 1x
- Category: Dessert
- Cuisine: American
Ingredients
- 24 Oreo cookies (regular or double-stuffed)
- 6 tablespoons unsalted butter, melted
- 16 oz (450 g) cream cheese, softened (full-fat)
- 1 cup (240 ml) heavy whipping cream, cold
- ½ cup (60 g) powdered sugar, sifted
- 1 teaspoon vanilla extract
- 10 crushed Oreo cookies (for filling)
- 4 oz (115 g) semi-sweet chocolate chips or chopped chocolate
- ⅓ cup (80 ml) heavy cream
- 1 teaspoon unsalted butter (optional, for shine)
Instructions
- Crush 24 Oreos in a food processor until fine crumbs form or crush in a resealable bag with a rolling pin.
- Transfer crumbs to a bowl and mix with 6 tablespoons melted butter until mixture holds together when pressed.
- Press the crumb mixture firmly into the bottom of a 9-inch springform pan to form an even layer. Chill in the fridge.
- Beat softened cream cheese until smooth. Add powdered sugar and vanilla extract and mix until combined.
- Whip cold heavy cream in a separate chilled bowl until stiff peaks form.
- Gently fold whipped cream into the cream cheese mixture, then fold in 10 crushed Oreos, leaving some chunks for texture.
- Pour filling over chilled crust and smooth the top. Cover and refrigerate for at least 4 hours or overnight.
- Heat ⅓ cup heavy cream in a small saucepan until just simmering. Pour over chopped chocolate and let sit 2-3 minutes.
- Stir ganache gently until smooth and glossy. Stir in 1 teaspoon butter for shine.
- Pour ganache over set cheesecake, spreading to edges. Refrigerate for 30 minutes to firm ganache.
- Remove cheesecake from springform pan carefully. Slice with a warm knife dipped in hot water and dried between cuts. Serve chilled.
Notes
Use room temperature cream cheese for smooth filling. Whip cream to stiff peaks but avoid overwhipping. Press crust firmly to avoid crumbling. Pour ganache warm but not hot to prevent melting cheesecake. Chill cheesecake overnight for best texture. For gluten-free, substitute Oreos with gluten-free cookies. For dairy-free, use dairy-free cream cheese, coconut cream, and dairy-free chocolate.
Nutrition
- Serving Size: 1 slice (1/12th of c
- Calories: 320
- Sugar: 20
- Fat: 22
- Carbohydrates: 28
- Protein: 4
Keywords: no-bake cheesecake, Oreo cheesecake, chocolate ganache, easy dessert, no oven dessert, creamy cheesecake, Oreo crust